

Free Crochet Penguin Amigurumi Pattern
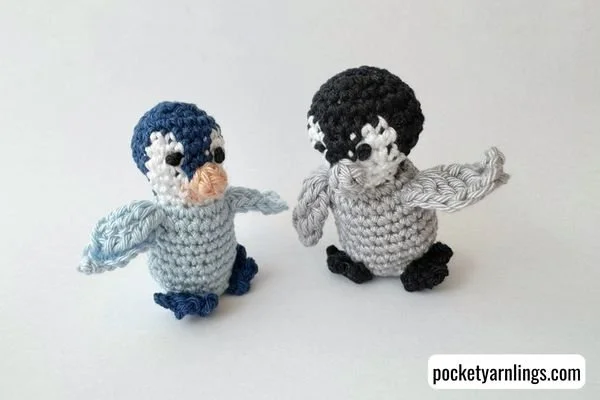
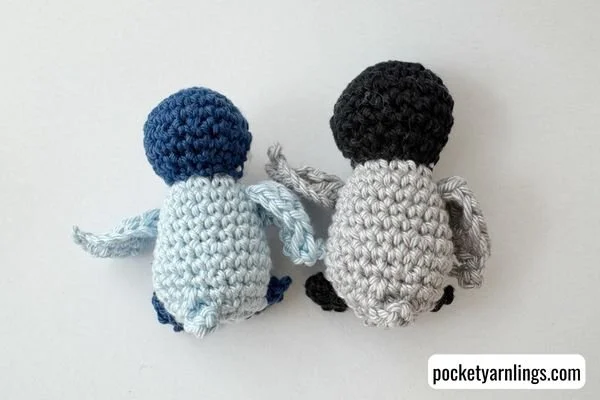
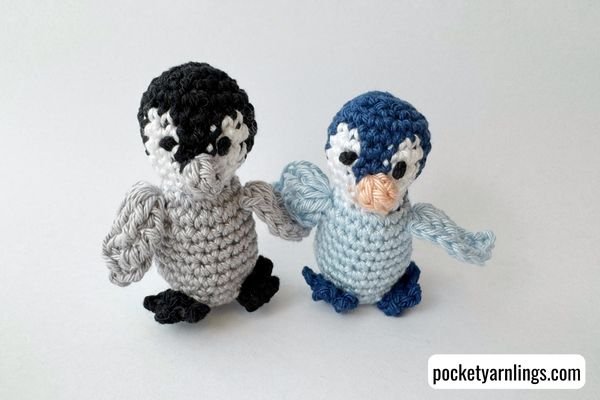
If you love crocheting birds, have a hand at trying this one - a penguin! Alongside some of my other Pocket bird patterns, like an owl, duck, chick and bird. This crocheted penguin works up quick with no external attachments, his head is crocheted continuously into the beak and the body with the wings.

There are affiliate links in this post. We will receive a commission if you make a purchase through our affiliate link at no extra cost to you. Do note I have used some if not most of these products at some point in time.
Table of Contents Show
Introduction to Crocheting Penguin
In this post, we will first be starting off with the relevant supplies and techniques you would need to crochet this penguin. Here to make this penguin, we will be using 4 different yarn colours. Then we will head into the pattern proper which includes the head and then the body with the wings.
This is relatively more intermediate to slightly more advanced pattern, here you will learn how to attempt different special stitches like popcorn and cluster stitches and also learn how to do multiple colour changes in amigurumi. The wings are also slightly more complex with very tall stitches like quadruple treble crochet.
Stick around after that to check out the full video of how to crochet a penguin and finally we will end off with the full pattern PDF download if that is the mode of reading that suits you best. Don’t forget to grab the free Animal Shaping Starter Guide if this is something you would love to design in the future!
Supplies and Techniques for Crocheting a Penguin
Here I have listed the techniques as well as the materials needed to crochet a penguin amigurumi. Each one is individually linked if you need to learn more about how to master each technique, or you could check out this post on “How to Learn Basic Crochet Stitches step by step for Absolute Beginners - 6 Easy Steps!”.
There are also some special stitches involved in crocheting this penguin which are listed below (popcorn and cluster stitches) and they are also individually linked to tutorials which will be helpful if you do not know how to make these stitches.
The materials needed are also listed below or if you wish to see what I start off most of my projects with, then check out this post on “My Crochet Tools and Accessories that are Super Simple to Start With”. Read on below.
Terminology for Crocheting Penguin
Ch = chain
St = stitch (refers to number of stitches in one round)
Dtr = double treble crochet
Ttr = triple treble crochet
Qtr = quadruple treble crochet
2sc1 = single crochet increase (meaning 2 single crochet in same stitch)
Sc2tog1 = single crochet decrease (referring to invisible decrease)
Special Stitches for Crocheting Penguin
4sc1 = 4 single crochet in same stitch
Sc4tog1 = single crochet 4 together
= insert hook in indicated, yo, pull up loop, insert hook in next st, yo, pull up loop, repeat another 2 times, yo, pull through all loops on hook
(or single crochet cluster stitch)
4sc pop = 4 single crochet popcorn stitch
4sc in indicated, remove hook from loop, insert hook through 1st sc of 4-sc group, replace loop on hook, yo, draw tightly through loop and st on hook
4dc pop = 4 double crochet popcorn stitch
4dc in indicated, remove hook from loop, insert hook through 1st dc of 4-dc group, replace loop on hook, yo, draw tightly through loop and st on hook
Materials and Tools for Crocheting Penguin
Scheepjes Catona or any equivalent fingering or sport weight yarn
Version 1 - Dark blue, Light blue, White, Orange (25gm each)
Version 2 - Black, White, Grey (25gm each)
Black (stash for eyes)
Darning needle
Filling – use leftover yarn or polyester fiberfill
Scissors
Glass eyes (just for landmarking)
See how they look like and my selection for my amigurumis just below.
Also check out my full list of commonly used crochet tools and accessories here.
Now that you have gathered your supplies and had a look at the basic terminology to reading the following pattern, let us first get started!
Yarn
Scheepjes Catona or any equivalent fingering or sport weight yarn

Crochet hook
2.5-3.0mm Clover crochet hook

Stuffing
Use leftover yarn or polyester fibrefill
Darning Needles
Safety Eyes
4mm glass eyes or safety eyes

Stitch Markers
Plastic stitch markers or metal stitch markers

Crochet Penguin Pattern
Crochet Penguin Head
Start off head with dark blue yarn.
Round 1: Ch4, sc2, 3sc1, go around and work into the other side of foundation chain, sc1, 2sc1 (all dark blue) – 8st
Round 2: Sc3, 2sc1, sc3, 2sc1 (all dark blue) - 10st
Round 3: 2sc10 (dark blue) - 20st
Round 4: Sc10 (dark blue), sc2 (white), sc3 (dark blue), sc2 (white), sc3 (dark blue) - 20st
Round 5: (Sc1, 2sc1) x 5 (dark blue), (sc1, 2sc1) x 1 (white), sc1 (white), 2sc1 (dark blue), sc1 (dark blue), 2sc1 (white), sc1 (white), 2sc1 (white then dark blue), (sc1, 2sc1) x 1 (dark blue) - 30st
Round 6: (Sc1, sc2tog1) x 5 (dark blue), (sc1, sc2tog1) x 1 (white), sc1 (white), sc2tog1 (dark blue), sc1 (dark blue), sc2tog1 (white), sc1 (white), sc2tog1 (white), (sc1, sc2tog1) x 1 (dark blue) - 20st
Round 7: Sc10 (dark blue), sc4 (white), 4dc pop (orange), sc3 (white), sc2 (dark blue) - 20st
Round 8: (Sc2, sc2tog1) x 2 (dark blue), sc2 (dark blue), sc2tog1 (white), sc2 (white), 4sc pop (orange), sc3 (white), sc2tog1 (dark blue) - 16st
Round 9: Sc2tog4 (dark blue), sc2tog1 (white), sc2 (white), sc2tog1 (white), sc1 (white), sc1 (dark blue) - 10st
Add stuffing to head.

Crochet Penguin Body
Continue from head into body.
Round 10: 2sc10 - 20st (all light blue)
Cut off white yarn, orange and dark blue yarn.
Round 11: Sc10, [(sc1, hdc1, dc1, tr1, dtr1, ttr1, qtr1) all in FLO, ch3, sl st 1 into 3rd ch from hook), ch7, sc1 FLO into same main st], sc8, [(sc1, hdc1, dc1, tr1, dtr1, ttr1, qtr1) all in FLO, ch3, sl st 1 into 3rd ch from hook), ch7, sc1 FLO into same main st] (all light blue) - 22st
Round 12: Sc10, sc1 BLO, sc8, sc1 BLO (all light blue) - 20st
Round 13: Sc20 (light blue) - 20st
Round 14: Repeat Round 13
Round 15: (Sc3, 2sc1) x 5 (all light blue) - 25st
Round 16: Sc25 (light blue) - 25st
Round 17: (Sc3, sc2tog1) x 5 (all light blue) - 20st
Round 18: Sc6 (light blue), (sc1, ch4, sl st 1, sc2, sc1 in same main st) (light blue), sc7 (light blue), (sc1, ch2, sl st 1 into 2nd ch from hook, sc1, dc1, ch1 and sl st 1 down, sc1, dc1, ch1 and sl st 1 down, ch2 and sc1 into same main st) FLO (dark blue), sc4 (light blue), (sc1, ch2, sl st 1 into 2nd ch from hook, sc1, dc1, ch1 and sl st 1 down, sc1, dc1, ch1 and sl st 1 down, ch2 and sc1 into same main st) FLO (dark blue) - 31st
Round 19: Sc2tog3, sc1 before tail, sc1 after tail, sc2tog3, sc1, sc1 BLO, sc2tog2, sc1 BLO (all light blue) - 13st
Add stuffing to body. Cut off dark blue yarn.
Round 20: Sc2tog6, sc1 (all light blue) - 7st
Round 21: Sc1, sc2tog1, sc1, sc2tog1, sc1 (all light blue) - 5st
Close up in FLO and fasten off.
Enjoy making quick pieces like this?
You might love my mystery crochet-alongs, where new pattern parts arrive every few days and slowly build into a full surprise set — often with a little story woven in along the way.
Start whenever you like and follow along at your own pace.
Embroider Penguin Eyes
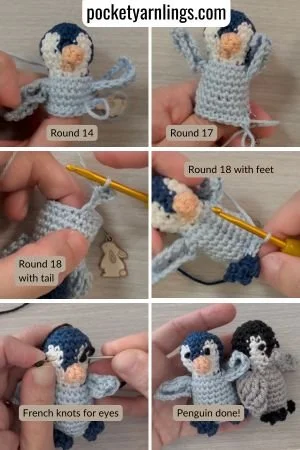
Add eyes by embroidering French knots over the top of the beaks on the face. Use a pin marker to landmark before threading in the yarn. Thread in both black and white yarn simultaneously through head and out to the desired eye location. Without removing yarn from the needle, place tip of needle close to the surface of the face. Loop yarn close to the face around needle twice.
Insert eye back into intended eye position and out through head again. Do not pull the yarn taut because the whole knot will go into the head. Instead, when pulling needle out of the head, pull gently so that the knot stays on the face.
Crochet Penguin Video
After referring to the pattern above, remember to check out the full video on how to crochet a penguin, from start to finish with nothing left out. It takes less than an hour and it includes captions with voice-overs as well. You can scroll to the specific parts that you are struggling when you are attempting the pattern above. Remember to also like the video and subscribe to my Youtube Channel so that when new amigurumi videos are released, you will know about it!
If you felt this post was amazing then remember to spread the love by pinning the image below to Pinterest so that others might find it and learn how to crochet a penguin too! I appreciate you so much for doing this!

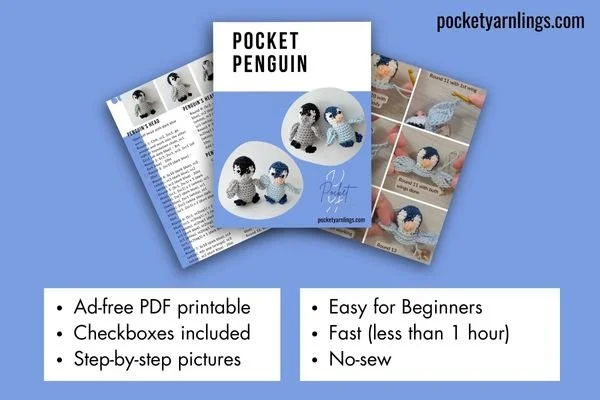
Penguin PDF Pattern
The Pocket Penguin PDF Pattern is an ad-free downloadable PDF printable, with checkboxes included and step-by-step pictorial tutorials. The pattern is easy for beginners, fast and no-sew. Just click on the image below or scroll down to the bottom of the page to find the pattern download.
Conclusion of Crocheting Penguin
Thank you for joining me in crocheting this little pocket penguin. Remember to tag me @pocketyarnlings on instagram so I can see your makes too and I will feature them in my email newsletter. Here is how you can support me so that I can make more posts and videos for you in the future:
What’s Next?
If you like this project but don’t have time to make it right now, feel free to save it for later by pinning the image below to your Pinterest board. And if you enjoy seasonal makes that unfold piece by piece, you might love my mystery crochet-alongs — guided projects delivered by email where small parts slowly come together into a full set and story.
👉 Choose your crochet adventure
Note: This is for the PDF PATTERN to make the amigurumi, NOT the finished product.
Included
- 1 PDF pattern, total 11 pages
- Beginner instructions
- Step by step photo tutorials
- Final pieces measuring about 8cm tall (3 inches) using sport yarn (weight 2) and crochet hook size 3.0 mm. They can be made bigger with bulkier yarn and bigger hook.
Crochet skill level
- Beginner
- Some basic crochet skills are needed, such as the following: single crochet, increases, working into FLO/BLO, sewing attachments
Crochet equipment
- Sport size yarn (weight 2)
- Crochet hook size 3mm
- Others - darning needles, stitch markers, glass eyes
- For ideas where to get the equipment or how they look like, check out my blog post:
https://www.pocketyarnlings.com/blog/my-crochet-tools
Features
- Each pattern features various views and angles of finished amigurumi for easier reference on assembly, as well as step by step tutorials for certain crochet techniques.
- No limb attachments, mainly attachments for detailing.
- Patterns relatively short, can be completed 30 minutes
- Final piece is mini-sized but adaptable, great for gifting.
Benefits
- Short and fast projects, no WIPs!
- Perfect as a gift, even if relatively last minute!
- Can be made into keychains
~~
After payment has been processed, you can download your PDF file immediately.
If you have any enquiry, please don’t hesitate to contact me here. I will do my best to answer your question within 12 working hours.
Enjoy making quick pieces like this?
You might love my mystery crochet-alongs, where new pattern parts arrive every few days and slowly build into a full surprise set — often with a little story woven in along the way.
Start whenever you like and follow along at your own pace.
Related articles
How do you Crochet Different Shapes in Amigurumi?
14 useful things you need to know about How to Crochet a Circle
8 extraordinary ways on How to Crochet an Oval Pattern
6 important things to know about Bobble Stitch Crochet
12 creative ways on How to Join Crochet Pieces Together
The 3 quick systematic steps involved in How to End a Crochet Project