

14 useful things you need to know about How to Crochet a Circle
The most basic crochet shape to create and also the base unit of an amigurumi - the crochet circle! Now this post is sort of a combination of other posts put together because I will be discussing a bit about crocheting a magic ring and also larger circles which might overlap with my tutorial blog post on increasing stitches. Along the way where it makes sense, I will reference these other posts as well.
Now first, we will talk about how to crochet the basic magic ring first, then how to crochet single crochet, half double crochet and double crochet circles. Then some troubleshooting tips on why your crochet circle does not lay flat, how to crochet larger circles (without them turning into hexagons) and finally 3D circles or spheres, which leads nicely into amigurumi!
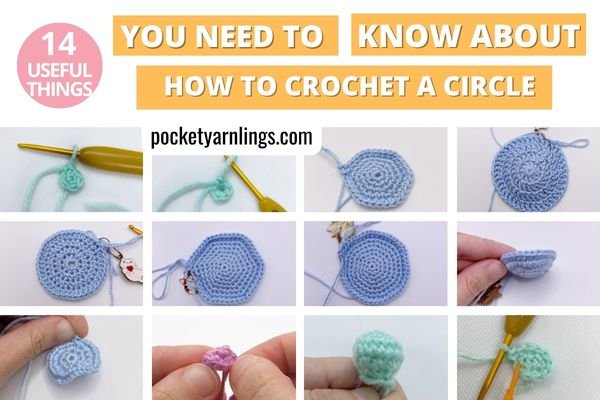
Table of Contents Show
How to crochet a magic ring?
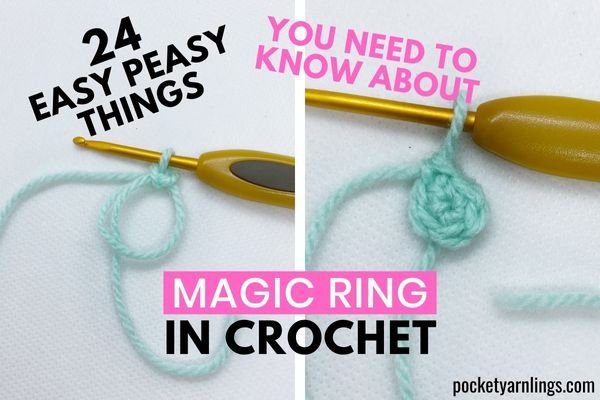
A magic ring is the same as a magic circle or an adjustable circle. It is a pretty basic step to start making a circle then a sphere and then eventually an amigurumi. Here I will talk about it briefly but for more details (as well as 2 alternative methods to try) - go check out this post on '24 Easy Peasy things you need to know about Magic Ring in Crochet'.
How do you crochet an adjustable circle?
I will mention my favourite go to method for crocheting a magic circle, which is my self-named 'Pinch and Flip method'. I have included step by step pictures and a video below for easier reference, but if you still do not get it, remember to check out the magic ring article above.
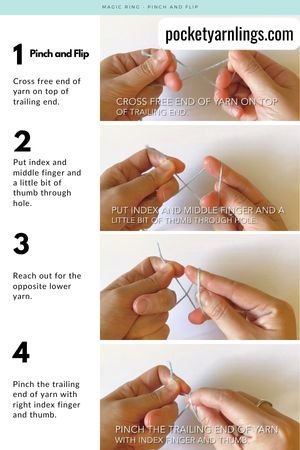
Pinch and Flip Method
Here I will be going through how to do a magic ring crochet step by step instructions.
1) Cross the free end of yarn on top of trailing end.
2) Put index and middle finger and a little bit of thumb through hole.
3) Reach out for the opposite lower yarn.
4) Pinch the trailing end of yarn with right index finger and thumb.
5) Pull pinched part through hole.
6) Flip free end and trailing ends of yarn on left hand between index and middle fingers.
7) Pinch down small loop on right hand between index finger and thumb, so the position doesn't move.
8) Transfer pinched loop to left hand so right hand is free to insert hook.
9) Yarn over and pull through loop on hook to form chain 1.

10) Continue single crocheting into the centre of the loop.
11) Pull free end of yarn to make the centre loop smaller and close up.
12) Continue crocheting into the middle loop until the desired number of stitches, for example 5 single crochet stitches.
13) After closing up the loop, to secure the magic ring, continue into the second round, either using a single crochet stitch or a slip stitch.

How do you crochet a round circle for beginners?
For beginners who have just started off crocheting, the magic ring can be challenging. Here is an alternative, which I will also mention similarly briefly. More details here - '24 Easy Peasy things you need to know about Magic Ring in Crochet'.
Tie a slip knot first, then crochet a short chain of 2 stitches and then single crochet into the 2nd chain away from the hook. You can single crochet any number of stitches, depending on how big you want the initial circle to be.
Steps in crocheting a circle that does not involve magic ring:
1) Chain 2.
2) Round 1: 5 sc into 2nd chain from hook - 5st
(Here I am referring to single crocheting 5 stitches into the 2nd chain from hook.)
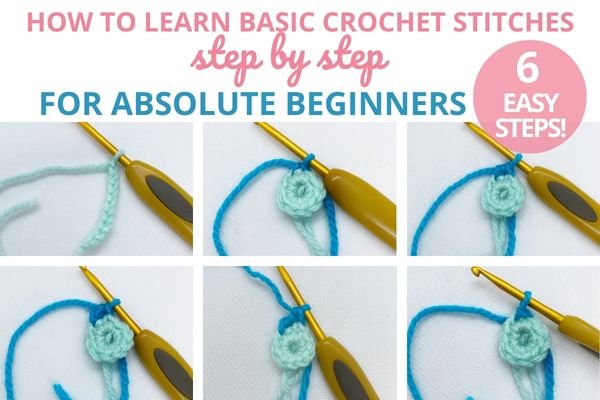
This is the easier way to start off with and sometimes what beginner crocheters will start off with after mastering a slip knot and a foundation chain. More about basic crochet stitches here - 'How to Learn Basic Crochet Stitches step by step for Absolute Beginners - 6 Easy Steps!'.
The downside of this method, compared with using a magic ring is that it does end up with a small gap in the centre and it is non-adjustable, and therefore 'non-magic' circle. Also, using this method to start off your amigurumi may result in an initial 'pointy' tip or amigurumi, I will talk a little more about this later on.

How do you crochet a flat seamless circle?
After completing the basic magic ring, which is a small circle, then you would want to expand on this and make a bigger circle. With each subsequent round, you will add increases in stitches to expand on the size, so much of this section also coincides with my post, '15 different detailed Ways on How to Increase in Crochet'.
How do you crochet a single crochet flat circle?
To make your initial circle bigger, increase when crocheting in a round for subsequent rounds. These increases are evenly spaced and there is a specific mathematical pattern for the increases in each round.
Round 1: Magic ring sc6 - 6st
Round 2: 2sc6 - 12st (or increase all around)
Round 3: (Sc1, 2sc1) x 6 - 18st
Round 4: (Sc2, 2sc1) x 6 - 24st
Round 5: (Sc3, 2sc1) x 6 - 30st
As you can see here, from the initial magic ring, the 2nd round involves increases all around, 3rd round involves alternate increases, 4th round increases every 2 stitches and so on. I will talk more about this later with the crochet circle calculator below.

How do you make a flat circle with double crochet?
To make a uniform and larger circle, use double crochet stitches instead of single crochet stitches. Also, do a preceding ch3 before the double crochet at the start of the round, to get the most uniform circle at the end.
Round 1: Magic ring dc10 - 10st
Round 2: (Sc1, ch3, 2dc1), 2dc9, sl st to top of ch3 - 20st
Round 3: (Ch3, dc1), 2dc1, (dc1, 2dc1) x 9, sl st to top of ch3 - 30st
Round 4: (Ch3, dc1), dc1, 2dc1, (dc2, 2dc1) x 9, sl st to top of ch3 - 40st
Just like for sc example, the 2nd round has increases throughout, 3rd round alternate increases, 4th round increases every 2 dc stitches and so forth.

How do you crochet a flat circle with half double crochet?
For the half double crochet in the round example, do a preceding chain of 2, to create a uniform flat circle.
Round 1: Magic ring sc10 - 10st
Round 2: (Sc1, ch2, 2hdc1), 2hdc9, sl st to top of ch2 - 20st
Round 3: (Ch2, hdc1), 2hdc1, (hdc1, 2hdc1) x 9, sl st to top of ch2 - 30st
Round 4: (Ch2, hdc1), hdc1, 2hdc1, (hdc2, 2hdc1) x 9, sl st to top of ch2 - 40st
Very much similar for hdc as for dc, except the chain is shorter, but the increases are all in the same fixed order.

How to crochet a large circle?
Now to crochet larger circles involve adding in more rounds to the initial circle pattern above, from Round 5 onwards. Here is a sort of crochet circle calculator for you to figure out what is the pattern you need in the next round to continue crocheting a flat circle. A sphere is a different matter and will be discussed later.
Crochet circle calculator
You could start with a bigger or smaller magic ring, but the mathematical pattern increases in subsequent rounds follow the same basic principle. For the example below, 2 sc1 refers to an increase in single crochet stitch, so 2 sc6 refers to increase in single crochet stitch for the next 6 stitches.
Round 1: Magic ring sc6 - 6st
Round 2: 2 sc6 - 12st
Round 3: (Sc1, 2 sc1) x 6 - 18st
Round 4: (Sc2, 2 sc1) x 6 - 24st
Round 5: (Sc3, 2 sc1) x 6 - 30st
Round 6: (Sc4, 2 sc1) x 6 - 36st
Round 7: (Sc5, 2 sc1) x 6 - 42st
Round 8: (Sc6, 2 sc1) x 6 - 48st
Can you spot the pattern above? After the initial doubling in the 2nd round, the increases alternate in Round 3, then every 2st in Round 4, then every 3st in Round 5, then every 4st in Round 6 and it goes on. I have done until Round 8 but from the pattern above you could go onto Round 9 and increase every 7st and so on to make a larger circle.
Here I made a kind of visual representation of the stitch pattern above, if you can decipher it.
Round 1= 1,1,1,1,1,1 (single crochet in each stitch throughout)
Round 2= 2,2,2,2,2,2 (double in each stitch around)
Round 3= (1,2), (1,2), (1,2), (1,2), (1,2), (1,2) (alternate increases)
Round 4= (1,1,2), (1,1,2), (1,1,2), (1,1,2), (1,1,2), (1,1,2)
Round 5= (1,1,1,2), (1,1,1,2), (1,1,1,2), (1,1,1,2), (1,1,1,2), (1,1,1,2)
Round 6= (1,1,1,1,2), (1,1,1,1,2), (1,1,1,1,2), (1,1,1,1,2), (1,1,1,1,2), (1,1,1,1,2)
Round 7= (1,1,1,1,1,2), (1,1,1,1,1,2), (1,1,1,1,1,2), (1,1,1,1,1,2), (1,1,1,1,1,2), (1,1,1,1,1,2)
Round 8= (1,1,1,1,1,1,2), (1,1,1,1,1,1,2), (1,1,1,1,1,1,2), (1,1,1,1,1,1,2), (1,1,1,1,1,1,2), (1,1,1,1,1,1,2)
By now you would have noticed the shape of your circle is starting to look more like a hexagon! Hmmm... so...

Why does my crochet circle look like a hexagon?
The larger the circles go, the more prominent the hexagon will look and the sharp pointed parts are generally where the increases are in each round. So to try to get your hexagons to look like circles instead, the increases do not exactly follow the mathematical formula above.
See how I specifically underlined Rounds 4, 6, and 8 or the even-numbered rounds and get ready to make special changes to those rounds. Keep Rounds 1-2 the same as it was previously.
Those changes are suggested below:
For Round 4, shift from (1, 1, 2) to (1, 2, 1) in repeats for rest of round.
For Round 6, shift from (1, 1, 1, 1, 2) to (1, 1, 2, 1, 1) in repeats for rest of round.
For Round 8, shift from (1, 1, 1, 1, 1, 1, 2) to (1, 1, 1, 2, 1, 1, 1) in repeats for rest of round.
So to make your hexagons look like circles again:
1) Keep the odd-numbered rounds the same as before.
2) For the even-numbered rounds, shift the stitch increase to the middle of the pattern repeat for that round.
The new pattern repeat suggestion would visually look like the following:
Round 1= 1,1,1,1,1,1
Round 2= 2,2,2,2,2,2
Round 3= (1,2), (1,2), (1,2), (1,2), (1,2), (1,2)
Round 4= (1,2,1), (1,2,1), (1,2,1), (1,2,1), (1,2,1), (1,2,1)
Round 5= (1,1,1,2), (1,1,1,2), (1,1,1,2), (1,1,1,2), (1,1,1,2), (1,1,1,2)
Round 6= (1,1,2,1,1), (1,1,2,1,1), (1,1,2,1,1), (1,1,2,1,1), (1,1,2,1,1), (1,1,2,1,1)
Round 7= (1,1,1,1,1,2), (1,1,1,1,1,2), (1,1,1,1,1,2), (1,1,1,1,1,2), (1,1,1,1,1,2), (1,1,1,1,1,2)
Round 8= (1,1,1,2,1,1,1), (1,1,1,2,1,1,1), (1,1,1, 2,1,1,1), (1,1,1,2,1,1,1), (1,1,1,2,1,1,1), (1,1,1,2,1,1,1)
Or in pattern form, it would be:
Round 1: Magic ring sc6 - 6st
Round 2: 2 sc6 - 12st
Round 3: (Sc1, 2 sc1) x 6 - 18st
Round 4: (Sc1, 2sc1, sc1) x 6 - 24st
Round 5: (Sc3, 2 sc1) x 6 - 30st
Round 6: (Sc2, 2sc1, sc2) x 6 - 36st
Round 7: (Sc5, 2 sc1) x 6 - 42st
Round 8: (Sc3, 2sc1, sc3) x 6 - 48st


Master the simple shapes behind every adorable toy — and start creating amigurumi your child will love.
Why won't my crochet circle lay flat?
Now that you know all the different ways to crochet a circle, here are some troubleshooting tips and tricks for why the crochet circle did not turn out the way you wanted.
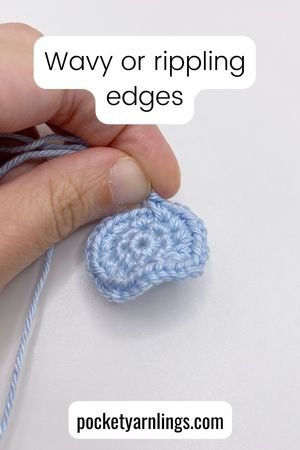
Why is my crochet wavy?
Your crochet circle looking wavy or having a rippling effect might be from squeezing too many increases in the stitch in a round. If you find this happening, then choose to just crochet without the increases and delay the increase for the subsequent round. If you follow the mathematical pattern repeats above, you should not have this wavy problem.
What causes cupping in crochet?
Cupping in your crochet circle means the rounds are narrowing and you are crocheting a cylinder instead of a flat circle. This occurs when the increases in the pattern repeats are not spaced far apart enough or the increases are not sufficient for the piece to stay flat. To fix this issue, simply add more increases in the round that is cupping and it should start to flatten out.

Why is my crochet circle turning into a cone?
The pointed tip of your circle might have something to do with the technique you chose to start the circle, with the chain 2 and single crochet method above rather than the magic ring. Another possible reason is that the subsequent rounds of the circle might be too narrow and you are not increasing enough, which results in a cone, instead of a flat circle.

How do I get my crochet to lay flat?
I would say to avoid having your crochet circle ripple, cup or turn into a cone, would be to follow the rough mathematical pattern increases like I outlined above and perhaps experiment around with those standard increases.
Round 1: Magic ring sc6 - 6st
Round 2: 2 sc6 - 12st
Round 3: (Sc1, 2 sc1) x 6 - 18st
Round 4: (Sc2, 2 sc1) x 6 - 24st
Round 5: (Sc3, 2 sc) x 6 - 30st
And so forth. So slowly increase the single crochet inside the brackets to get an even spacing throughout the rounds, so you can keep the magic circle flat and no longer rippling.
How do you crochet a simple sphere?
Having finished the basic flat circle, let us move onto making 3D shapes like a sphere. From making a circle with subsequent round increases, continue maintaining the same stitches in the round and then decreasing back down again to complete the sphere.
The pattern for a sphere is as follows:
Round 1: Magic ring sc5 - 5st
Round 2: 2sc5 - 10st
Round 3: 2sc10 - 20st
Round 4: Sc20 - 20st
Add stuffing to the sphere.
Round 5: Sc2tog10 - 10st
Round 6: Sc2tog5 - 5st
Close up in FLO in last round.

How do you close a crochet sphere?
Leave some trailing yarn before cutting and fastening off at the end of crocheting the sphere above. Then use a darning needle to string through the front loop of all the stitches in the final round (in the example above just the 5 stitches). Finally pull the trailing yarn taut and tighten the last round to close up the hole.
There is an entire blog post here on how to finish off a crochet project, titled...''. Remember to go check it out.

Why is my crochet sphere pointy?
This could have occurred because you started off making the sphere with the chain 2 and single crochet method over the magic ring method. Or it could be because the sphere started off with too few stitches, for example starting with a magic ring of sc3 could make the sphere pointy. Also, do not make the subsequent rounds too narrow or it will make the sphere pointy or cone-like.
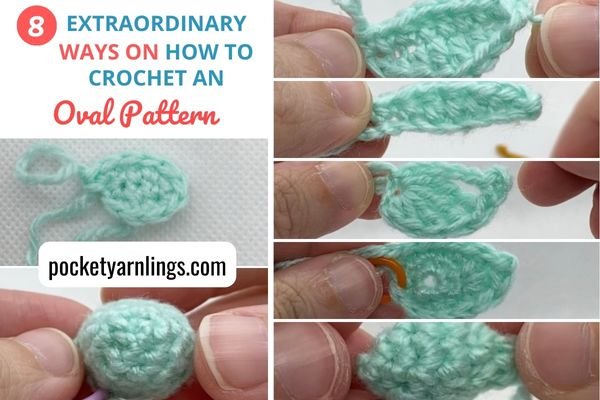
How do you crochet a flat oval?
Finally I thought to include this little bit because crocheting a circle is actually quite different from crocheting a flat oval. This classically involves using a foundation chain method to crochet an oval but I will not be going into too much detail here. I just wanted to show how it differs from crocheting a basic circle.
The crochet pattern for making an oval shape is as follows:
Round 1: Ch4, sc2, 3sc1, go around chain, sc1, 2sc1 – 8st
Round 2: Sc3, 2sc1, sc3, 2sc1 – 10st

Check out this comprehensive article here which has everything about crocheting ovals inside, titled '8 extraordinary ways on How to Crochet an Oval Pattern'.
Conclusion of how to crochet a circle
Hope this was useful, I went over briefly about crocheting magic rings, then single crochet circles, half double crochet circles and double crochet circles, larger circles with a crochet circle calculator and some troubleshooting tips and tricks for circles. Do remember to share this post if you found it useful and pin it to Pinterest for others to see. Also remember to check out the full article on crocheting ovals over here, '8 extraordinary ways on How to Crochet an Oval Pattern'.

If you found this article useful, please remember to share it or pin it to Pinterest. Also, to check out more of my ideas for using various types of crochet stitch techniques and shapes (2D and 3D) to shape amigurumi, grab my free Amigurumi Shaping Starter Guide below!
Master the simple shapes behind every adorable toy — and start creating amigurumi your child will love.