

8 extraordinary ways on How to Crochet an Oval Pattern
Thinking about crocheting more than just basic circles? Add variations by trying out oval crochet patterns, and in this blog post I have 9 different suggestions on how to do it!
Each part will include a crochet oval written pattern, some step by step pictorial instructions, perhaps a video and finally how I apply it in my amigurumi!
Are you ready? Let's start!
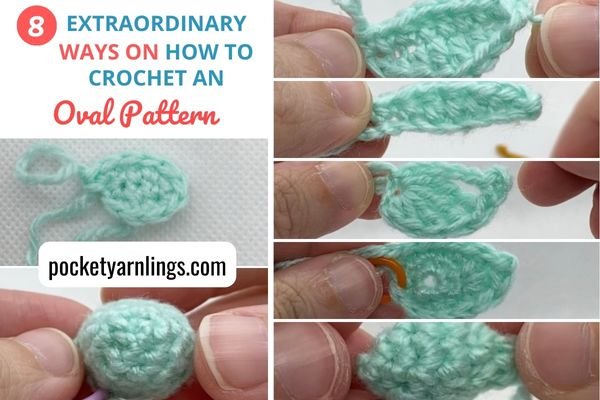
Table of Contents Show
How to crochet a Flat Oval?
Let us start off with how to crochet a flat oval or 2D oval shape, as you will see later on, I will also talk about 3D oval shapes. It includes a variety of rounded oval shapes and pointed oval shapes. They are as follows: oval, oval with foundation chain, half oval, oval with magic ring and tear drop shape - total 5 flat ovals!
How do you crochet an oval shape?
Here we will start with the short crochet pattern of a basic oval and then move onto breaking down the individual steps involved with pictorial step-by-step instructions as well.
Crochet oval written pattern
The crochet pattern for making an oval shape only consists of 2 rounds in this example:
Round 1: Ch4, sc2, 3sc1, go around chain, sc1, 2sc1 – 8st
Round 2: Sc3, 2sc1, sc3, 2sc1 – 10st
Steps involved in crocheting an oval:
1) Chain 4.
Start off with a chain of 4. To make the oval longer or flatter, you can always start off with a much longer chain. For easier illustration, I have only done up to 4.
2) Sc2 down chain.
3) 3sc1 in last chain, or 3 single crochet in the last chain.
For step 3, in the last chain of the row, do 3 single crochet stitches into the same ch. Do 2sc1 first, then rotate in step 4, and finish off the last single crochet into the same last ch.
4) Go around or rotate.
5) Finish up last sc1 (in 3sc1) after turning.
Step 5 shows the last single crochet in the 3sc1 in the last ch. Continue onto the other side of the foundation chain, as in step 6, along the direction of the arrow.
6) Sc1 in next st on the other side of chain.
7) 2sc1 next. This is the end of the first round.
8) Sc1 in new 2nd round. Then place stitch marker.
The arrows in step 7 and 8 indicate the direction of rotating the whole piece. End off the 1st round with 2sc1 as in step 7. Step 8 shows the start of the 2nd round.
9) Continue to sc2.
Steps 8 and 9 include the start of 2nd round, then 2sc1 at the bend while rotating the piece.
10) 2sc1 at the bend. Go around again or rotate.
11) Continue to sc3 down the round.
12) 2sc1 in the last st of second round.
Step 11 continues down the row on the other side of the chain again and end off with 2sc1 in step 12.
The final oval is done! Ok to make it a bigger oval, continue in subsequent rounds by single crocheting along the length of the sides and doing 2sc1 around the bends.
Step by step pictures of how to crochet an oval

Video of how to crochet an oval
Examples of how to incorporate oval shape into amigurumi
See how I used this oval method to make the bellies of my Looney Tunes characters! It is most evident for Wile Coyote over the left side, for Bugs and Sylvester, I joined up with oval with the neck region.

How do you crochet an oval with a foundation chain?
So technically with the steps above, you have crocheted an oval with a foundation chain but just below here I have decided to include a slight variation. This will create a leaf-like pointed oval shape, rather than a rounded oval, and the steps are also a variation of the above. You can see the uses in amigurumi later on.
Crochet oval with foundation chain written pattern
Normally in the pattern example below, Rows 2 and 3 would be written together but for the purposes of the pictorial instructions below, I have broken it up for easier reference.
The pattern is as follows:
Row 1: Ch9
Row 2: Sc2, hdc1, dc2, hdc1, sc2, go around chain and rotate,
Row 3: Sc2, hdc1, dc2, hdc1, sc2
Steps involved in crocheting a pointed oval with a foundation chain:
1) Chain 9.
This is mostly basic when you start off with a slip knot and make a whole foundation chain. In this example, I made ch9 or a chain of 9.
For more details on basic crochet stitches like crocheting a foundation chain, check out this detailed blog post on 'How to Learn Basic Crochet Stitches step by step for Absolute Beginners - 6 Easy Steps!'.
2) Row 2: Sc2, hdc1, dc2, hdc1, sc2 down foundation chain.
To create a taller effect in the middle and narrower effect at the ends, I have used single crochet at ends and half double and double crochet in middle.
3) Rotate the whole row and go around chain.
In the top 2 images seen in the steps below, the foundation chain part is at the bottom, while in 3rd image, it’s on the left and in the last picture, the foundation chain part has gone to the top.
4) Continue crocheting on the other side of the foundation chain.
The foundation chain part is now facing upwards and you can continue to crochet on the other half of the foundation chain.
5) Row 3: Sc2, hdc1, dc2, hdc1, sc2
6) Same as row 2, symmetrical to original row on foundation chain.
The final piece consists of the foundation chain, the first row crocheted on and then the subsequent row crocheted on the other side!
Step by step pictures of how to crochet an oval with a foundation chain

Video of how to crochet an oval with a foundation chain
Examples of how to incorporate oval with foundation chain into amigurumi
I have used this method can be used to make leaves or ears. I have done this for my Rabbit from Winnie the Pooh and also my past rabbits like Peter Rabbit.

How do you crochet a half oval shape?
To crochet a half oval shape, just make use of the previous technique but only half of it. It would make the final oval slightly thinner than the last 2 techniques we talked about.
Crochet half oval written pattern
The crochet pattern is as follows:
Row 1: Ch9
Row 2: Sc2, hdc1, dc2, hdc1, sc2 - 8st
Steps involved in crocheting a half oval:
1) Start with the foundation chain.
In this case, it’s a chain of 9. You can always make it longer or shorter.
2) Single crochet at the ends
When starting the crochet down the foundation chain, use shorter stitches. In this case, I used single crochet twice, using slip stitches can work out to be even shorter.
3) Use higher stitches for the middle section (hdc1, dc1, tc1 etc)
For row 2: sc2, hdc1, dc2, hdc1 sc2
As you can see, right after the initial single crochet, I moved onto taller stitches like half double crochet and double crochet. To make the middle section even taller, you could go up to treble crochet or even higher!
To learn more about all the different types of basic crochet stitches, check out this comprehensive article on 'How to Learn Basic Crochet Stitches step by step for Absolute Beginners - 6 Easy Steps!'.
4) End off the row with short stitches again
I ended off the way I started, which was a single crochet of 2. This way, they look symmetrical along the row, starting and ending the same way.
The end effect is actually half of the previous leaf shape we came up with. One side is essentially more of a straight line and the other side is a gradual curve (depending on how high you decide on the stitches), hence half an oval!
Step by step pictures of how to crochet a half oval

Video of how to crochet a half oval
Examples of how to incorporate half oval into amigurumi
Why choose this method over the previous one? I used it in specific situations, such as... Marvin Martian’s little visor in front of helmet! I don’t use this as often as the previous method but it’s great for certain parts of an Amigurumi. I also used it for my lion dance troupe here. See the mouth part?


Master the simple shapes behind every adorable toy — and start creating amigurumi your child will love.
How to crochet oval with a magic circle?
Here I will be going through something slightly different - this time crocheting an oval using a magic circle technique instead of a foundation chain! Similarly, it will be more of a pointed oval but you could always crochet without the pointed ends, by removing the slip stitches.
Crochet oval with magic circle written pattern
(Terminology
Sc = single crochet, no yarn over
Hdc = half double crochet, yarn over 1 time
Dc = double crochet, yarn over 1 time
Tr = treble crochet, yarn over 2 times)
The crochet pattern is as follows:
Round 1: Magic ring sc6 — 6st
Round 2: 2sc6 — 12st
Round 3: Sc4, hdc1, [(dc1, tr1, ch1 and sl st 1 down, dc1) all in same st], hdc1, sc5 — 14st
Steps involved in crocheting an oval with magic ring:
1) Magic ring sc6 - 6st
Start off with a simple magic ring of 6. You can always adjust this to be smaller by doing a smaller starting ring size.
2) Round 2: 2sc6 - 12st
Or 2 sc all around the round.
Increase the stitches in round 2 to get 12 stitches in the round. Step 3-10 are all in the 3rd round.
3) Sc4 at the start of 3rd round.
4) Hdc1 in next st.
5) Dc1 in next st.
Slowly increase the height from hdc1 to dc1. Note that steps 5, 6, 7 and 8 are all into the same main st.
6) Tr1 in same st as step 5.
After the treble crochet (tr1) in step 6, chain 1 and sl st 1 downwards, then dc1 back into the same main st.
7) Chain 1. Sl st 1 down.
(You could skip this step if you do not want the pointedness.)
8) Dc1 into the same st as step 5 and 6.
9) Hdc1 in next st.
10) End off round 3 with sc5 to get final pointed oval.
Finish round 3 with hdc1 and sc at the end.
And you get the final pointed oval!
Step by step pictures of how to crochet an oval with a magic ring

Video of how to crochet an oval with a magic ring
Examples of how to incorporate oval with magic ring into amigurumi
I often use this method for ears, I did use this for a very old Yoda I made. See how it points outwards? More recently, I used it for Pigling Bland from my Peter Rabbit collection. It’s great for using on animal amigurumis and is a great companion to the other 3 methods I used for making pointed ovals.

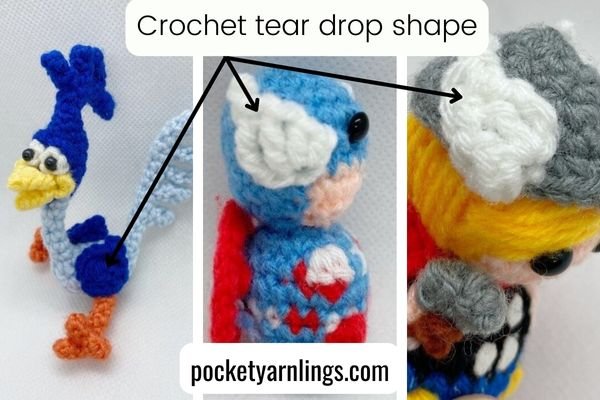
How to crochet tear drop shape?
So technically this is kind of like a tear drop shape, but I mostly used this technique to crochet wing-like shapes. But I was having a tough time naming this shape (as with many of the random shapes I come up with) so I decided on tear drop.
Another way to call it would be to crochet an oval shape with tall stitches but that is not really very descriptive. As this method does use tall stitches, let’s get some basic terminology right first, note these are US terms (UK terms are totally different!).
(Terminology
Sc = single crochet, no yarn over
Hdc = half double crochet, yarn over 1 time
Dc = double crochet, yarn over 1 time
Tr = treble crochet, yarn over 2 times
Dtr = double treble crochet, yarn over 3 times
Trtr = triple treble crochet, yarn over 4 times)
Crochet tear drop shape written pattern
Ch2, (hdc1, dc1, tr1, dtr1, trtr1) all in same 1st st, (ch3 then sl st into 3rd ch from hook), ch5, sl st into original 1st st
Steps involved in crocheting tear drop:
1) Chain 2.
2) Hdc1 into 2nd ch from hook.
3) Dc1 into same 2nd ch from hook.
4) Tr1 into 1st ch again.
5) Dtr1 into 1st ch.
6) Trtr1 back into 1st ch.
Steps 2-6 all go into the 1st chain (or 2nd chain from hook), in gradual increasing heights. First hdc1 in step 2, then dc2, tr1, dtr1, trtr1. If the yarn over part gets confusing, refer back to the terminology above.
Note that with each increasing column, there is a gap in between each column.
7) Ch3.
After ending the series of columns in step 6, chain 3 in step 7. Then sl st 1 downwards to create a pointed end.
8) Sl st 1 into 3rd ch from hook, to form a pointed end.
9) Then chain 5.
10) Sl st 1 back into original 1st st, to form final pointed oval.
End off with chain of 5 right after the sl st and then join up to the original 1st st again.
Step by step pictures of how to crochet a tear drop shape

Video of how to crochet a tear drop shape
Examples of how to incorporate tear drop shape into amigurumi
The final pointed oval in step 10 does look like a leaf right? I often use it for making little wings for my animal amigurumis, just like in Road Runner here! He has one on each side (the left and right crochet patterns are actually different because I wanted them looking symmetrical).
One of my earliest uses for this crochet technique was to make Captain America’s little feathered headgear. Haha, I actually used it for Thor’s old helmet too.
How to crochet a 3D Oval?
Now we move onto 3D ovals, or an oval sphere, or as I named it, an ovoid shape. There are 2 different versions I talk about below, one is a rounded version and one has pointed ends. Let us start with the rounded on first.
How do you crochet an oval sphere?
Here we will start with the short crochet pattern of a basic flat oval like the very first pattern at the top, which is the first 2 rounds of the crochet pattern below. Then see the individual steps and the video after that.
Crochet oval sphere written pattern
The pattern is as follows:
Round 1: Ch4, sc2, 3sc1, go around chain, sc1, 2sc1 – 8st
Round 2: Sc3, 2sc1, sc3, 2sc1 – 10st
Round 3: Sc10 – 10st
Round 4: Repeat round 3 – 10st
Steps involved in crocheting an oval sphere:
1) Chain 4.
Start with a shorter chain of 4. To make a flatter and longer ovoid shape, start off with a longer chain. Continue to sc2 down row and then 3sc1 at the bend, as in step 3.
2) Sc2, 3sc1 in last ch.
3) Go around or rotate.
4) Sc1, 2sc1 and this is the end of the first round.
After going around chain, continue to sc1, 2sc1 with total 8st in round.
5) Continue into round 2: sc3, 2sc1 at the bend.
6) Finish up rest of round 2: sc3, 2sc1.
Step 6 is after going around the bend and crocheting into the other side of the foundation chain. It is basically going to continue in rounds around the base foundation chain.
7) Round 3: Sc10 - 10st
Continue to sc all around.
8) Round 4: Sc10
Continuing into round 3, it’s just single crochet all around in step 7. Then step 8 is repeating the same process. Depending on how elongated you want the oval to go, continue into subsequent rounds with single crochet all around.
As for closing up, you could decrease like a regular sphere or you could reduce down to a few opposing stitches and sew them up together.
Step by step pictures of how to crochet an oval sphere

Video of how to crochet an oval sphere
Examples of how to incorporate oval sphere into amigurumi
This is the very method I used to make Bugs Bunny’s fat cheeks! I stuffed it full so it appears very full! How his cheeks turned out in different angles, lol.

How to crochet an oval shaped head?
Another way to describe an oval shaped head would be a biconvex shape. Making a biconvex shape is like making a 3D oval shape or like crocheting a rugby ball or a football. It’s really useful for making head shapes, somewhat egg-shaped. The pattern starts off like making a cone and then it tapers off to another sharp end.
Crochet oval shaped head written pattern
This pattern involves increasing stitches and decreasing stitches. Go check them out first if you are not sure what I am talking about.
'15 different detailed Ways on How to Increase in Crochet'
'15 different detailed Ways on How to Decrease in Crochet'
This crochet pattern is really simple and goes like this:
Round 1: Ch2 then 3sc1 - 3st
Round 2: 2sc3 - 6st
Round 3: 2sc6 - 12st
Round 4: Sc12 - 12st
Round 5: Sc2tog6 - 6st
Round 6: Sc2tog3 - 3st
Steps involved in crocheting an oval sphere:
1) Round 1: Ch2. Then 3 single crochet into 2nd ch from hook.
2) Round 2: 2sc3 - 6st
Or 2 sc all around.
3) Round 3: 2sc6 - 12st
Or 2 sc all around again.
Increasing rounds in step 2 and 3 gradually, I’m doubling them up here. You can continue to increase in each new round but in step 4 I decided to taper off.
4) Round 4: Sc12 - 12st
Sc all around.
5) Round 5: Sc2tog6 - 6st
Decrease all around.
6) Round 6: Sc2tog3 - 3st
Decrease all around for last time.
Steps 5-6 involves decreasing using the invisible decrease method. This is to achieve the same pointy end as the beginning.
Step by step pictures of how to crochet an oval shaped head

Video of how to crochet an oval shaped head
Examples of how to incorporate oval shaped head into amigurumi
Ta-da the final biconvex shape! I’m not sure what to name the shape - maybe I should say how to crochet a small football, lol. So I used this technique to create a few amigurumi tricks, like Daffy Duck’s head here:
I used a very similar pattern and technique to create Mercy’s (from Overwatch) ponytail hairstyle as well here.
If you are interested in more ways to make amigurumi hair, check out this blog post all about making amigurumi hair: '24 creative ways on How to Crochet Doll Amigurumi Hair'.

How do you crochet a Large Oval?
There are 2 ways to crochet a large oval, either you use thinner stitches and make more rounds or thicker stitches and smaller rounds. The first method below is using single crochet but with 3 rounds, while the second method is using double crochet and only 2 rounds are involved.
How do you crochet an oval base in single crochet?
I am using the same oval pattern right at the top but making it much bigger by going more rounds around it. To make it a bigger oval, continue in subsequent rounds by single crocheting along the length of the sides and doing 2sc1 around the bends.
Round 1: Ch4, sc2, 3sc1, go around chain, sc1, 2sc1 – 8st
Round 2: Sc3, 2sc1, sc3, 2sc1 – 10st
Round 3: 2sc1, sc2, 2sc3, sc2, 2sc2 - 16st
How to do a double crochet oval?
If you are not sure how to do a basic double crochet then remember to check out this comprehensive basic article on 'How to Learn Basic Crochet Stitches step by step for Absolute Beginners - 6 Easy Steps!'. Then move onto the pattern below. It also involves increases in rounds.

Round 1: Ch7, 2dc1 into 4th ch from hook, dc2, 6dc1 in last ch, go around and rotate, dc2 on the other side of ch, 3dc1 in last ch, join with sl st to top of beginning ch3 - 15st
Round 2: (Ch3, 2dc1 into same st), 2dc2, dc2, 2dc6 around the bend, dc2, 2dc3, join with sl st to top of beginning ch3 - 28st

Conclusion of how to crochet an oval
I hope this post was useful for you to imagine all the different ways you can crochet ovals or pointed ovals. They include with a foundation chain single and on both sides, magic ring, tall stitches, 3D oval sphere and biconvex shapes. Also thank you for bearing with the funny names for the shapes!
If you found this article useful, please remember to share it or pin it to Pinterest. Also, to check out more of my ideas for using various types of crochet stitch techniques and shapes (2D and 3D) to shape amigurumi, grab my free Amigurumi Shaping Starter Guide below!
Master the simple shapes behind every adorable toy — and start creating amigurumi your child will love.