

Easy Crochet Animals for Beginners: A Step-by-Step Guide
Crocheting animals can be a fun and rewarding hobby for anyone looking to get into the world of crochet. From cute and cuddly teddy bears to whimsical unicorns and everything in between, there are endless possibilities when it comes to crocheting animals. So grab your crochet hook and let's get started on this fun and creative journey!
Table of Contents Show

Introduction to Crocheting Animals for Beginners
If you're new to crocheting animals, don't worry! With a little bit of practice and patience, you can easily learn how to make your own adorable creatures. In this article, we'll start off with the materials you need to get started, basic crochet techniques to master beforehand, before moving onto different shapes to create your animal and finally finishing off with assembly work.
Materials and Tools for Beginners Crocheting Animals
Let us first talk about what are the necessary materials and tools you need to crochet your first animal amigurumi body. You will need your yarn, crochet hook, stuffing, darning needle and safety eyes. For the purposes of the animal pattern included inside this article, I will first talk about the general tools you will need and then the specific ones need for the animal in this tutorial.
Yarn Types and Colours
Yarn Weight: Choose yarn weights suitable for the desired body size; for smaller animals, use finer weights (e.g., sport, DK), and for larger ones like plushie toys use chunky weight instead. For beginners, I would recommend starting off with DK yarn, it is the easiest to get started with!
Fibre Type: Acrylic yarn is commonly used for its durability and ease of maintenance. There is usually a good colour range to pick from and cheap to start off with. Cotton yarn provides a smoother finish and is another good alternative.
Colour Palette: Select appropriate colours based on the animal being crafted. Consider natural animal colours for realistic creations or playful, vibrant hues for fantasy creatures.
For the purposes of the pattern in this post, I have picked Scheepjes Catona Snow White Yarn (106) and Jet Black Yarn (1110), 25gm ball should suffice for both colours. It is a fingering weight cotton yarn which is easy to start off with.
If you need more ideas on different yarn types to consider for your amigurumi, remember to check out this post on ”12-point Checklist to Select the Best Yarn for Amigurumi”.
Stuffing Materials
Polyester Fiberfill: This is the most common stuffing material for amigurumi due to its affordability, washability, and ability to hold shapes well.
Leftover Yarn Stash: Great way to recycled small strands of old yarn. The consistency of the amigurumi might turn out softer than with polyester fiberfill.
Here I used leftover yarn from previous projects. Of course, if you do not have any previous projects then you would not have leftover yarn, instead invest in a small back of polyester fiberfill.
To see more about the crochet tools and accessories I use, check out this post on “My Crochet Tools and Accessories that are Super Simple to Start With”.

Crochet Tools
Crochet Hooks: A set of appropriate-sized crochet hooks for the selected yarn weight. Pick a set of ergonomic hooks so that you do not injure your wrists with your amigurumi project. If you are starting out, then try out a cheaper metallic hook instead.
Yarn Needles: Needles for sewing all the different body parts together, pick a smaller one which is easier to thread through.
Stitch Markers: Useful for marking rounds or specific points in the body to maintain symmetry and proper shaping.
For my most trusty hook, I used a Clover Soft Touch 3mm hook (alternatively you could also go down to 2mm) which is a good ergonomic hook. This size to pair with the Scheepjes Catona fingering yarn above, which is a balance of easier crocheting and minimizing the gaps in the amigurumi. My stitch markers are pretty metallic ones I got from Etsy but you could just make do with a simple paper clip or safety pin for a start.
Here are more crochet hook ideas “Best Crochet Hook for Amigurumi and 12 ways for Choice Selection” and more stitch marker ideas “10 Crochet Stitch Marker Types and their 10 easy Uses in Amigurumi”.
Accessories for Animal Amigurumi
Eye Embellishments: Utilize safety eyes for a professional and secure eye attachment. Alternatively, you could use embroidery thread to embroider eyes, like making use of a french knot. For simplicity here, I picked an external accessory for my animal’s eyes.
I used glass eyes for the pattern below, which is different from the usual safety eyes which has a washer backing to keep it securely instead the amigurumi. For a start, you could use a pair of black pins (at the relevant size) for the eyes and simply use glue and glue the stalk into the head, which is what I did in the example below.
For more ideas on amigurumi eyes later on should you want to experiment, check out this post on “Amigurumi Crochet Eyes - 10 creative ideas that you can use!”.
Crochet Techniques for Beginners Crocheting Animals
Have a look through the necessary crochet techniques you need to know before embarking on your first animal amigurumi. Here I have included the most basic ones needed for beginners to get started, so none of the fancy shaping you see for more complex amigurumis. Hopefully it is not overwhelming so you can quickly get started! It also corresponds to what you need to know to crochet the pattern listed below later on.
Basic Crochet Stitches for beginners crocheting animals
Magic Ring or Adjustable Loop: Start your project by using this technique to create a tight, closed centre for the head, allowing for easy tightening. If you cannot master this, try out ch2 and single crochet into 2nd chain from stitch.
Here are more details with “24 Easy Peasy things you need to know about Magic Ring in Crochet”.
Single Crochet (sc): Master the single crochet stitch which is the most basic form of crochet stitch. This will be done in rounds, as will be elaborated more on later.
Here are more details with “Master the Art of Single Crochet Stitches: A Comprehensive Guide and Tips”.
Basic Crochet Techniques for beginners crocheting animals
Single Crochet Increase: Learn how to increase stitches to shape the head, gradually expanding the diameter till the widest part before decreasing.
Here are more details with “15 different detailed Ways on How to Increase in Crochet”.
Invisible Decrease: Then continue with the invisible decrease technique to seamlessly reduce stitches without leaving noticeable gaps, ensuring a smooth and neat finish.
Here are more details with “15 different detailed Ways on How to Decrease in Crochet”.

Amigurumi Techniques for beginners crocheting animals
Working in the Round: Crocheting continuously in a spiral to form the head and the body, which will be elaborated on below when talking about crocheting spheres and cylinders.
Stuffing: Learn the art of stuffing amigurumi heads appropriately, ensuring a firm yet soft consistency to your animal amigurumi
Closing Openings: Master the technique of closing the openings neatly and securely once the head and the body are both complete, ensuring the stuffing stays in place.
Sewing attachment: For both sewing 2D shapes to 3D shapes or even 3D shapes together. There is some assembly work involved, which will be elaborated on further below with the pattern suggestion.
Here are more details with ending off amigurumi projects with “The 3 quick systematic steps involved in How to End a Crochet Project” and more about sewing attachments with this post “12 creative ways on How to Join Crochet Pieces Together”. I have not listed colour changes as one of the amigurumi techniques here because we will be working all in the same colour for a start!

Free Animal Shaping Starter Guide
Crocheting Basic Animal Shapes for Beginners
Amigurumi are fundamentally crocheted pieces of artwork in both 2D and 3D forms that are combined in various ways to create popular motifs like animals, dolls and characters. Here I will briefly talk about the most commonly used types of shapes for animal amigurumi, steps involved to create them and also accompanying short patterns.
To make the flow of this article easier to follow, the pattern corresponds to the animal that will be discussed in further detail later on. The shapes are listed in order of how I would normally crochet them, especially when I am designing along the way, before I sew all the individual parts together. If you would like to follow along the animal pattern, this would be a good place to start, or you could read the whole article first before tackling the pattern.
Crocheting the Basic Animal Head and Body
First, we start off with the skeleton which is the amigurumi body. I find it easiest to start with this because you can decide the rest of the facial and body detailing based on this basic body size, then adjust your pattern accordingly.
Spherical Animal Head
Start: Begin with a magic ring. Crochet single crochet (sc) stitches into the ring.
Increase Rounds: Increase by working increases (2 sc in each stitch) in the second round.
Head Rounds: Crochet additional rounds without increasing to maintain the same diameter of the sphere.
Decrease Rounds: Decrease evenly in each round (exact opposite of earlier increases).
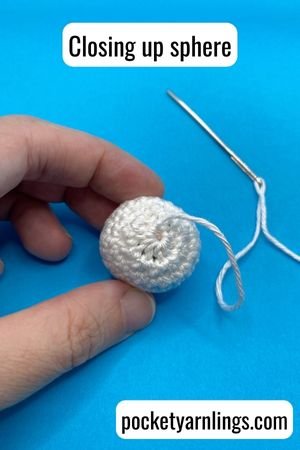
Closing the Sphere: Finish by closing the sphere. Use a yarn needle to close the remaining gap neatly.
Spherical Animal Head Pattern
Start off with white yarn.
Round 1: Magic ring sc10 – 10st
Round 2: 2sc10 – 20st
Round 3: Sc20 – 20st
Round 4: (Sc1, 2sc1) x 10 – 30st
Round 5: (Sc1, sc2tog1) x 10 – 20st
Round 6: Sc20 – 20st
Round 7: Sc2tog10 – 10st
Add stuffing to the head.
Close up in front loops only (FLO) and fasten off with a yarn tail for sewing to body later.
For more ideas on how to customize different types of 3D spheres, check out this comprehensive post, “Mastering Crochet Balls: Step-by-Step Guide for Creating Perfect Spheres”.
Cylindrical Animal Body
Start: Begin with a magic ring. Crochet single crochet (sc) stitches into the ring.
Increase Rounds: Increase by working increases (2 sc in each stitch) in the second round.
Body Rounds: Crochet additional rounds without increasing to maintain the diameter of the cylinder or tube. Adjust the number of rounds as needed based on the desired length of the final tube.
Decrease Rounds: Decrease evenly in each round to make the diameter of the tube narrower until it can close up.
Closing the Cylinder: Finish by closing up the cylinder. Use a yarn needle to close the remaining gap neatly.
Cylindrical Animal Body Pattern
Start off with white yarn.
Round 1: Magic ring sc10 – 10st
Round 2: 2sc10 – 20st
Round 3: Sc20 – 20st
Round 4-8: Repeat Round 3 – 20st
Round 9: Sc2tog10 – 10st
Add stuffing to the body.
Close up in front loops only (FLO) and fasten off.
For more ideas on how to customize different types of 3D cylinders, check out this comprehensive post, “How to Crochet a Tube in 10 different useful styles”.

Crocheting the Animal Facial Detailing
Now we move onto the animal facial detailing because we have the base spherical head to work off in terms of spacing and positioning of the facial components. Here we will be talking about a combination of 2D shapes and 3D shapes – flat circle for the ears, 3D hemisphere for the snout and sphere for the nostril.
Circular Animal Ears
Start and End: Begin with a magic ring. Crochet single crochet (sc) stitches into the ring. Then fasten off leaving a yarn tail.
Circular Animal Ear Pattern
Start with white yarn. Crochet one ear first and then the second one after completing.
Round 1: Magic ring sc7 – 7st
Round 2: Sl st 1 and end off
Fasten off and leave a yarn tail for attachment to the head later on. You should have 2 sets of circular ears.
For more ideas on how to customize different types of 2D circles, check out this comprehensive post, “14 useful things you need to know about How to Crochet a Circle”.
Hemispherical Animal Snout
Start: Begin with a magic ring. Crochet single crochet (sc) stitches into the ring.
Increase Alternate Rounds: Increase by working increases in alternate stitches in the second round.
Snout Rounds: Crochet additional rounds without increasing to maintain the same diameter of the hemisphere.
Fasten off: Leave the wide of the hemisphere open with a trailing yarn tail, this is the side that will be subsequently attached to the head later on during assembly.
Hemispherical Animal Snout Pattern
Start with white yarn.
Round 1: Magic ring sc5 – 5st
Round 2: (Sc1, 2sc1) x 2, sc1 – 7st
Round 3: Sc7 and end off – 7st
Fasten and end off, leave a trailing yarn tail for attachment to the head later.
Spherical Animal Nose
Steps involved with crocheting sphere are as mentioned for the head above, except for the nose here is simpler and involves less rounds. We will be using the black yarn here for the nose.
Spherical Animal Nose Pattern
Start with black yarn.
Round 1: Magic ring sc3 – 3st
Round 2: Sc3 – 3st

Crocheting the Animal Limbs
After finishing up the animal head, body and facial detailing, we can move onto the limbs that will subsequently be attached to the animal body. For this example, I decided to go with simpler shapes like hemispherical arms and cylindrical legs. You could always mix and match with all cylindrical limbs or all spherical arms. It depends on how you want your final animal amigurumi to turn out!
Hemispherical Animal Arms
To make it easier to follow, the hemispherical shape for the animals arms are the same as the snout above. So you could make 3 versions of the same hemisphere and put them one side for attachment later after you have all the individual pieces ready.
Hemispherical Animal Arm Pattern
Start with white yarn. Crochet one arm and then the second one after completing.
Round 1: Magic ring sc5 – 5st
Round 2: (Sc1, 2sc1) x 2, sc1 – 7st
Round 3: Sc7 and end off – 7st
Fasten and end off, leave a trailing yarn tail for attachment to the body later.
Fasten off and leave a yarn tail for attachment to the body later on. You should have 2 sets of hemispherical arms.


Cylindrical Animal Legs
Follow along the same idea for the cylindrical body above but this time it is much thinner because we are crocheting the legs.
Cylindrical Animal Leg Pattern
Start with white yarn. Crochet one leg and then the second one after completing.
Round 1: Magic ring sc5 – 5st
Round 2: (Sc1, 2sc1) x 2, sc1 – 7st
Round 3: Sc7 – 7st
Round 4-5: Repeat Round 3 – 7st
Fasten and end off, leave a trailing yarn tail for attachment to the body later.
Fasten off and leave a yarn tail for attachment to the body later on. You should have 2 sets of cylindrical legs.

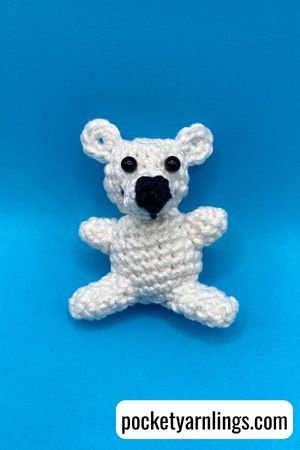
The different individual parts you should have at the end should include the following:
Head
Spherical Head
Circular Ears x 2
Hemispherical Snout
Spherical Nose
Body
Cylindrical Body
Hemispherical Arms x 2
Cylindrical Legs x 2
You should have a total of 10 different parts at the end in individual pieces!
Customization and Personalization of Crochet Animals
This is the most fun part of crocheting amigurumi! After getting the hang of the basic 2D and 3D shapes, then it is simply a matter of mixing and matching them in various combinations to achieve different figures – whether it is an animal, a doll or a character! For example, instead of using circular flat ears, you could try out flat triangular ears instead for a different animal like a cat!
If you want to get ideas on how to use different shapes in crocheting different animal parts, including faces like heads, ears and nose, body parts and limbs, then check out more resources below. These would make more sense if you have completed this whole article and want to move on from there with more ideas for animal shaping!
Animal Faces
Animal Bodies
Finishing Touches and Assembly
This last part is all about the finishing touches, including stuffing, finishing off, fastening off, weaving in ends and last but not least, sewing all the different parts together. For the assembly section, I have broken it down into sewing different pieces together, including flat pieces, open pieces or closed amigurumi pieces. These are all important amigurumi techniques, which are slightly different from basic crochet techniques.
Stuffing
The first step in finishing your crochet animal is to stuff it properly. You can use a variety of materials to stuff your animal, such as polyester fiberfill, cotton, or even scraps of yarn. Make sure to stuff the animal firmly, but not too tightly, to give it a nice shape. Once you have stuffed your animal, it's time to shape it. Use your hands to mould the animal into the desired shape.

Finishing Off
Finish off crochet round
When you have finished the last stitch in a round, which is for most of the examples above (including the 3D spheres, cylinders and flat 2D circles), you should have one remaining loop on the hook. Cut off the trailing yarn then use the crochet hook to pull on the one loop on the hook until the whole yarn length is pulled through.
Fasten off crochet rounds
Use a darning needle to thread through the last bit of trailing yarn mentioned previously. Then insert the darning needle into the next stitch (both FLO and BLO) at the front, then into the back of the adjacent stitch. And then continue into the front of the following stitch again. This is usually what I do before to fasten off the round, before I use the trailing yarn for sewing pieces together.
Fasten off crochet amigurumi
Here we are talking about fastening off amigurumi rather than just in the round, which also involves closing it up. First thread yarn through a darning needle, then insert it into the front loops of all the stitches in the last round. Then finally to close it up, pull the trailing yarn taut like you would a drawstring. You will then see the final circular hole will start to close up.
Weaving in ends for amigurumi
After closing up the drawstring, with the darning needle and the yarn still thread through, pull it out the other side of the amigurumi, then weave in and out of the stitches. Once you have done this multiple times, you can cut off the string. Alternatively, you could use multiple yarn strings from multiple attached pieces and tie them together in knots and finally use your scissors to push the knot back into the amigurumi to hide it.
Sewing Crochet Animal Pieces Together
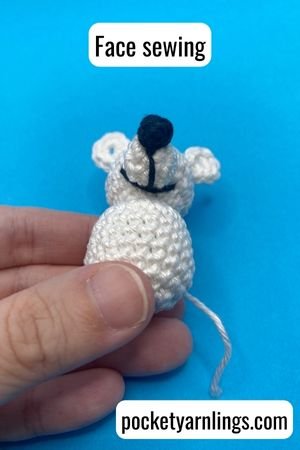
With the 10 pieces mentioned above in the animal pattern, there is a lot of sewing and attachment to do! This is the order of sewing that makes most sense to me because I position one part over the next and then decide on the shaping from there. First off, we will sew the head to the body first to get the base skeleton. Then we will proceed onto facial detailing, by positioning the snout over the middle of the face first, then the 2 flat ears on either side of the snout. After finishing the face, we can systematically sew down the arms to top half of the body and legs to the bottom half of the body.
Sew two closed amigurumi pieces
Sewing the head onto the body involves sewing a closed sphere to a close cylinder. This involves positioning the head right on top and in the middle of the cylinder and using a whip stitch or invisible stitch method to seamlessly combine them. Ensure the stitches are tight but not too tight, maintaining the shape and structure while concealing the seam for a polished finish.

Sew open amigurumi piece to closed amigurumi piece
When attaching the hemispherical snout to the middle of the head, this involves attaching an open amigurumi piece to a closed one. Fasten off the open piece with the trailing yarn end and use this to thread through the desired position on animal head. Use a whip stitch to secure the round edges of the open snout end onto the surface of the sphere.
Sew flat piece to closed amigurumi piece
Attaching the circular ears to the sides of the head involve attaching flat pieces to a closed amigurumi piece. Likewise, string through the spherical head and then continue to thread through only the bottom half of the circle. You might want to repeatedly thread through the same few stitches to secure it down onto the animal head.

Sew open amigurumi piece to closed amigurumi piece
Just like sewing the snout onto the head, sew the hemispherical arms and cylindrical legs onto the body, which involves sewing together open amigurumi pieces onto a closed piece. In addition to the same steps above, remember to be attentive to symmetry and alignment for a cohesive look.

Conclusion to Crocheting Animals for Beginners
Crafting your first amigurumi animal is a delightful journey blending creativity and skill. As you've discovered the fundamental materials, tools, and techniques in this guide, you've taken the first steps toward creating animal amigurumi that brim with personality.
Remember, practice makes perfect in the world of crochet, so don't shy away from experimenting with shapes, colours and patterns. Embrace the joy of bringing characters to life through your stitches and let your imagination soar! Go ahead and pin the image below to Pinterest if you found this article useful!
