

8 Simple Ideas for Easy Crochet Animal Heads
Crocheting animal heads infuses personality and character into amigurumi creations. Animal amigurumi heads come in a variety of shapes and sizes, from small and simple to large and complex. You can choose to make a realistic-looking head or a more whimsical, cartoonish version.

Table of Contents Show
Introduction of Crocheting Animal Heads
Here we will talk about some basics first like materials needed to crochet animal heads, the basic crochet techniques that you need to know, and then different ways to crochet facial features of animal amigurumi. We will end off with some points on attachments of head to body and customization with personalization. Here we will be concentrating on small crochet animal heads.
Materials and Tools for Crocheting Animal Heads
Choosing the right materials is fundamental in capturing the essence and distinct characteristics of the animal being crocheted. Experimenting with textures, colours, and embellishments offers endless possibilities to create lifelike or fantastical animal heads in amigurumi crafting.
Yarn for Crocheting Animal Heads
Yarn Types: Choose fine or lightweight yarn, such as sport or DK weight, to achieve intricate small animal toys. Cotton or acrylic yarns work well, offering durability, a smooth finish, and ease of manipulation. On the other hand, if you are thinking of crocheting plushie animal toys, then choose chunky or worsted yarn to create more huggable soft toy gifts.
Colour of Yarn: Opt for soft yarn in assorted colours suitable for the specific animal's characteristics. Varied textures and tones can emulate fur, feathers, or scales. For instance, consider shades of browns, greys, and whites for realistic animal fur or vibrant hues for imaginative creatures.

Crocheting Supplies for Crocheting Animal Heads
Crochet Hooks: Choose a crochet hook sized appropriately for the yarn weight to ensure the stitches create the desired density and detail for the animal's head. For smaller projects, use size 2 or 3mm crochet hooks with fingering or DK yarn, while for larger chunky makes, use 4-6mm crochet hook with the right yarn weight.
Darning Needle: Employ a yarn needle for sewing and weaving in ends as you crochet. This tool aids in attaching parts together and completing details like ears, snouts, or other facial features.
Stuffing Material for Animal Head: Use a suitable stuffing material to give the animal heads shape and volume. This ensures the heads hold their structure and lend a realistic or stylized appearance.

Accessories for Crochet Animal Heads
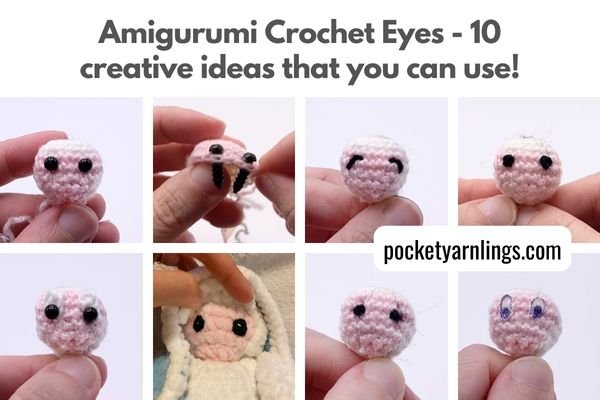
Eye Embellishments: Utilize safety eyes for a professional and secure eye attachment. Alternatively, use embroidery thread to embroider eyes, giving a handcrafted and customizable touch to the animal's face.
Embellishments for Detailing: Incorporate additional materials like felt, yarn scraps, or embroidery thread to add intricate details such as noses, ears, whiskers, or unique facial markings that distinguish the animal's features.
Crochet Techniques for Crocheting Animal Heads
Here's a breakdown of essential crochet techniques for crafting animal heads in amigurumi. You might want to familiarize yourself with some of these techniques before you decide to challenge yourself with crocheting animal heads. Start off with basic crochet stitches, then basic crochet techniques and finally amigurumi techniques. Using these basic crochet knowledge, it should be easy to crochet animal heads!
Basic Crochet Stitches for crocheting animal heads
Magic Ring or Adjustable Loop: Begin your project seamlessly by using this technique to create a tight, closed centre for the head, allowing for easy tightening.
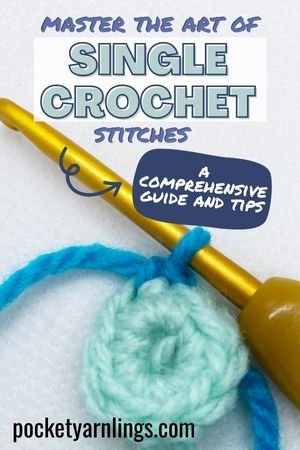
Single Crochet (sc): Master the single crochet stitch which is the most basic form of crochet stitch. This will be done in rounds, as will be elaborated more on later.

Basic Crochet Techniques for crocheting animal heads
Single Crochet Increase: Understand how to increase stitches to shape the head, gradually expanding the diameter.
Invisible Decrease: Learn the invisible decrease technique to seamlessly reduce stitches without leaving noticeable gaps, ensuring a smooth and neat finish.


Amigurumi Techniques for crocheting animal heads
Working in the Round: Practice crocheting continuously in a spiral to form the head, allowing for a seamless appearance without visible seam lines.
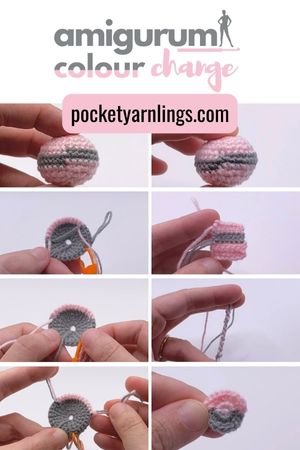
Colour Changes: Familiarize yourself with changing yarn colours to create distinctive features such as stripes, spots, or different facial markings for various animal characteristics.
Stuffing: Learn the art of stuffing amigurumi heads appropriately, ensuring a firm yet soft texture and shaping the head to your desired form.
Closing Openings: Master the technique of closing the openings neatly and securely once the head is complete, ensuring the stuffing stays in place.


Free Animal Shaping Starter Guide
Crocheting Facial Features of Animal Heads
For this section, we will be talking about different ways to crochet facial features like animal ears, snouts and cheeks. It is a summary of all the different ways you can consider trying out but for the details on each part, remember to check out the more detailed blog post for them.
How to Crochet Animal Ears?
Crafting animal ears in amigurumi involves various shapes and techniques. Here we are just going through some 2D shapes that can be used to make animal amigurumi ears. Experiment with sizes, stitches, and techniques within these shapes for customized animal ear designs in amigurumi.
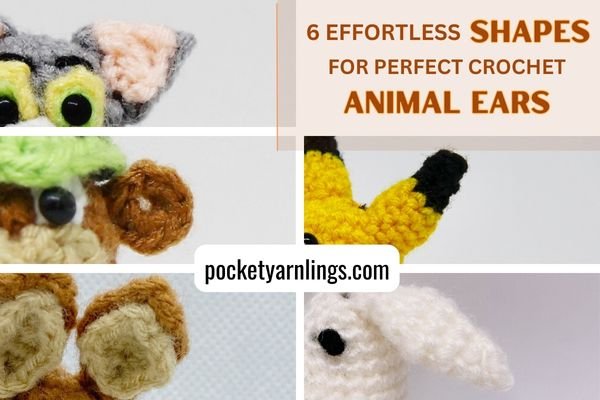
Circle Ears: Begin with a magic ring or chain loop, working single crochet rounds to create circular ears. Ideal for bears, rabbits, or mice.
Triangle Ears: Start with a chain, shaping rows to form triangular ears. Suited for animals like cats, dogs, or foxes.
Oval Ears: Resemble elongated circles, formed by strategic increases and decreases. Fit animals like bunnies, pigs.


Here are more details on shaping animal ears with short free patterns inside too!
How to Crochet Animal Snouts?
Crafting animal snouts in amigurumi is slightly different from the suggestions above as they tend to be more 3D in shape rather than 2D. Customize the number of rounds, increases, or decreases within these shapes to match the precise snout of the amigurumi animal, infusing individual characteristics into the final creation.
Spherical Snouts: Start with a small circular base, working rounds with gradual stitch decreases to achieve a round shape. Ideal for bears, pigs, or specific dog breeds.
Cylindrical Snouts: Begin similarly to spheres, maintaining a consistent diameter for several rounds to form a tubular shape. Suited for horses, cows, or certain reptiles.
Conical Snouts: Start with a circular base, gradually decreasing stitches to form a pointed tip. Perfect for specific bird species.


Here are more details on shaping animal snouts and noses with short free patterns inside too!

How to Crochet Animal Cheeks?
Similar to the 3D shapes mentioned above but this time crocheting 2 sets of the same shapes to be placed on either side of the face as cheeks. Customize sizes, rounds, or stitching techniques within these shapes to match specific facial structures, infusing character into your amigurumi creations.
Spherical Cheeks: Crochet small circular bases, gradually decreasing stitches in continuous rounds to form rounded and soft shapes. Perfect for teddy bears, chubby animals, or dolls.
Conical Cheeks: Begin with circular bases, decreasing stitches to form pointed tips, creating more angular features. Suitable for animals like foxes, wolves, or creatures with defined facial structures.

How to Attach Crochet Animal Head to Body
Once you have added the facial features, it's time to attach the head to the body. Depending on the animal you have created, you may need to stuff the body before attaching the head.
Attaching the animal head to the body in amigurumi involves a few key steps for a secure and polished finish. Here I have broken it down into before attachment, during attachment and post attachment for easier reference.
Before Attachment of Animal Head to Body
Prepare Both Parts: Ensure that both the head and body are complete and stuffed according to your desired firmness. Leave a yarn tail on both the head and body for sewing.
Positioning: Determine the ideal placement of the head on the body. Use pins or stitch markers to temporarily position the head to ensure proper alignment before sewing.

During Attachment of Animal Head to Body
Sewing: Thread the yarn tail from the head onto a yarn needle. Start sewing the head to the body using a whip stitch or any preferred sewing method. Ensure that the stitches are tight enough to hold the parts securely but not too tight to distort the shape.
Secure Attachment: Sew around the circumference of the head where it meets the body, making multiple passes to reinforce the attachment. Knot the yarn securely inside the body or head to prevent unraveling.
After Attachment of Animal Head to Body
Hide Ends: After securing the head to the body, weave in the yarn ends inside the amigurumi to hide them neatly.
Final Adjustments: Make any final adjustments to the head positioning or stitches to ensure a seamless attachment and the desired appearance.
By carefully sewing and securing the head to the body, you can create a stable and professional-looking attachment for your amigurumi, allowing for a charming and cohesive finished product.
Customization and Personalization of Crochet Animal Heads
So, I have gone through crocheting ears, snouts and cheeks above, you can continue customization and personalization by incorporating facial details like eyes and noses, in addition to mixing and matching all the different ideas and techniques we have talked about in this article.
Customizing facial details like eyes and noses allows for a delightful level of personalization in amigurumi:
Eyes: Experiment with different sizes, shapes, and types of safety eyes or crochet eyes to match the character of the animal. Position the eyes symmetrically on the face using stitch markers before attaching them securely. For safety eyes, insert and secure the washers tightly on the inside of the head. Alternatively, embroider eyes using embroidery floss or yarn for a unique look.
Noses: Create noses using various techniques, such as crocheting small spheres, cones, or embroidering triangle shapes. Customize the nose's size and placement to match the animal's facial features and personality.
Mix and Match: Combine different eye and nose styles, sizes, or colours to create diverse expressions and personalities for your amigurumi animals.

Conclusion of Crocheting Animal Heads
Crocheting animal heads in amigurumi invites a creative exploration filled with diverse shapes, colours, and techniques. From selecting materials and mastering crochet basics to crafting intricate facial features like ears, snouts, and cheeks, each step adds character and uniqueness to these delightful creations.
Attaching the head to the body with precision and adding personalized details like eyes and noses further infuses charm into these handcrafted characters. I hope all these different suggestions and techniques will give you more ideas on how to shape your next animal amigurumi head! Remember to pin the image below if you found this post useful!
