

How to Crochet a Cylinder
Circular series
How to crochet a circle - using ch2 and Sc (part 1)
How to crochet a circle - using Magic ring (part 2)
How to crochet a sphere - crochet in a round (part 1)
How to crochet a sphere - bobble stitch (part 2)
How to crochet a cylinder
This is the final tutorial in the Circular series. Of course, there will be more shape tutorials! This time I will be talking about crocheting cylinders. I often use this method to make the amigurumi body.

Previously, in the ‘how to crochet a sphere part 1′ I mentioned the technique I used to make the heads, then in ’how to crochet sphere part 2′, I used bobble stitches to make the limbs.
How to crochet a cylinder
Like previously, I will include the crochet pattern first then proceed with the step by step instructions on how to achieve it. Right at the bottom will be the video on how to do it, which may be easier for some to follow.
Cylinder Pattern
Round 1: Magic ring 5 – 5st
Round 2: 2sc5 – 10st
Round 3: Sc10 BLO – 10st
Round 4: Sc10 – 10st
Round 5: Repeat round 4 – 10st
Continue in rounds of 10st until desired length.
Similarly, start with magic ring and then in step 2, increase the stitches such that 2sc all around in round 2.Will end up with 10 stitches in 2nd round.

Step 4 involves single crochet into the back loop only. This leaves the front loops exposed. See what I mean in the next few steps.

(FLO or front loop only refers to the dotted areas, the loop behind it which is not dotted out is the BLO or back loop only.)

After you have done a few single crochet in step 4, only in the back loops, you will start to see the front loops appearing as a border or demarcation.

Continue rounds 4-5 as sc10 all around and further on to rounds 6 and beyond if you want the cylinder longer. You can see the final cylinder I did was quite a bit longer. Essentially keep the same number of loops in the round so that it will progress longitudinally downwards.

If you are more of a video person, check out the same tutorial in video form right at the bottom of this blog post. Feel free to fast forward and pause at areas you are not sure of.

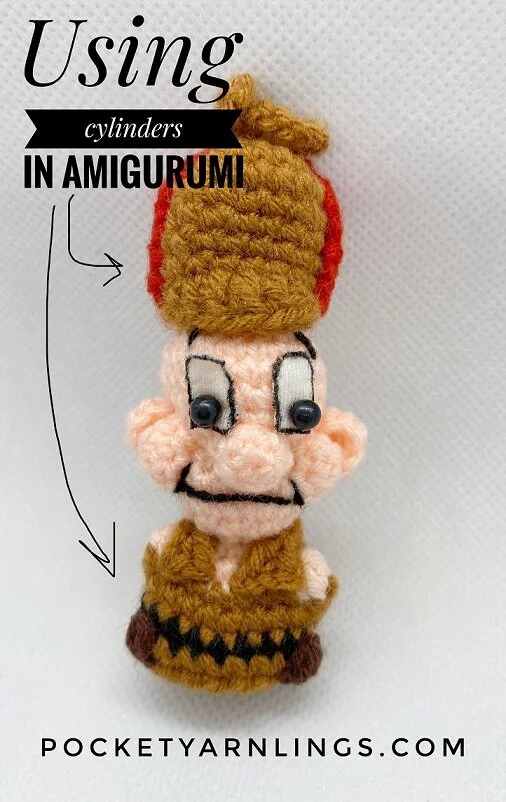
Tada, how I used the above method to make Elmer’s and Yosemite’s bodies. Incidentally, I pretty much used the same method for Elmer’s long cylindrical hat as well only this time I did not use BLO/FLO technique inside.

That’s the end of the circular series, I do hope it was useful! Please share it if you think so! Also, subscribe to my youtube channel to see more videos. There will be many more tutorials to come in various other shapes to achieve different kind of amigurumi appearances so look out for that!

Discover how easy toy design can be! The free Amigurumi Shaping Starter Guide shows you how every toy is built from simple 2D and 3D shapes — and walks you through a clear 5-step process for turning those shapes into your very own customized designs.