

How to Crochet a Circle. Part 2 - Magic Ring

Circular series
How to crochet a circle - using ch2 and Sc (part 1)
How to crochet a circle - using Magic ring (part 2)
How to crochet a sphere - crochet in a round (part 1)
How to crochet a sphere - bobble stitch (part 2)
How to crochet a cylinder
This is the 2nd part on how to crochet a circle. Check out the 1st part on how I used a chain 2 and single crochet method to crochet a circle.
Previously I mentioned about how to start a round with that method but we do end up with a gap in the centre. When using the magic ring technique, you can pull the free end of the yarn taut such that the gap disappears!

How to crochet a circle - using magic ring
Steps 1-2 may be slightly more difficult to follow, it might help more to check out the video tutorial version here. Or the video will be right at the bottom of this blog post.

Note that in the 1st step here when you pull the free end of yarn through centre of loop, flip the position of the ball end above the free end of yarn.

In step 3, you have only completed the 1st chain. Insert hook into the loop in the centre, yarn over and pull yarn through the centre.
At this point, you should end up with 2 loops on the hook. Then yarn over to pull yarn through 2 loops on hook.
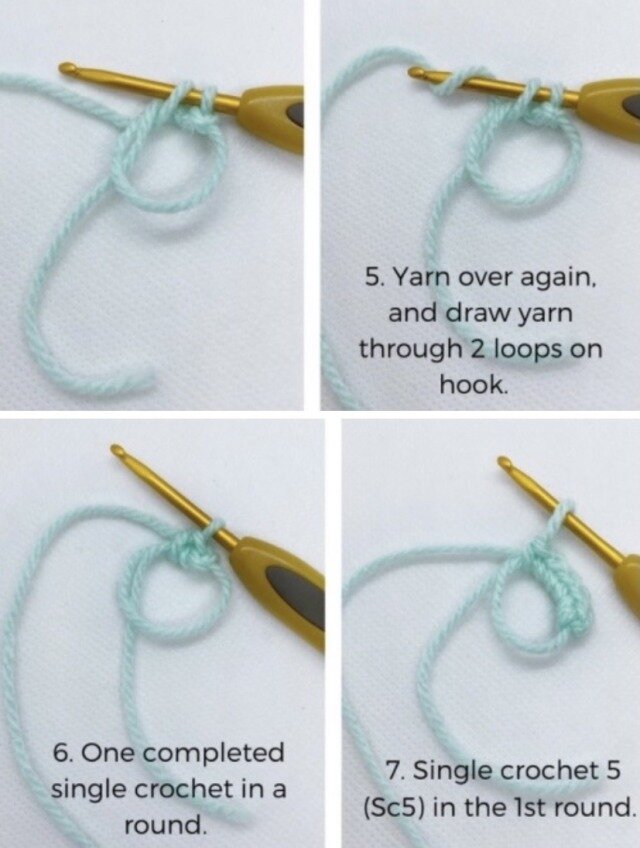
Ta-da! Your first completed Sc in a round. It’s very similar to making a single crochet in a chain but instead of inserting your hook in the next chain, you are inserting into the central loop!
Continue on single crochet to desired number of rounds, in this case I made it 5 in the round (sc5).

This is where the magic happens! After you have completed the desired number of single crochet, pull the free end of yarn taut. You should see the central loop getting smaller and smaller. If you pull till the end, the ring will completely close up!

Steps 10-14 is to complete the circle. Essentially you are joining up to the beginning of the round when you first started your 1st Sc (in point 6).

Some choose to single crochet into the beginning of the round, some choose to slip stitch instead.
In this illustration, I have inserted the hook into the 1st sc, drawn yarn through and made a single crochet to complete the round.

After this 1st Sc of the round is formed, I usually place my stitch marker here. This is to mark the beginning of the round so that you do not lose count when you continue crocheting in the new round. For this method, notice how the gap nicely closes up, compared to the ch2 and sc method.
If you are more of a video person, check out the same tutorial in video form right at the bottom of this blog post. Feel free to fast forward and pause at areas you are not sure of.

Check out the ears in the Looney Tunes amigurumi above. They are essentially made up of 2 circles, one smaller inner ear and one larger outer ear. I used the same method outlined above to make them!

If you found this useful, please share it! Also, subscribe to my youtube channel to see more videos. Until the next tutorial, happy hooking!

Discover how easy toy design can be! The free Amigurumi Shaping Starter Guide shows you how every toy is built from simple 2D and 3D shapes — and walks you through a clear 5-step process for turning those shapes into your very own customized designs.