

12 Actionable Techniques you need to know about How to Crochet a Rectangle
Crocheting rectangles is the next step after learning how to crochet a basic square. It is relative easy to follow up with and serves as the building block for an array of projects, from cozy blankets to charming amigurumi and stylish accessories. They offer a different shape compared to squares and can create interesting design possibilities when combined with other shapes or motifs in larger crochet pieces.
Table of Contents Show

What is a crochet rectangle?
A crochet rectangle is a four-sided shape with four right angles, where opposite sides are equal in length. As opposed to a square, the four sides are not equal in length, but two opposite ones are the same length and likewise for the remaining two.
It's formed by working rows of stitches that increase and decrease in a specific pattern to create longer sides and shorter ends, resulting in a rectangular shape.
How to crochet a rectangle step by step?
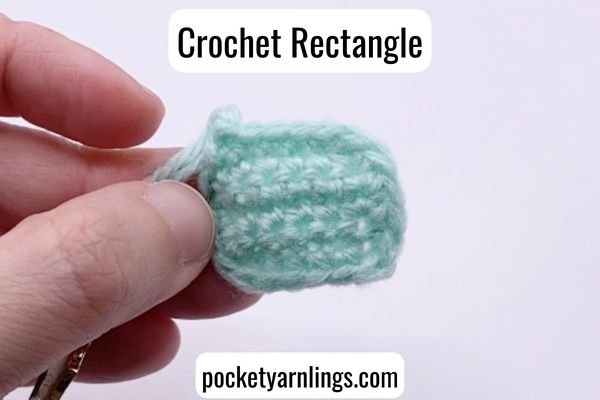
Crocheting a rectangle is very similar to crocheting a square, just that the sides are uneven. This time I start off with a chain of 7 instead but the total number of rows are similar to the square pattern, before moving onto the rounds.
Row 1: Chain 7
Row 2: Sc6, ch1 and turn - 4st
Row 3-5: Repeat Row 2 - 4st
If you simply end off at Row 5, you will get a basic rectangle shape that is the easiest to crochet up. In the next part, I ended off with an additional step to crochet around the basic piece above just to tidy it up and make a neater rectangle, still using single crochet stitches.

How to start a crochet rectangle?
With the pattern written above, here are the steps described in words for how to start, continue and finish off a crochet rectangle. First, we start off with a slip knot, then chain a certain number of stitches inside the foundation chain to create the length of the rectangle. Then we work into the first row, across the foundation chain. With the example above, we worked single crochet stitches into the foundation chain.
How to continue crocheting a rectangle?
After completing the foundation chain and the first row, we have the turning chain, in the above case, since we are using single crochet stitches, simply chain 2 and turn your work. This chain serves as the turning chain to begin the next row.
As for subsequent rows, repeat the same stitch pattern across each row and continue repeating the rows until the rectangle reaches the desired height. In the above pattern example, it was just 5 rows.
How to finish up the crochet rectangle?
To finish up the crochet rectangle, complete the intended number of rows, which forms the height of the rectangle and then fasten off your yarn, leaving a tail for weaving in the ends. Use a yarn needle to weave in any loose ends to secure them.
This basic pattern can be modified by changing the stitch pattern, increasing or decreasing the size, or incorporating different colours to create variations in the rectangle. Adjust the length and height based on your project's requirements or preferences.
How do you make a rectangle in crochet?
In addition to the short pattern mentioned above, I have continued on below to crochet around all four sides of the rectangle to make the final piece neater and more even. So firstly, follow all the steps mentioned above and then continue on below in the answer for the next section.
How to crochet rectangle in rows?
The simple short rectangular crochet pattern is repeated here:
Row 1: Chain 7
Row 2: Sc6, ch1 and turn - 4st
Row 3-5: Repeat Row 2 - 4st

Turn and rotate whole piece, sc1 in last st, then place stitch marker here. Continue in rounds now, instead of rows.
Round 1: Sc1 in last st (as mentioned above), sc2 along side, 2sc1 in corner, turn and rotate, sc4 along bottom, 2sc1 in corner, turn and rotate, sc3 along side, turn and rotate, sc6 - 20st
The final completed rectangle should have 20 st in the round, with the edges in all sides tidied up nicely. I have used this method before to create capes for my amigurumi.
How to crochet a rectangle in the round?
Crocheting a rectangle in a round is slightly different from crocheting in rows as in the example above. Unlike crocheting square which involves crocheting around a magic ring, for crocheting rectangles in a round, we will be starting with a foundation chain. When first starting out this pattern, it might look more like an oval rather than a rectangle. As you do multiple increases in the corners, then the rectangle becomes more obvious. See the pattern example below:
Row 1: Ch6
Row 2: Sc4, 3sc1, go around and crochet on the other side of chain, sc3, 2sc1 – 12st
Row 3: 3sc1, sc3, 3sc1, sc1, 3sc1, sc3, 3sc1, sc1 – 20st
Row 4: Sc1, 3sc1, sc5, 3sc1, sc3, 3sc1, sc5, 3sc1, sc2 – 28st
Row 5: Sc2, 3sc1, sc7, 3sc1, sc5, 3sc1, sc7, 3sc1, sc3 – 36st
Just for easier reference, note that the corners of the rectangle are always formed in the middle of the 3sc1, for each subsequent round.

How to crochet a rectangle granny square?
This is included for completeness because there are rectangle granny squares! Since this is not my area of passion, I am not the best equipped to give step by step instructions so here I am linking out to a tutorial with pictures and videos to help teach you how to achieve a rectangle granny square. You can check it out here.
Can you make a rectangle with c2c crochet?
Yes, you can create a rectangle using the Corner-to-Corner (C2C) crochet technique. While C2C is often used to create squares or square-shaped patterns, you can modify the technique to create rectangular shapes by adjusting the increases and decreases. Experimenting with different stitch counts and row lengths will help you achieve the desired size and proportions for your rectangular C2C project. The process involved in C2C crochet involves multiple steps, which would be better explained in detail with the post below.
How to single crochet a rectangle?
For this next section, we will be talking about using different types of stitch heights to crochet a rectangle. We have explored how to single crochet a rectangle in rows above and also briefly how to do so in a round. For the next 2 parts, we will be talking about crocheting a double crochet rectangle in both rows and rounds.
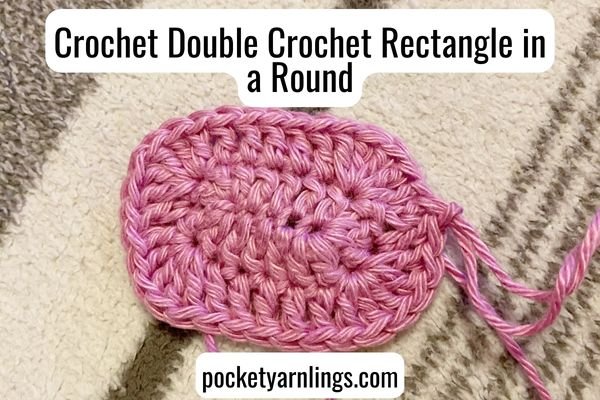
How do you double crochet a rectangle?
This pattern is the same as crocheting a single crochet rectangle in rows as mentioned above but this time, the stitches are replaced with double crochet stitches and you will have to add in taller turning chains correspondingly. See more of the pattern below:
Row 1: Chain 7
Row 2: (Sc1 into 2nd ch from hook, ch3), dc6, ch3 and turn – 6st
Row 3: Dc6, ch3 and turn - 6st
Row 4-5: Repeat Row 2 - 6st

How to do double crochet rectangle in the round?
This is slightly more complex than crocheting single crochet rectangle in the round. It follows the single crochet pattern above in a round closely except that the corners are thicker with 5 double crochet stitches in the same stitch (as opposed to just 3 single crochet stitches in the corners). Also, the turning chains need to be added as well.
Row 1: Ch6
Row 2: (Sc1 into 2nd ch from hook, ch3), dc4, 5dc1, go around, dc3, 4dc1, sl st to top of ch3 – 16st
Row 3: (Ch3, 5dc1), dc5, 5dc1, dc1, 5dc1, dc5, 5dc1, dc1, sl st to top of ch3 – 27st
Likewise, the corners always formed in middle of 5dc1, similar to how the corners are formed in the middle of the 3sc1 above.
How to crochet different sizes of rectangle?
To crochet different sizes of rectangles, there are a few ways to go about doing it as I will elaborate on below. Simply, you could either increase the length of the initial foundation chain or increase the number of rows or rounds you work into. Doing this while all maintaining the same proportion will get you different sizes of rectangles. Of course, an even easier way is to use thicker weight yarn and a larger crochet hook to work up a bigger rectangle faster, or even consider using taller stitches like double and treble crochet stitches to make larger rectangles! I will go through some short pattern examples below.
How do you make a smaller rectangle crochet pattern?
For a small rectangle, you could follow the easiest example I stated above which is a 7x5 rectangle or the pattern below:
Row 1: Chain 7
Row 2: Sc6, ch1 and turn - 4st
Row 3-5: Repeat Row 2 – 4st
This is technically using the shortest stitch, the single crochet stitch (apart from slip stitch) and a rectangle of 7x5 is as small as it gets, although you could try to make the rectangle even smaller. Shorter foundation chains do not make for uniform perfect rectangles so I did not make the pattern any shorter or smaller.
How to crochet a long rectangle?
There are 2 ways you can crochet a long rectangle, either by starting off with a longer foundation chain and then the number of rows are fewer or you should start with a short foundation chain and include many subsequent rows after that. I have included 2 short pattern examples below to illustrate what I mean.
Row 1: Chain 10
Row 2: Sc4, ch1 and turn - 4st
Row 3-5: Repeat Row 2 – 4st
In this case, the initial chain is the longer side of the rectangle while the rows are the shorter side. Here is the other example:
Row 1: Chain 6
Row 2: Sc5, ch1 and turn - 4st
Row 3-10: Repeat Row 2 – 4st
This is the other example where the initial foundation chain is the shorter side, while the number of rows crocheted corresponds to the longer side.
While on the other hand, if you choose to crochet with taller stitches like double crochet stitches, then technically the height of the row will double that of single crochet stitches, so to achieve the same long rectangle, you could finish it in a shorter time period! I mentioned more under double crochet rectangle examples above.

Free Amigurumi Shaping Starter Guide
Learn how to create a toy for your child with your own hands in 5 simple steps.
Why is my crochet rectangle slanted?
A slanted crochet rectangle often occurs due to a few reasons, like inconsistent tension might cause one side of rectangle to be tighter or looser than the other, causing the slanting. This can also happen to the turning chains at the end of rows, causing the edges to be slanted. Sometimes, it might be uneven stitch counts within rows like missing or adding stitches.
Why is my crochet rectangle curving?
Another common issue apart from slanting is curving of the crochet rectangle. This can also similarly happen with tension variation especially for beginners, which can cause the corners of the rectangle to curl. Apart from maintaining consistent tension and maintaining the right stitch count, sometimes using a hook that is too small for the yarn weight might cause a denser fabric and the curling issue might arise. Finally, incorrect increases or decreases within the pattern or inadequare or excessive shaping can also contribute to curving.

Why does my crochet rectangle get smaller?
If you see your crochet rectangle getting smaller, you could be miscounting your stitches like missing or skipping stitches, or perhaps the tension is too tight, and it is turning out smaller than expected. Apart from skipped stitches, accidental decreases within the pattern will definitely make the rectangle smaller than intended. Also do make sure you are using the right crochet hook size for the yarn weight, as smaller hooks tend to make the stitches tighter and the rectangle eventually gets smaller.
How to keep my crochet rectangle edges straight?
A few simple ways to keep your crochet rectangle edges straight would include keeping your tension consistent throughout each row of the rectangle. Make sure you count your stitches regularly especially after completing each row, paying attention to the turning chains as well. Double check that you are following the pattern accurately, in particular when they mention increases and decreases in the row. These simple steps should help keep the rectangle edges straight and even.
What can I make with a rectangle crochet?
Rectangles in crochet are versatile and can be used to create various projects. Here are some ideas of what you can make using a crochet rectangle:
Scarves: A long, narrow rectangle can be fashioned into a stylish scarf. You can use different stitch patterns, colors, or yarn textures to create unique designs.
Table Runners: Crocheted rectangles can be sewn or joined together to make beautiful table runners. Experiment with various patterns and colors to match different decor styles.
Blankets or Afghans: Join multiple rectangles to form larger panels for blankets or afghans. Mix and match colors or stitch patterns for a personalized touch.
Pillows or Cushion Covers: Sew two rectangles together, stuff them with pillow inserts, and create decorative throw pillows or cushion covers for your home.
Tote Bags: Fold a rectangle in half, stitch the sides together, add handles, and create a simple yet stylish tote bag.
Placemats: Crochet rectangles can be used individually or joined to make placemats. They offer a handmade touch to your dining table.
Wall Hangings: Embellish a crochet rectangle with fringes, tassels, or appliques and hang it as a decorative wall hanging.
Shawls: Larger rectangles can be used as the base for crochet shawls or wraps. Add lace edging or decorative borders for an elegant finish.

These are just a few ideas to inspire you. Rectangles in crochet can be a starting point for various projects, and with creativity and imagination, you can turn them into a wide range of items for both practical use and decoration.
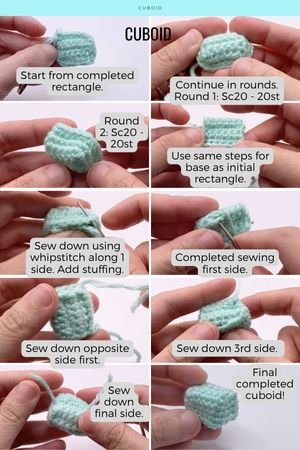
How to crochet a 3d rectangle?
A 3D rectangle would mean a cuboid, with 4 sides being rectangular and longer and the last 2 opposite sides smaller like a square.
We will similarly start off the same way as the rectangle above, then continue into rounds and end off with the same rectangle covering the last side. The pattern is as follows:
Row 1: Chain 7
Row 2: Sc6, ch1 and turn - 4st
Row 3-5: Repeat Row 2 – 4st
Turn and rotate whole piece, sc1 in last st, then place stitch marker here. Continue in rounds now, instead of rows.
Round 1: Sc1 in last st (as mentioned above), sc2 along side, 2sc1 in corner, turn and rotate, sc4 along bottom, 2sc1 in corner, turn and rotate, sc3 along side, turn and rotate, sc6 - 20st
Round 2-3: Sc20 in a round - 20st
Using a separate new piece of yarn, create the same rectangle again:
Row 1: Chain 7
Row 2: Sc6, ch1 and turn - 4st
Row 3-5: Repeat Row 2 – 4st
Add stuffing to the first piece that has 5 sides, then close up the last side with the second rectangular piece by sewing them together using whipstitch. I have used this method to create a couch and a similar more long-winded version to create an ice cream truck.
How do you crochet a rectangle basket?
Creating a crocheted rectangle basket involves making two rectangular panels and then assembling them to form the sides and base of the basket. This is much like the previous example I gave on crocheting the cuboid but with one side exposed to form a basket. Complete the same pattern above but with 5 sides only and work with a much larger rectangle as the base. So instead of starting with a chain of 7, you might want to go up to a chain of 20, depending on how large you want your rectangle basket to be!
Feel free to customize your rectangle basket by adjusting the stitch pattern, size, or adding embellishments to match your preferences or home decor. This basic pattern provides a framework for creating a crocheted rectangle basket that can be adapted and personalized in various ways.

How to use crochet rectangle in amigurumi?
Crocheting rectangles can be a valuable technique in amigurumi to create various components like limbs, bodies, and more. Here's how you can use crochet rectangles in amigurumi:
Body: Larger rectangles can form the base of the amigurumi body. Fold or sew the rectangle to create a tubular shape and stuff it to form the body. You can adjust the length and width to suit the design.
Clothing or Accessories: Rectangles can be used as a starting point for creating clothing or accessories for the amigurumi, such as scarves, skirts, or blankets.
Vehicles: Joining up multiple rectangles into a cuboid shape can be made into small vehicles like an ice cream truck, which is the example I have below here!

Conclusion of how to crochet a rectangle
With a few simple steps, by chaining the desired length, stitching rows or rounds in a preferred pattern, and watching the rectangle take shape. Whether it's the base of a cozy blanket, the foundation of an amigurumi friend, or the starting point for various accessories, mastering the art of crocheting rectangles unlocks a world of possibilities in the realm of crochet.
Free Amigurumi Shaping Starter Guide
Learn how to create a toy for your child with your own hands in 5 simple steps.
Related articles
How do you Crochet Different Shapes in Amigurumi?
14 useful things you need to know about How to Crochet a Circle
8 extraordinary ways on How to Crochet an Oval Pattern
9 Practical Things you need to know about How to Crochet a Cube
10 Helpful Things you need to know about How to Crochet a Square
Mastering Crochet Balls: Step-by-Step Guide for Creating Perfect Spheres