

7 Quick Inspirational Crochet Curly Cue Examples to experiment with
If you have never experimented with curls in crochet then you have come to the right place. Crocheting a curl down a foundation chain is simple and quick but did you know you can add all kinds of variations to make the curls different?
Later in the post, I will also talk about how these different crochet curly cue variations can be incorporated into amigurumi so that they can be more personalized - whether for doll or animal amigurumi!
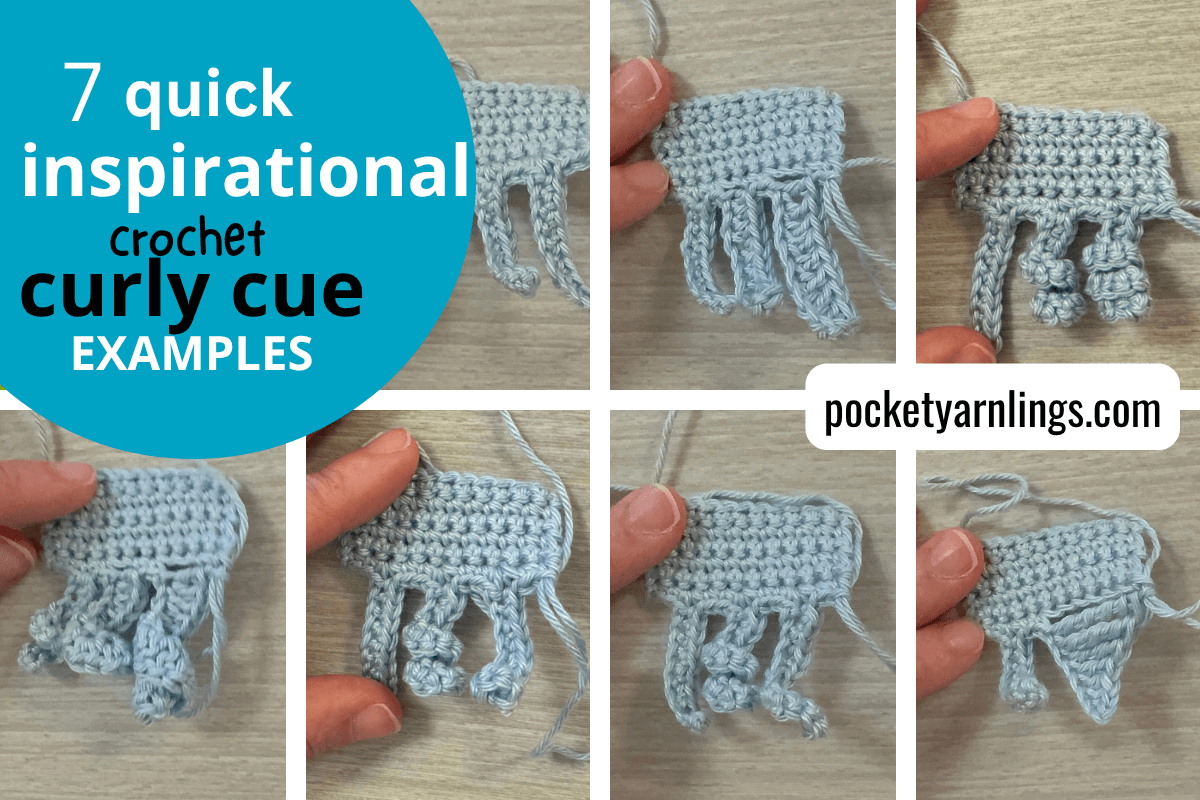
Table of Contents Show
What is a crochet curly cue?
In crochet, a "curly cue" refers to a small, spiral-shaped crochet motif or embellishment. There are many other variations of this term including crochet curlicue or crochet curly q. It is often used as part of a decorative element in various crochet projects, including in amigurumi!
Curly cues are typically made by crocheting a series of stitches in a spiral pattern, along a chain, resulting in a coil-like shape. They are also described as a spiral twist or a corkscrew spiral in crochet projects.

How to make curled crochet?
Here we briefly talk about the steps involved in make a curly cue in crochet or a spiral twist. Then after that, we will move onto the exciting part which is all the different variations you can incorporate into your curly cue! Right at the end, we will have some examples of how they can be used in amigurumi, whether for dolls or for animals.
Start with a Chain: Begin by making a small foundation chain to form the initial base.
Crochet in a Spiral: Work single crochet (or another stitch of your choice) into the chain, increasing the number of stitches in each stitch to create a curly spiral effect.
Finish and Secure: Once the curly cue is the right length and size, fasten off your yarn and weave in any loose ends.
What are some simple crochet curly cue patterns?
This is the part that gets interesting where you can start making different kinds of variations - including chain lengths, stitch heights, stitch counts and a combination of them in various examples. There are 7 different ways I experimented with below but there are definitely endless more to try out. Scroll to the bottom to see them all in action inside a short video showcasing how to do them.
1) Different Crochet Chain Lengths (Ch5, ch10, ch15)
First off, the easiest way would be to change the length of the initial foundation chain, so for the image below, going from left to right, I have written the short patterns on how to achieve them:
Shortest chain - Chain 5, work into 2nd chain from hook, sc4 down, sc1 in same main stitch
Middle chain - Chain 10, work into 2nd chain from hook, sc9 down, sc1 in same main stitch
Longest chain - Chain 15, work into 2nd chain from hook, sc14 down, sc1 in same main stitch

2) Different Crochet Stitch Heights (Sc9, hdc9, dc9)
The next easy variation to try is using different stitch heights or taller stitches. Here I’ve kept the initial chain length constant and varied the heights - from single crochet, to half double crochet, then onto double crochet.
To try even taller stitch heights, check out the last variation below here. By making the stitch heights different, it makes each progressive chain thicker or wider! Also remember to factor in skipping stitches when working back into the main row.
Narrowest chain - Chain 10, work into 2nd chain from hook, sc9 down, sc1 in same main stitch
Middle chain - Chain 10, work into 2nd chain from hook, hdc9 down, skip 1st then sc1 along main row
Widest chain - Chain 10, work into 2nd chain from hook, dc9 down, skip 2st then sc1 along main row

3) Different Crochet Stitch Numbers (Sc1, 2sc1, 3sc1)
So far we have been looking more at flat chains rather than curls so from this point on, we will be looking at curlier chains! The easiest method is to keep the single crochet stitch height and just increase the number of stitches in each chain. My terminology for an increase in the next stitch is 2sc1 or 2 single crochet stitches in the same stitch.
Flat - Chain 10, work into 2nd chain from hook, sc9 down, sc1 in same main stitch
Curly - Chain 10, work into 2nd chain from hook, 2sc9 down, sc1 in same main stitch
Coily - Chain 10, work into 2nd chain from hook, 3sc9 down, sc1 in same main stitch


Master the simple shapes behind every adorable toy — and start creating amigurumi your child will love.
4) Increased Crochet Stitch Number and Different Stitch Heights (2sc1, 2hdc1, 2dc1)
Since we want to maintain the same curliness instead of just flat chains, continue the same concept of crocheting multiple stitches in each chain. Only this time, we will be working taller stitch heights in each chain, which means combining the previous 2 points.
Thinnest coil - Chain 10, work into 2nd chain from hook, 2sc9 down, sc1 in same main stitch
Thick coil - Chain 10, work into 2nd chain from hook, 2hdc9 down, skip 1st then sc1 along main row
Thickest coil - Chain 10, work into 2nd chain from hook, 2dc9 down, skip 2st then sc1 along main row

5) Half Increased Crochet Stitches and Half Single Crochet Stitches (2sc5, sc4)
Here we are working a variation of crocheting a more gradual curl. For reference, I placed the flat thinnest chain on the extreme left and the curliest single crochet curly cue in the middle. The third curl is a combination of both, which includes a curlier bottom part (with 2sc5) and a flatter top part (with sc4).
Flattest - Chain 10, work into 2nd chain from hook, sc9 down, sc1 in same main stitch
Most curly - Chain 10, work into 2nd chain from hook, 2sc9 down, sc1 in same main stitch
Combination - Chain 10, work into 2nd chain from hook, 2sc5, sc4, sc1 in same main stitch

6) Alternate Increased Crochet Stitches and Single Crochet Stitches [(2sc1, sc1) x 4, sc1]
Another variation of the previous example to crochet a gradual curve is to simply alternate single crochet stitches down the chain together with increases. Likewise, for reference, I placed the flat thinnest chain on the extreme left and the curliest single crochet curly cue in the middle. The third curl is a combination of both, which includes alternating sc stitches and increases.
Flattest - Chain 10, work into 2nd chain from hook, sc9 down, sc1 in same main stitch
Most curly - Chain 10, work into 2nd chain from hook, 2sc9 down, sc1 in same main stitch
Combination - Chain 10, work into 2nd chain from hook, (2sc1, sc1) x 4, sc1

7) Increasing Crochet Stitch Heights (Sl st 1, sc1, hdc1, dc1, tr1, dtr1, ttr1)
This last example is an abbreviated version of what I often like to use in my amigurumi. Conceptually, it just involves crocheting a long chain and then progressively working the shortest stitches onto the tallest stitches. In this case, it involves slip stitch 1 stitch, then single crochet 1 stitch, then half double crochet 1, double crochet 1, treble crochet 1, double treble crochet 1 and finally triple treble crochet 1 stitch.
Thinnest - Chain 10, work into 2nd chain from hook, sc9 down, sc1 in same main stitch
Widest base - Chain 9, work into 2nd chain from hook, sl st 1, sc1, hdc1, dc1, tr1, dtr1, ttr1, skip 4st then sc1 along main row

Video for Crocheting Curly Cue Variations
To see all the 7 variations and steps above, check out the video below to get inspiration for your next crochet project. Then after watching, move onto the different ways I make use of these to incorporate into my amigurumi, and have a hand at trying some of them!
What uses for crochet curly cue?
Crochet curly cues are versatile decorations that can enhance a wide range of projects, like garments, pillows, hair accessories, gift wrapping and scrapbooking. Specifically here I am talking about crochet curlicues in the context of amigurumi and how I incorporate them! Here are some ways I have used them in both my doll and animal amigurumis.
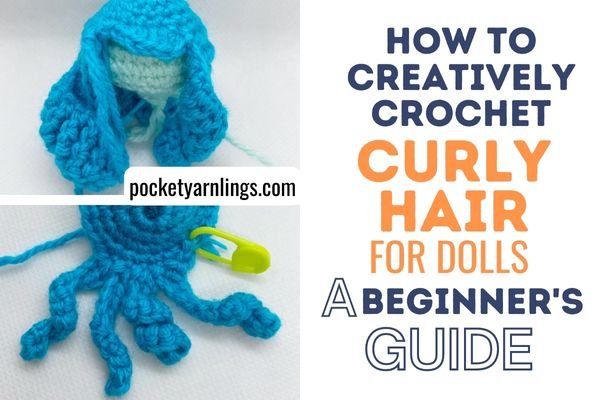
How to crochet curly hair for dolls?
Crocheting curly hair for dolls involves crafting spiral-shaped curls using yarn to simulate natural hair. To achieve this, crochet a chain of stitches, work single crochet stitches into it, and then roll or twist the resulting piece into tight spirals.
Next, attach them onto the doll’s head using a darning needle, securing them in place. There you have it! I have an entire blog post breaking this down, title “How to creatively crochet curly hair for dolls - a Beginner’s Guide”.
How to do easy crochet curly cues in animals?
There are many types of animals that can incorporate curly cues, for example for a horse’s mane and tail. Or to crochet an octopus with tentacles! To create an octopus amigurumi with curly tentacles, start by crocheting the octopus body in rounds until it's the desired size.
For the tentacles, crochet a chain and work single crochet stitches into it, then roll or twist the chain into a spiral curl. The result is a playful and whimsical octopus with charming, curly tentacles that add a unique touch to your amigurumi creation.
To learn how to crochet this octopus amigurumi step by step, check out the free pattern over here, making use of this curly cues method to make the tentacles. Try to change up the tentacles in the pattern using all the 7 variations mentioned above and you would have personalized your own octopus!

Conclusion to Crochet Curly Cues
In conclusion, crochet curly cues are a delightful and versatile embellishment for a variety of projects. Whether you’re adding a playful touch to a hat, scarf, or amigurumi doll, these simple yet charming spirals bring a unique flair to your creations.

If you found this whole blog post useful, remember to pin to Pinterest so that others might find inspiration too! With just a few basic stitches and techniques, you can easily master the art of crochet curly cues and elevate your handmade items to the next level.
To actually put these curly cue suggestions into use by crocheting curly hair, grab the Free Amigurumi Hair Starter Guide below, which showcases such a hair wig cap crochet pattern!
Master the simple shapes behind every adorable toy — and start creating amigurumi your child will love.
Related articles
How do you Crochet Different Shapes in Amigurumi?
14 useful things you need to know about How to Crochet a Circle
8 extraordinary ways on How to Crochet an Oval Pattern
How to Crochet a Tube in 10 different useful styles
Mastering Crochet Balls: Step-by-Step Guide for Creating Perfect Spheres