

How to Crochet a Tube in 10 different useful styles
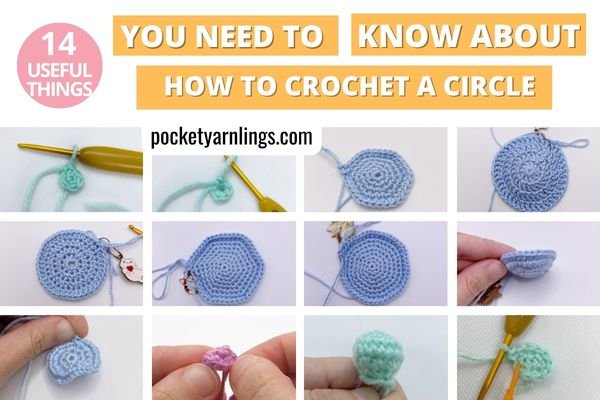
When crocheting amigurumis, they are actually made up of various 3D shapes - of which the most commonly used ones include the sphere and the cylinder. By mixing and matching those two shapes, you could create a lot of different appearances for your amigurumi projects. To learn more about crocheting flat circles and round spheres for a start, remember to check out this blog post on '14 useful things you need to know about How to Crochet a Circle'.
Here I will be talking about crocheting cylinders and tubes and many different way to vary it or experiment with it - closed tubes, hollow tubes, skinny tubes, large tubes and a crochet cord as well. Then at the end, I will briefly talk about different ways to bend crochet tubes without using wires!
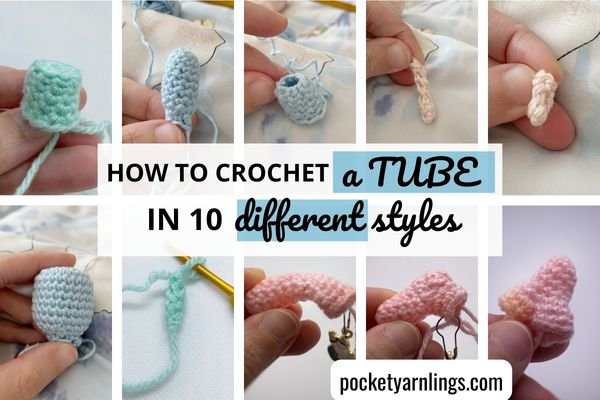
Table of Contents Show
How to crochet a cylinder tube
Just below here I made a deliberate effort to differentiate crocheting a cylinder and tube, the steps are actually mostly the same. Except when crocheting a cylinder, I decided to add a FLO/ BLO demarcation to make it more obvious that it is a cylinder, rather than a tube. Read on to see what I mean.
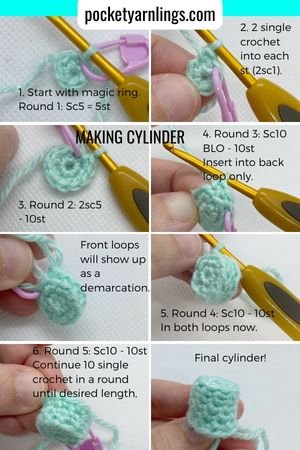
How to crochet a cylinder
Start off crocheting a cylinder with crocheting a flat circle first. Start off with a magic ring and then in step 2, increase the stitches such that 2sc all around in Round 2. You should get a flat circle. To learn all the different ways to crochet a flat circle, check out this comprehensive blog post '14 useful things you need to know about How to Crochet a Circle'.
To create a wider cylinder, make the initial circle larger by working more rounds around it. If you want it narrow, then start off with a smaller circle. I will go more into detail later in this post. Follow the pattern and the steps below:
Round 1: Magic ring sc5 – 5st
Round 2: 2sc5 – 10st
Round 3: Sc10 BLO – 10st
Round 4: Sc10 – 10st
Round 5: Repeat round 4 – 10st
Continue in rounds of 10st until desired length.

Round 3 involves single crochet into the back loop only. This leaves the front loops exposed. See what I mean in the next few steps.
(FLO or front loop only refers to the dotted areas, the loop behind it which is not dotted out is the BLO or back loop only. If you are not sure about this, I have this post all about FLO/ BLO, 'Front Loop and Back Loop in Crochet - the easy way to know everything'.)
After you have done a few single crochet in step 4, only in the back loops, you will start to see the front loops appearing as a border or demarcation.
Continue rounds 4-5 as sc10 all around and further on to rounds 6 and beyond if you want the cylinder longer. You can see the final cylinder I did was quite a bit longer. Essentially keep the same number of loops in the round so that it will progress longitudinally downwards.
When you are ready to start narrowing off and closing up the cylinder then move onto Round 6 stated below. Remember to add the stuffing before closing up.
Round 6: Sc2tog5 BLO - 5st
Close up in FLO using a darning needle, then fasten off.
To see how to close up the cylinder, which is not shown in the video above, check out my updated video over here right below. It is part of my Shape Building Challenge.
How to crochet a closed tube
This is very similar to the steps above except in crocheting a closed tube, you might not want the obvious FLO/BLO border demarcation. So the pattern below is the same as the above with the removal of the front and back loop parts. See how the final appearance is slightly different, more of a tube rather than a cylinder.
Round 1: Magic ring sc5 – 5st
Round 2: 2sc5 – 10st
Round 3: Sc10 – 10st
Round 4: Sc10 – 10st
Round 5-9: Repeat round 4 – 10st
Continue in rounds of 10st until desired length.
Continue rounds 4-5 as sc10 all around and further on to rounds 6 and beyond if you want the cylinder longer. Keep the same number of loops in the round so that it will progress longitudinally downwards.
Round 10: Sc2tog5 - 5st
Close up in FLO using a darning needle, then fasten off.

How do you crochet a hollow tube?
Crocheting a hollow tube is slightly different from the above 2 examples because it would be both sides of the tube are not covered. Instead of starting off with a magic ring like what I did above, start off with crochet chain made into a ring.
How do you join a ring in crochet chain?
Start off with chain 10. Then you join the 2 ends of the chain together with a slip stitch and then continue crocheting down the chain. For example, you could chain 10 stitches and then join end to end with a slip stitch.
If you want a bigger hollow tube, start off with a longer foundation chain, like a chain of 10, then continue crocheting down the chain to continue getting a round of 10. This would make the tube thicker than starting of with a chain of 5.

Round 1: Chain 10, join end to end and sl st
Round 2: Sc10 - 10st
Round 3: Sc10 – 10st
Round 4: Sc10 – 10st
Round 5-6: Repeat round 4 – 10st
Continue in rounds of 10st until desired length.
When you are happy with the length, just fasten and cut off without closing up the end, since you want a hollow tube.

Different sizes of tubes or cylinders
Now that we have gone through some variations of crocheting cylinders or tubes, here is the part when you start to vary the cylinder sizes, either length-wise or width-wise. We will talk about a skinny cylinder then a shorter one and finallly a large one, before moving onto crochet cords.
How do you crochet a skinny cylinder?
Crocheting a skinny cylinder is much like crocheting a thin or narrow cylinder, which is sometimes done for amigurumis with very skinny arms or legs. To vary the pattern above just a little bit, simply add in fewer stitches in a round to get a skinnier cylinder:
Round 1: Magic ring sc3 – 3st
Round 2: Sc3 – 3st
Round 3: Sc3 – 3st
Round 4: Sc3 – 3st
Round 5-6: Repeat round 4 – 3st
Continue in rounds of 3st until desired length.
Close up in FLO using a darning needle, then fasten off.

If you find it tricky to work into small rounds, especially if you are using a lighter yarn weight and a smaller crochet hook, try to flatten the whole cylindrical piece before insert the hook, I find that helps. It is very easy to lose count in a small round, so remember to include in stitch markers.
If you do not know what are stitch markers, then check out this blog post '10 Crochet Stitch Marker Types and their 10 easy Uses in Amigurumi'.
How to crochet a small tube?
Above we discussed about crocheting a skinny tube so now if you want to crochet a small tube, it is even easier - simply crochet fewer rounds in total! So you could make it fat and short or in the example I give just below, make the tube short and skinny. This might sometimes be crocheted separately to be attached on for detailing on an amigurumi.
Round 1: Magic ring sc3 – 3st
Round 2: Sc3 – 3st
Round 3: Sc3 – 3st
Close up in FLO using a darning needle, then fasten off.

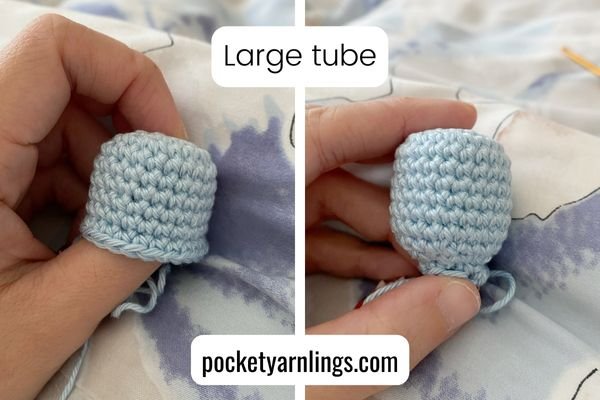
How do you crochet a large tube?
To make the tube larger, start off the initial flat circle as a larger round. For example, after starting off with the magic ring, continue increasing in subsequent rounds to continue getting a flat circle, until you decide to move into a cylinder by keeping the same number of stitches. At the same time, increase the number of rounds to make it longer. See what I mean here:
Round 1: Magic ring sc10 - 10st
Round 2: 2sc10 - 20st
Round 3: (Sc1, 2sc1) x 10 - 30st
Round 4: (Sc2, 2sc1) x 10 - 40st
Round 5: Sc40 - 40st
Round 6: Sc40 - 40st
Round 7-10: Repeat round 6 - 40st
Continue in rounds of 40st until desired length. When you are ready to start narrowing again then decrease the stitches in the round.
Round 11: (Sc2, sc2tog1) x 10 - 30st
Round 12: (Sc1, sc2tog1) x 10 - 20st
Round 13: Sc2tog10 - 10st
Close up in FLO using a darning needle, then fasten off.

with sphere, cylinder & cone patterns — plus exclusive access to the Shape Building Challenge!
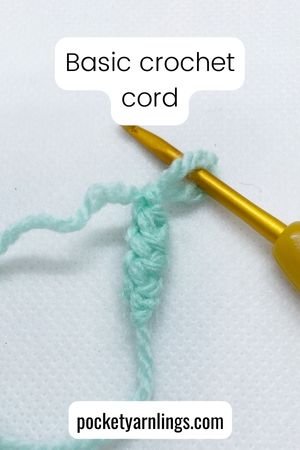
How do you crochet a simple cord?
The reason I decided to add this in is because technically crocheting a simple cord is like crocheting in a very very small round, a round of 2 single crochet stitches. Which is related to crocheting tubes or cylinders so if you were wondering how to possibly crochet the thinnest form of a tube, a basic crochet cord is just that.
1) Start off with a slip knot, then ch2. Then sc1 in 2nd ch from hook.
The outlined part in the picture above shows the FLO (front loop only) of stitch closest to hook. This is where to first insert hook to make the first single crochet.
2) Insert hook into FLO of st closest to hook.
3) Flip cord upwards.
Pictures 2 and 3 are the same but with different view points, just flip the whole cord upwards to get the view in picture 3.
4) Yarn over, draw yarn through 2 loops on hook.
5) You have just completed the first sc in the cord!
6) Insert hook into FLO of st closest to hook and parallel loop just below it, meaning insertion into 2 loops.
After completing the 1st single crochet in the cord, aim the insertion of hook into the outlined part in the picture. That outline actually represents the FLO (front loop only) of the stitch closest to the hook and the parallel loop just below it (= previous round FLO). Flip cord upwards in picture 7 (same step as picture 6 with different view).
7) Flip cord upwards, it is still the same as the previous step 6. Should have 3 loops on hook.
8) Yarn over, draw yarn though only 2 (of 3) loops on hook.
9) Should have only 2 loops left on hook.
Complete 2nd single crochet in cord, now you have 2 layers in the cord!
10) Yarn over and single crochet again.
11) Completed 2nd sc in the cord.
12) Repeat steps 6-11 again to lengthen the cord, until the desired length.
13) Cord of 3 layers completed.
14) Repeat depending on how many time pattern says to continue, usually stated in layers.
Last picture shows a cord of 10 layers.

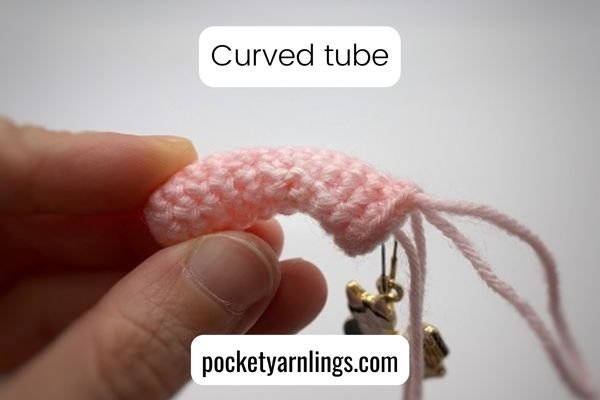
How do you curve a crochet tube?
This is the part that gets a little bit more complicated. How to you take a crocheted cylinder and then bend it or curve it? After all, it is not a plasticine that you can mould. The easiest technique would be to add a wire inside the crocheted tube and you can bend it at any angle. But if you intend to crochet an amigurumi for a child then try avoid adding any wires inside your crochet toys.
In general, I would say that there are 3 ways to curve a crochet tube. I will talk about them as a whole but I will not be going too much into detail the specific step by step techniques. I have made some detailed resources (including pictures and videos), that is included in some of my courses, so just drop a comment below if you are interested to learn more.
The 3 ways include crocheting a gradual bend or a curve, a perpendicular bend at 90 degrees or a very steep bend which is more than 90 degrees. I have about 16 different techniques to achieve this, which is too much material to include in the rest of this blog post.
How to crochet a curve amigurumi?
A curve refers the the tube or cylinder just having a gradual bend. As you can see in the examples below, I have used techniques like changes in stitch count, stitch height, mixture of both, FLO/BLO techniques and cluster stitch to achieve a bent-appearance.
When crocheting amigurumis, the most common reasons to be utilizing a curve would be maybe crocheting a bent limbs like an arm or a leg.
How do you make an amigurumi bend?
The next example is a perpendicular bend at 90 degrees, which can be achieved a few different ways, of which the easiest is to crochet 2 separate cylinders and then sew them together at a 90 degree angle. Other ways to try including crocheting in short rows, long rows, sometimes including a cluster stitch, and even doing a chain and surface crochet technique.
Similarly, these bends are used for amigurumi arms or even head transitions into the neck and neck transitions into bodies for animal amigurumi. You could crochet many separate 3D shape pieces and then sew them all together but by using some of the techniques above. Or you could achieve the same look with just tweaking the crocheting techniques above without sewing!

How to crochet a steep bend in a tube?
Crocheting a steep bend in a tube is not commonly used but branching from a tube into 2 tubes is commonly used and that often results in steep bends in a tube or cylinder. The common ways I achieve this is by chain and surface crocheting or skipping stitches and then surface crocheting.

I have done this for crocheting a main doll amigurumi body and branching it off at the bottom into 2 legs without having to sew. The branches at the bottom are often at a steep angle, hence my reference to steep bends in a tube.
In all, like I mentioned, there are about 16 different ways to do this, which is too much to go through in this blog post, the examples are below:

If you are interested in learning more about this, drop me a comment at the bottom and I will look into it.
Conclusion of crocheting a cylinder
Hope you managed to get the basics of crocheting a cylinder or a tube from this blog post and also have a quick peek at ideas on how one simple cylinder can be shaped in many different ways! I talked about crocheting a cylinder, a tube, a hollow tube, making different sizes, how to crochet a basic crochet cord and finally ways to bend a cylinder.

If you found this article useful, please remember to share it or pin it to Pinterest. Also, to check out the free Amigurumi Shape Builder Cheat Sheets below with a free sphere, cylinder and cone pattern PDF!
with sphere, cylinder & cone patterns — plus exclusive access to the Shape Building Challenge!
What’s Next
🧵 How do you Crochet Different Shapes in Amigurumi? »
See how spheres, cones, and cylinders come together to form every amigurumi.
🟠 Mastering Crochet Balls: Step-by-Step Guide for Creating Perfect Spheres »
Learn how to crochet smooth, consistent spheres — the foundation for heads, bodies, and round amigurumi shapes.
🔺 9 Different Creative Exciting Ways for How to Crochet Cones »
Learn the shaping needed for snouts, hats, spikes, noses, and pointed features.