

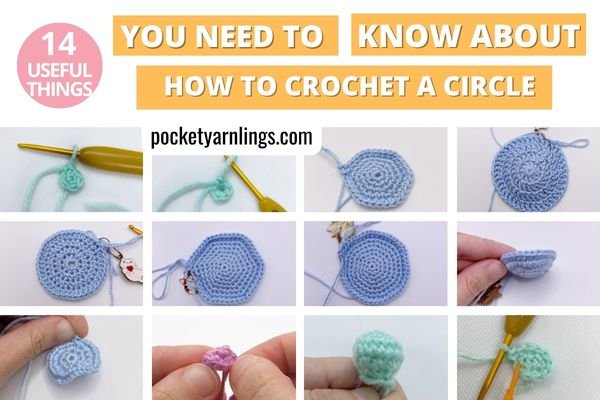
Mastering Crochet Balls: Step-by-Step Guide for Creating Perfect Spheres
Are you looking for a fun and easy way to create your own crochet balls? Look no further! In this post, I will not only be talking about the step-by-step instructions for how to crochet the different parts of the ball, I will also be touching on variations in the crochet pattern to create larger or smaller sized spheres! For each part, I also include suggested short patterns and accompanying pictures so they are easier to visualize!
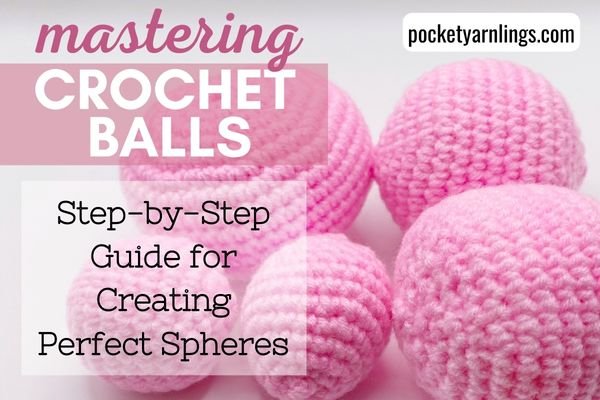
Table of Contents Show
Getting Ready to Crochet a Sphere
Understanding Crochet Terminology
Before starting to crochet a ball, it's important to understand some basic crochet terminology. Here are a few terms you should be familiar with:
Ch = chain
Sc = single crochet
Sl st = slip stitch
St = stitch (refers to number of stitches in one round)
2sc1 = single crochet increase (meaning 2 single crochet in same stitch)
Sc2tog1 = single crochet decrease (referring to invisible decrease)
To check out how to crochet these basic crochet stitches, increases and decreases, click on each individual link to see a detailed post on each topic.
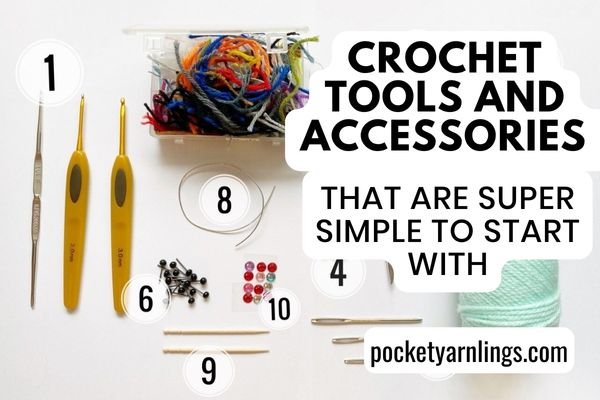
Materials Needed for Crochet Ball
To crochet a ball, you'll need a few basic materials:
Yarn: Choose a yarn that is appropriate for the project you have in mind. A lightweight yarn will be easier to work with when crocheting a small ball, while a heavier yarn will be more durable for a larger ball.
Crochet Hook: The size of your hook will depend on the weight of your yarn. Choose a hook that is appropriate for the yarn you've chosen.
Polyester Fibrefill: This will be used to stuff your ball and give it shape.
Darning Needle: Alternatively called a tapestry needle used to close up the sphere right at the end.
Stitch Markers: Useful to keep track of the beginning of each round as you are working up the sphere.
Scissors: To be used right at the end when you are finishing up the sphere and fastening off.
Choosing the Right Yarn and Hook
When choosing your yarn and hook, it's important to keep in mind the size of the ball you want to create. A smaller ball will require a lighter weight yarn and a smaller hook, while a larger ball will require a heavier weight yarn and a larger hook.
It's also important to choose a yarn that is appropriate for the intended use of your ball. If you're making a ball for a child's toy, choose a yarn that is soft and machine washable. If you're making a decorative ball, you may want to choose a yarn with a bit of sparkle or texture.
By understanding basic crochet terminology, gathering the necessary materials, and choosing the right yarn and hook, you'll be well on your way to crocheting a beautiful sphere.
How to Crochet a Ball Step by Step?
For this section, I have incorporated the basic components of each step involved in actually making the sphere and also subsections on how you can change up the sphere like making it larger and smaller by altering the crochet pattern. There are 6 steps in all, and each step has a few points to it.
Step 1) How do you crochet a round circle?
This part involves starting off with just a basic 2D flat circle first, by using a magic ring and then alternative suggestions with not using a magic ring. Then I talk about how most crocheters start off with a magic ring of 6 single crochet stitches, but you can change that up to be bigger and smaller.
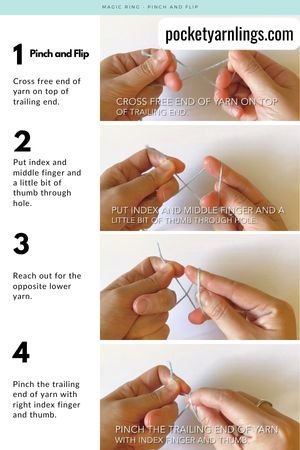
How do you crochet a circle with a magic ring?
The magic ring is a technique that allows you to start crocheting in a circle without leaving a hole in the centre. It is a useful technique for projects like amigurumi or a sphere, where you need to start with a small circle. Here's how to crochet a circle with a magic ring:
1) Cross the free end of yarn on top of trailing end.
2) Put index and middle finger and a little bit of thumb through hole.
3) Reach out for the opposite lower yarn.
4) Pinch the trailing end of yarn with right index finger and thumb.
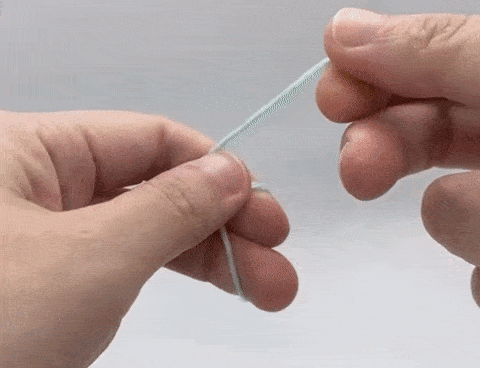
5) Pull pinched part through hole.
6) Flip free end and trailing ends of yarn on left hand between index and middle fingers.
7) Pinch down small loop on right hand between index finger and thumb, so the position doesn't move.

8) Transfer pinched loop to left hand so right hand is free to insert hook.
9) Yarn over and pull through loop on hook to form chain 1.


To learn more about different ways to tackle a magic ring, check out this comprehensive article “24 Easy Peasy things you need to know about Magic Ring in Crochet”.
Can I crochet a round circle without a magic ring?
Yes, you can crochet a round circle without a magic ring. Here's how:
1) Make a slip knot and chain two.
2) Make six single crochet stitches into the second chain from the hook.
3) Do not join the round with a slip stitch. Instead, continue crocheting in a spiral, working one single crochet stitch into each stitch from the previous round.
4) Mark the first stitch of each round with a stitch marker to keep track of your progress.
To learn more about using this technique, do check out this article on “14 useful things you need to know about How to Crochet a Circle”.
Is a magic circle always 6?
Most crocheters will start off a sphere with a magic circle containing 6 single crochet stitches because it leads to the easiest and most ‘perfect’ sphere. As different variations of crocheting a sphere, I decided to experiment with increasing and decreasing the number of stitches in the first round. By following the same general pattern (more on that below), I made a sphere that starts with a magic ring of sc8 and one that starts with a magic ring of sc4.


With the magic ring sc8 example, I followed the exact same pattern as for magic ring sc6 example, except for the changes in the first round and the corresponding proportionate increases and decreases in making the sphere (more on that in the next point). While for the magic ring sc4, I also used the same pattern but reduced the total number of rounds because if I didn’t adjust it, the final sphere will look more like an egg!
So you see, you could also create larger and smaller spheres with other magic circles other than that of 6 stitches, try experimenting with other sizes to see what sizes and shapes you get!
Step 2) How to Increase in crochet in a round?
The next part after completing the initial circle is expanding that flat circle outwards by increasing all around the round. It is relatively simple to just learn how to crochet in a round, but I address some additional shaping points like how you know how much to increase, what does increasing do, how come it turns up looking like a hexagon instead of a circle and lastly, how to know how many rounds to increase.
To increases stitches in crochet, simply single crochet regularly in one stitch and then repeat another single crochet back into the same stitch. There you have it, a single crochet increase, or 2 single crochet stitches in the same stitch, that's it!

How do you know how much to increase in crochet?
Increase when crocheting in a round here refers to evenly spaced increases and there is a specific mathematical pattern for the increases in each round. With this same mathematical pattern, you can apply this, regardless of the magic circle you started off in the previous step. Here I will start off the example of magic ring sc6 and then right below that, magic ring sc8 as well – just to show you that we are using the same formula.
Base Sphere Crochet Pattern – Version 1 with magic ring sc6
Round 1: Magic ring sc6 - 6st
Round 2: 2sc6 – 12st
Round 3: (Sc1, 2sc1) x 6 – 18st
Round 4: (Sc2, 2sc1) x 6 – 24st
Round 5: (Sc3, 2sc1) x 6 – 30st
Round 6: (Sc4, 2sc1) x 6 – 36st
As you can see here, from the initial magic ring, the 2nd round involves increases all around, 3rd round involves alternate increases, 4th round increases every 2 stitches, 5th round increases every 3 stitches and 6th round increases every 4 stitches and so on, you get the idea.

Larger Sphere Crochet Pattern – Version 2 with magic ring sc8
Round 1: Magic ring sc8 - 8st
Round 2: 2sc8 – 16st
Round 3: (Sc1, 2sc1) x 8 – 24st
Round 4: (Sc2, 2sc1) x 8 – 32st
Round 5: (Sc3, 2sc1) x 8 – 40st
Round 6: (Sc4, 2sc1) x 8 – 48st
As you can see with this short example, the sphere roughly follows the same mathematical pattern as the one above but with changes in the numbers from 6 to 8, consequently resulting in the stitch count of each round being higher and the sphere becoming larger.
What does increasing in crochet in a round do?
As you can see from the examples above, increasing in crochet results in a simple initial magic ring expanding into a flat 2D circle. Depending on how large you want the circle to be, continue the increases in the pattern above (into Rounds 7 and beyond) until you reach the desired circle size.
Why does my crochet circle look like a hexagon?
First off, I will take the base sphere crochet pattern mentioned above (version 1 with magic ring sc6) and try to come up with a visual representation right below the pattern.
Base Sphere Crochet Pattern – Version 1 with magic ring sc6
Round 1: Magic ring sc6 - 6st
Round 2: 2sc6 – 12st
Round 3: (Sc1, 2sc1) x 6 – 18st
Round 4: (Sc2, 2sc1) x 6 – 24st
Round 5: (Sc3, 2sc1) x 6 – 30st
Round 6: (Sc4, 2sc1) x 6 – 36st
If you can decipher it right below:
Round 1= 1,1,1,1,1,1 (single crochet in each stitch throughout)
Round 2= 2,2,2,2,2,2 (double in each stitch around)
Round 3= (1,2), (1,2), (1,2), (1,2), (1,2), (1,2) (alternate increases)
Round 4= (1,1,2), (1,1,2), (1,1,2), (1,1,2), (1,1,2), (1,1,2)
Round 5= (1,1,1,2), (1,1,1,2), (1,1,1,2), (1,1,1,2), (1,1,1,2), (1,1,1,2)
Round 6= (1,1,1,1,2), (1,1,1,1,2), (1,1,1,1,2), (1,1,1,1,2), (1,1,1,1,2), (1,1,1,1,2)
To be honest, by this Round 6, it might not be obvious that the circle looks more like a hexagon, so for the images shown below, I have gone beyond 6 rounds to show you how the hexagon appears.


Now to transform the hexagon more into a nice round circle, make the increases in the round staggered, instead of being stacked on top of each other – that is the part that makes the circle angular or more like a hexagon. So, the increases do not exactly follow the same mathematical formula stated previously.
To make the changes from a hexagon to a round circle, I specifically underlined Rounds 4, 6 or the even-numbered rounds and then get ready to make special changes to those rounds. Keep Rounds 1-2 the same as it was previously.
Those changes are suggested below:
For Round 4, shift from (1, 1, 2) to (1, 2, 1) in repeats for rest of round.
For Round 6, shift from (1, 1, 1, 1, 2) to (1, 1, 2, 1, 1) in repeats for rest of round.
For Round 8, shift from (1, 1, 1, 1, 1, 1, 2) to (1, 1, 1, 2, 1, 1, 1) in repeats for rest of round.
So to make your hexagons look like circles again:
1) Keep the odd-numbered rounds the same as before.
2) For the even-numbered rounds, shift the stitch increase to the middle of the pattern repeat for that round.
The new pattern repeat suggestion would visually look like the following:
Round 1= 1,1,1,1,1,1
Round 2= 2,2,2,2,2,2
Round 3= (1,2), (1,2), (1,2), (1,2), (1,2), (1,2)
Round 4= (1,2,1), (1,2,1), (1,2,1), (1,2,1), (1,2,1), (1,2,1)
Round 5= (1,1,1,2), (1,1,1,2), (1,1,1,2), (1,1,1,2), (1,1,1,2), (1,1,1,2)
Round 6= (1,1,2,1,1), (1,1,2,1,1), (1,1,2,1,1), (1,1,2,1,1), (1,1,2,1,1), (1,1,2,1,1)
Or in pattern form, it would be the following:
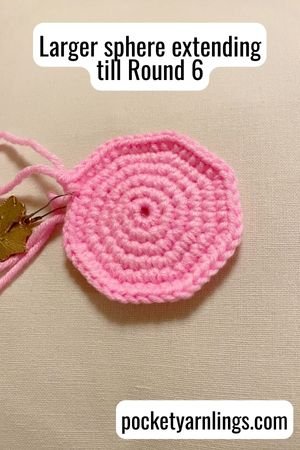
Rounder Sphere Crochet Pattern – Version 3 with magic ring sc6
Round 1: Magic ring sc6 - 6st
Round 2: 2 sc6 - 12st
Round 3: (Sc1, 2sc1) x 6 - 18st
Round 4: (Sc1, 2sc1, sc1) x 6 - 24st
Round 5: (Sc3, 2sc1) x 6 - 30st
Round 6: (Sc2, 2sc1, sc2) x 6 - 36st

How do you know how many rounds to increase in crochet?
This finally boils down to how large you want your sphere to be (I will discuss more below on various ways to make your sphere large). If you want your sphere to be larger, then add in more rounds to increase in crochet. For instance, for the above crochet pattern examples, I had only worked until Round 6.
You can continue to work into Rounds 8 or even up to Round 10 using firstly the same general mathematical formula for the increases and secondly remember to stagger the increases for the even-numbered rounds. So it will look something like this:
Round 7: (Sc5, 2sc1) x 6 - 42st
Round 8: (Sc3, 2sc1, sc3) x 6 – 48st
Round 9: (Sc7, 2sc1) x 6 – 54st
Round 10: (Sc4, 2sc1, sc4) x 6 – 60st
In contrast, if you would like to crochet a smaller sphere, you could just stop earlier than Round 6, like the small sphere example below, I simply stopped at Round 4 to create a smaller sphere:
Smaller Sphere Crochet Pattern – Version 4 with magic ring sc6 and only 4 rounds
Round 1: Magic ring sc6 - 6st
Round 2: 2sc6 - 12st
Round 3: (Sc1, 2sc1) x 6 - 18st
Round 4: (Sc1, 2sc1, sc1) x 6 - 24st
See what happens below when I continued to go beyond Round 4 - the sphere ends up looking more like a egg!
To learn all about increases in crochet, remember to check out this comprehensive article “15 different detailed Ways on How to Increase in Crochet”. If you find this blog post useful and want to reference back again later, remember to pin to Pinterest!

Step 3) How to turn a crochet circle into a sphere?
The middle part of crocheting a sphere simply involves taking that initial flat 2D circle and transforming it into a 3D format. This can be done simply by performing single crochet in the round, without any increases or decreases and at the same time, figure out how many continuous rounds to work in.
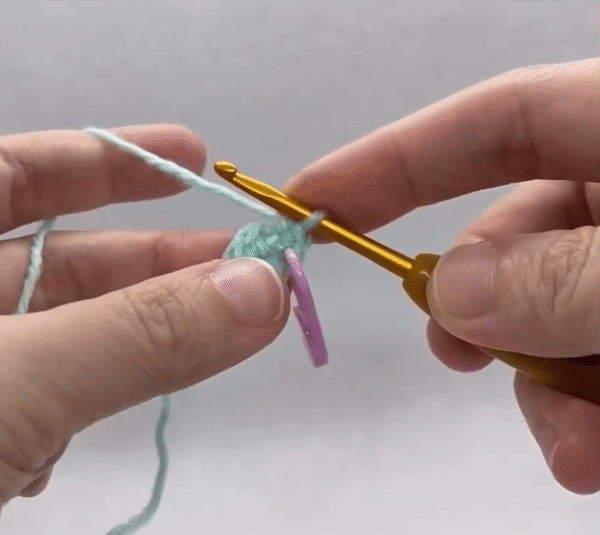
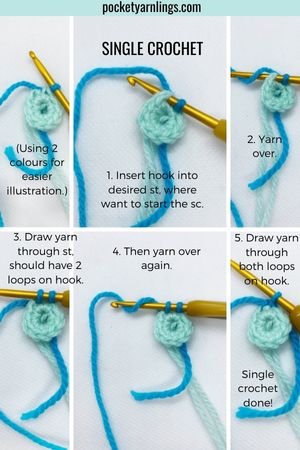
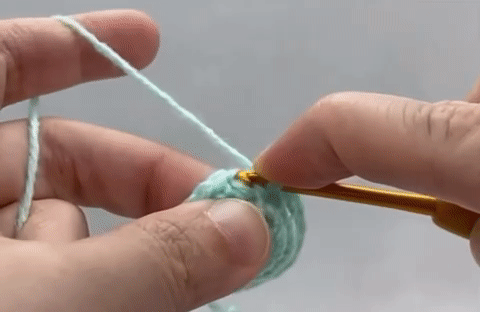
How to perform a single crochet in a round?
To turn a crochet circle into a sphere, you will need to start working in rounds. To do this, you will need to know how to perform a single crochet in a round.
First, I'll go through the steps involved in creating the single crochet stitch first. The steps are as follows:
1) Insert hook into desired stitch, where want to start the single crochet.
2) Yarn over.
3) Draw yarn through stitch, you should get 2 loops on the hook.
4) Then yarn over again.
5) Draw yarn through both loops on the hook.
You should end up with just one loop on the hook.
Now let's apply these same 5 steps to a round.
After you have finished single crocheting inside the initial magic ring in the first round, and then subsequently worked up the increases in step 2, then the third step involves single crocheting in a circle using the suggested steps above. This should be even simpler than the overall step 2 above.
How many continuous rounds to work in crochet?
There is no hard and fast rule how to do this but the general crocheting consensus is to count the number of rounds completed above (before reaching step 3) with the addition of 1 to get the number of continuous rounds to work in crochet. For example, for the Rounder Sphere Crochet pattern mentioned above, I worked until Round 6, so the number of continuous rounds to work would be (6+1) = 7 rounds in total.
The continuation of the pattern will look like this:
Rounder Sphere Crochet Pattern – Version 3 with magic ring sc6
Round 1: Magic ring sc6 - 6st
Round 2: 2 sc6 - 12st
Round 3: (Sc1, 2sc1) x 6 - 18st
Round 4: (Sc1, 2sc1, sc1) x 6 - 24st
Round 5: (Sc3, 2sc1) x 6 - 30st
Round 6: (Sc2, 2sc1, sc2) x 6 - 36st
Rounds 7-13 (7 rounds): Sc36 – 36st

So, you see I have just continued single crochet all around for Rounds 7 to 13, which is a total of 7 rounds as mentioned above. Although it might be worth experimenting to try out a variety of perhaps 6 rounds or 8 rounds as it might not be obvious variations in the final sphere – just not too many rounds or it will end up looking more like a cylinder!
Step 4) How do you crochet a decrease in a sphere?
After finishing up the middle part of extending the flat circle into a more 3D shape, then start to crochet a decrease in the sphere by decreasing all around. Here I briefly talk about decreases and using invisible decrease to minimize the gaps in the sphere, which are the basic steps. Then I talk a bit more about shaping like how to know how much to decrease, what does decreasing do and how to know how many rounds to decrease.
Steps involved in doing a single crochet decrease
1. Insert hook into desired stitch, where want to start the single crochet decrease.
2. Yarn over.
3. Draw yarn through stitch, you should get 2 loops on the hook.
4. Insert hook into next stitch, then yarn over again.
5. Draw yarn through stitch to get 3 loops on the hook.
6. Finally, yarn over for the last time, and pull yarn through all 3 loops on the hook to get back 1 loop on the hook only.
You have just taken away 1 stitch from your crochet project! From the initial 2 stitches, you have brought it down to just 1 stitch and hence the decrease.

Steps involved in doing a single crochet invisible decrease
1. Insert hook into front loop only of the desired stitch.
2. Tilt the crochet hook slightly anti-clockwise and again insert hook into front loop only of the next stitch.
3. Yarn over and draw yarn through the 2 front loops, should have 2 loops on hook.
4. Yarn over for a final time.
5. Draw yarn through the last 2 loops on the hook, to complete the single crochet decrease.

I generally prefer using the invisible decrease method because the gaps in between the stitches are a lot smaller and the stuffing shows through less, for both crocheting this sphere and making amigurumi in general. The examples above are all meant to be done in a round for the purposes of continuing this sphere.
To learn all about decreases in crochet, remember to check out this comprehensive article “15 different detailed Ways on How to Decrease in Crochet”.

How do you know how much to decrease in crochet?
Likewise, for what was mentioned earlier for the increases in crocheting in a round, the decreases follow the same specific mathematical pattern but this time in the reverse order from the increases. We will be continuing from Round 13 (with sc all around) and then moving onto the decreases.
Here I will first talk about the base sphere version first because the mathematical pattern is easier to follow and then I will include in the rounder version to minimize creating a hexagonal appearance when decreasing the rounds.
Base Sphere Crochet Pattern – Version 1 with magic ring sc6
Round 1: Magic ring sc6 - 6st
Round 2: 2sc6 – 12st
Round 3: (Sc1, 2sc1) x 6 – 18st
Round 4: (Sc2, 2sc1) x 6 – 24st
Round 5: (Sc3, 2sc1) x 6 – 30st
Round 6: (Sc4, 2sc1) x 6 – 36st
Rounds 7-13 (7 rounds): Sc36 – 36st
Round 14: (Sc4, sc2tog1) x 6 – 30st
Round 15: (Sc3, sc2tog1) x 6 – 24st
Round 16: (Sc2, sc2tog1) x 6 – 18st
Round 17: (Sc1, sc2tog1) x 6 – 12st
Round 18: Sc2tog6 – 6st
As you can see here, from the Round 13, the 14th round involves decreases every 4 stitches, 15th round decreases every 3 stitches, 16th rounds every 2 stitches, 17th round every alternate stitch, down to last 18th round where it is decreases all around. As you can see, the order of the decreases is the reverse of the order of the increases right at the start.
In the pictures below here, the base sphere which is more ‘hexagonal’ is on the left, which is more evident in the top view, while the sphere on the right is the one with the staggered increases and hence the ‘rounder’ sphere.


Now to make the sphere neater and less hexagonal, we will adopt the same method that was used for the staggered increases previously but now with staggered decreases. Similarly, in the even-numbered rounds, to shift the decrease to the centre of the brackets.
Rounder Sphere Crochet Pattern – Version 3 with magic ring sc6
Round 1: Magic ring sc6 - 6st
Round 2: 2sc6 - 12st
Round 3: (Sc1, 2sc1) x 6 - 18st
Round 4: (Sc1, 2sc1, sc1) x 6 - 24st
Round 5: (Sc3, 2sc1) x 6 - 30st
Round 6: (Sc2, 2sc1, sc2) x 6 - 36st
Rounds 7-13 (7 rounds): Sc36 – 36st
Round 14: (Sc2, sc2tog1, sc2) x 6 – 30st
Round 15: (Sc3, sc2tog1) x 6 – 24st
Round 16: (Sc1, sc2tog1, sc1) x 6 – 18st
Round 17: (Sc1, sc2tog1) x 6 – 12st
Round 18: Sc2tog6 – 6st
That is essentially really the pattern, but I will be talking more about shaping and ending off later with stuffing and closing up the sphere.

What does decreasing in crochet do?
While increasing as mentioned above results in expansion of a circle, on the flip side, decreasing in crochet causes contraction or narrowing of the circle. This helps progress the circle from a flat 2D appearance to a 3D spherical appearance and to eventually close up.
How do you know how many rounds to decrease in crochet?
This is an easier question that knowing how many rounds to increase as mentioned earlier. As you have already predetermined the number of increases above, just follow along for the equivalent number of rounds for the decreases in crochet – after all you do want a perfect sphere. In the above example, because you started increasing from Rounds 2-6 (5 rounds), then correspondingly, you should decrease for 5 rounds aka Rounds 15 to 18.
If you decided to go along for a larger sphere and increase till Round 10 (meaning increase for 9 rounds), then you would have to decrease for 9 rounds as well. On the other hand, a smaller sphere with only Rounds 2-4 for increases, the reverse decrease should span 3 rounds as well.
To learn all about decreases in crochet, remember to check out this comprehensive article “15 different detailed Ways on How to Decrease in Crochet”.
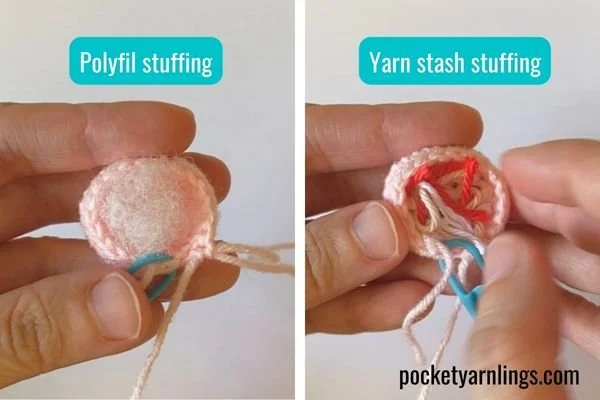
Step 5) How to add stuffing to a crochet ball?
The last 2 steps are steps often used in making amigurumi and not often done for flat crochet projects. This involves adding stuffing to the crochet ball before moving onto the last step.
Before you start closing your crochet sphere, you need to add stuffing. Here's how to do it:
1) Take a small amount of stuffing and roll it into a ball.
2) Insert the ball into the opening of your crochet sphere.
3) Continue adding stuffing until your sphere is full, but not too firm.
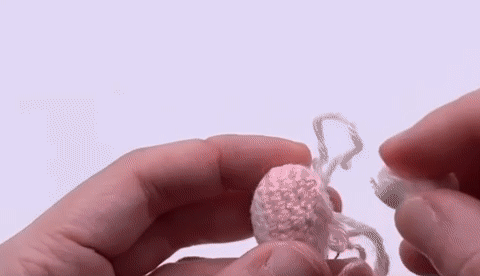
Step 6) How do you close a crochet sphere?
The last step involves closing a crochet sphere, which some crocheters choose to do when they decrease the sphere to the smallest round or sometimes even before that. Once you've added your stuffing, it's time to close your crochet sphere. Here's how to do it:
1) Cut your yarn, leaving a long tail.
2) Thread the tail onto a darning needle.
3) Insert the needle into the front loop only (FLO) of the next stitch in the round.
4) Continue in this way, working your way around the sphere into each FLO, inwards from the outside.
5) When you reach back to the beginning of the round, pull the yarn tight.
6) Insert the needle into the centre of the sphere and pull the yarn through.
7) Cut the excess yarn, flatten out the closed up base – it has been closed off!
Congratulations! You've closed your crochet sphere and finished it!


with sphere, cylinder & cone patterns — plus exclusive access to the Shape Building Challenge!
Variations of Crochet Ball Pattern
Now that you have achieved one basic sphere, let us talk about ways to create variations of crochet sphere. Here I will not be talking about changes in colours like stripes or spots and I will also not be talking about other types of shapes. Instead I will be talking about only a spherical shape but how to change up the sizes.
How can I crochet a giant sphere?
Crocheting a giant sphere can be a fun and exciting project for those who are looking for a challenge or looking for a plushie! There are a few ways to crochet a giant sphere, it could take changing your equipment or even changing up your crochet pattern. Here I will go through some ideas.
Changing crochet tools
Use a larger hook: A larger hook will help you create larger stitches, which will result in a larger sphere.
Use thicker yarn: Thicker yarn or heavier weight yarn will also help you create a larger sphere, like using bulky yarn for example.
Changing crochet pattern
Start off with a larger round: By starting off with a larger magic circle, you can create a wider or larger sphere, like with a magic ring of sc8 rather than sc6. See the example below:
Larger Sphere Crochet Pattern – Version 2 with magic ring sc8
Round 1: Magic ring sc8 - 8st
Round 2: 2sc8 – 16st
Round 3: (Sc1, 2sc1) x 8 – 24st
Round 4: (Sc2, 2sc1) x 8 – 32st
Round 5: (Sc3, 2sc1) x 8 – 40st
Round 6: (Sc4, 2sc1) x 8 – 48st
Rounds 7-13: Sc48 – 48st
Round 14: (Sc4, sc2tog1) x 8 – 40st
Round 15: (Sc3, sc2tog1) x 8 – 32st
Round 16: (Sc2, sc2tog1) x 8 – 24st
Round 17: (Sc1, sc2tog1) x 8 – 16st
Round 18: Sc2tog8 – 8st
More rounds of increases (and decreases): By incorporating more rounds of increases, you can make the sphere ‘taller’ or larger. So instead of doing just increases in Rounds 2-6, you could continue increasing till Round 8 or 10 like I mentioned above. I will give an example pattern and picture for the smaller sphere later on, which is the same concept.
How do you crochet a small sphere?
Crocheting a small sphere is a great way to practice your crochet skills and create cute decorations. To make a small sphere, you could similarly either change your crochet tools or the crochet pattern you are working on.
Changing crochet tools
Use a smaller hook: A smaller hook will help you create smaller stitches, which will result in a smaller sphere.
Use thinner yarn: Thinner or light weight yarn will also help you create a smaller sphere. Imagine using lace yarn versus worsted yarn to crochet the same pattern sphere.
Changing crochet pattern
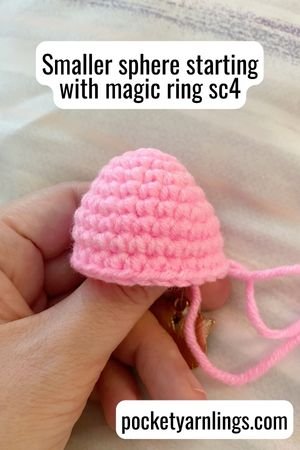
Start off with a smaller round: By starting off with a smaller magic circle, you can create a narrower or smaller sphere, like with a magic ring of sc4 rather than sc6. See the example below:
Smaller Sphere Crochet Pattern – Version 4 with magic ring sc4
Round 1: Magic ring sc4 - 4st
Round 2: 2sc4 – 8st
Round 3: (Sc1, 2sc1) x 4 – 12st
Round 4: (Sc2, 2sc1) x 4 – 16st
Round 5: (Sc3, 2sc1) x 4 – 20st
Round 6: (Sc4, 2sc1) x 4 – 24st
Rounds 7-9: Sc24 – 24st
Round 10: (Sc4, sc2tog1) x 4 – 20st
Round 11: (Sc3, sc2tog1) x 4 – 16st
Round 12: (Sc2, sc2tog1) x 4 – 12st
Round 13: (Sc1, sc2tog1) x 4 – 8st
Round 14: Sc2tog4 – 4st
For this example above, I actually had to reduce the number of rounds with increases as compared to the base version starting with magic ring sc6. If I did not, the sphere will end up looking more like an egg!
Less rounds of increases (and decreases): By incorporating less rounds of increases, you can make the sphere 'shorter’ or smaller. So instead of doing just increases in Rounds 2-6, you could continue increasing till Round 4 only. See the pattern example below.
Smaller Sphere Crochet Pattern – Version 5 with magic ring sc6 and fewer rounds
Round 1: Magic ring sc6 - 6st
Round 2: 2sc6 - 12st
Round 3: (Sc1, 2sc1) x 6 - 18st
Round 4: (Sc1, 2sc1, sc1) x 6 - 24st
Rounds 5-9 (5 rounds): Sc24 – 24st
Round 10: (Sc1, sc2tog1, sc1) x 6 – 18st
Round 11: (Sc1, sc2tog1) x 6 – 12st
Round 13: Sc2tog6 – 6st

I found that using this method actually results in a nicer, more perfect sphere as compared to reducing the initial magic ring. If the sphere starts off with a magic ring that is too small a number, you might have a pointy start to your sphere, making it look more like an egg rather than a sphere!
If you find this blog post useful and want to reference back again later or for others to check out as well, remember to pin to Pinterest!
Conclusion of Crocheting a Sphere or Ball
Congratulations, you have successfully completed crocheting a sphere or ball! With a little bit of practice, you can create a variety of sizes and colors to suit your needs. Here are some key takeaways to keep in mind:
Always start with a magic ring or adjustable ring to create a seamless start to your sphere.
Increase the round to expand the circle and then decrease the round to transform it from a 2D shape to a 3D shape.
Stuff your sphere firmly, but not too tightly, to ensure it retains its shape and structure.
Experiment with different stitch patterns to create unique spheres that reflect your personal style.
With a little bit of patience and practice, you can create beautiful and functional objects that you can be proud of. So grab your hook and yarn, and keep on crocheting!
with sphere, cylinder & cone patterns — plus exclusive access to the Shape Building Challenge!
What’s Next
🧵 How do you Crochet Different Shapes in Amigurumi? »
See how spheres, cones, and cylinders come together to form every amigurumi.
🟦 How to Crochet a Tube in 10 different useful styles »
Master cylindrical shapes used for arms, legs, bodies, antennae, and more.
🔺 9 Different Creative Exciting Ways for How to Crochet Cones »
Learn the shaping needed for snouts, hats, spikes, noses, and pointed features.