

How to Shrink Amigurumi
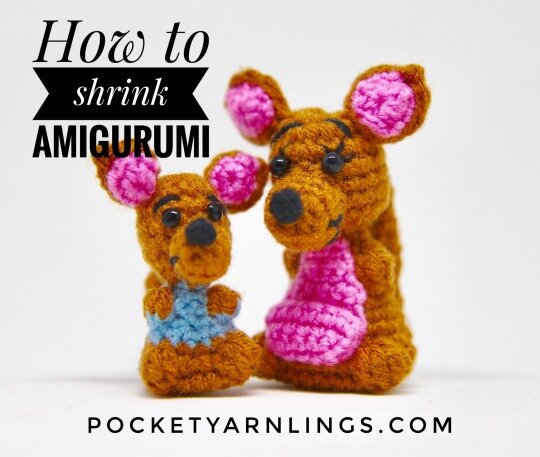
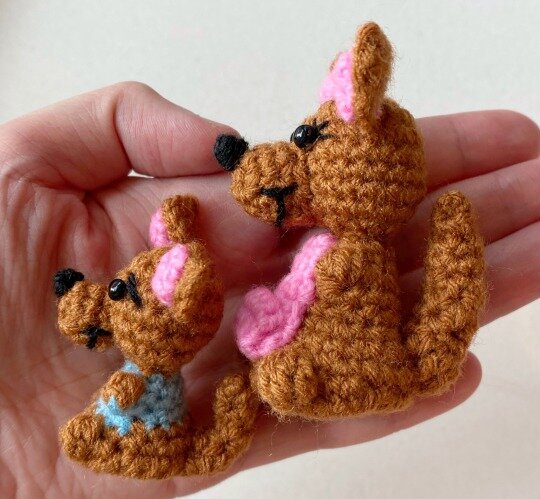
Have you ever seen a great pattern and go… wow that’s awesome but I would really love make a tinier version of it? Over here, I made a version of Kanga, used the pattern and shrank it down to make Roo.
This round, I’ll talk all about making your Amigurumi shrink using both methods of shrinking down your equipment as well as shrinking down your techniques.
Now this is relatively easy because it does not involve tinkering with the pattern itself, just with the equipment you choose to start with.
Shrink equipment down
1) Reduce yarn size
You can switch from a bulkier yarn to a thinner one, for example from a worsted yarn to a sport yarn. Remember you have to switch the hook correspondingly as well.
2) Reduce hook size
When you choose a thinner yarn, the crochet hook size has to go down as well. In the example above, if you switch from a worsted yarn to a sport one, the crochet hook should go down from 4.5mm to 3.5mm. To see more about sizing, check this out.
3) Reduce the size of the eyes too
Don’t forget this part, cos you will be reducing the size of the attachments as well. Since you will be shrinking down the size of the head, the safety or glass eyes should go down in size too!

These methods involve tapering with the original pattern. If you need a reference for each specific technique, you can check out the Kanga and Roo combination patterns for ideas.
Shrink techniques down
1) Reduce size of rounds
Since amis are mostly started with a magic ring and continues in rounds, then suffice to say, you can adjust the size of each round.
Reduce the starting round
For instance, if you usually start with a magic ring of 10 and would like to reduce down to half, then start with a magic ring of 5. Somewhere in between if you don’t want such a big shrinkage.
Reduce the biggest round in the ami
Or aka the widest part of the body, you can reduce the size of that round as well. In the case of Kanga and Roo, the widest part of the body is at the base - for Kanga she ends off with a magic ring of 30 while for Roo it’s a magic ring of 20.
Reduce rounds for main body and attachments
This goes for not only the main body of the ami but its attachments as well, example in Kanga and Roo, the snouts and tails too, the nostrils as well!
It’s also important to try to keep the rounds proportionate, so that when you reduce the largest round, the smaller ones are reduced correspondingly. This way, you can keep the general shape formation the same.
2) Reduce number of rounds
For this particular method, if you reduce the total number of rounds in the ami, the overall height at the end will become shorter. As you can see for Kanga and Roo:

There are 2 methods to this:
Reduce number of repeat rounds of same size
Often in either the head or the body of the ami, you would insert multiple repeat rounds of the same size to make a column (or a cylinder). By cutting down the number of these rounds, you would get a shorter or stouter column.
Reduce the increments and decrements of each subsequent round
Usually, to make the final desired outline of the ami, increases and decreases in the rounds are used to make the ami wider or narrower. Of course to keep the general shape, this would still proceed as usual but this time, consider adding less increments or decrements instead.
3) Reduce the crochet techniques
This method really depends on the pattern you are using initially. As I mentioned previously about single crochet, half double and double crochet, they will create varying heights in the ami.
So simply for this method, reduce the height of each single stitch by reducing the crochet technique, e.g. from dc to hdc, or from hdc to sc. If done for all the stitches, it will reduce the overall height of the ami.
But note that this method may alter the appearance of the whole pattern if not done well.
I would say this is more relevant for the next point.

4) Reduce size of bobble stitches
Point 3 about reducing the crochet techniques would probably be easiest to use in the case of bobble stitches.
Just so you know, I love making bobble stitches for my ami limbs. Mostly because I don’t have to sew them on separately and it still forms a nice little protrusion which obviously looks like the limbs.
So reducing the bobble stitches would just be a matter of reducing the crochet techniques (like in point 3). Example, you can reduce a treble crochet bobble (4tc) to a double crochet bobble (4dc), like what I did for Kanga’s and Roo’s legs.

That’s all I have on this, for now… In summary, to shrink down your Amigurumi, you can try shrinking your equipment down or your crochet techniques down.
If you want to try out all the techniques I mentioned in further detail, you could try out the Kanga and Roo patterns!
Do share this or pin this if you found it was useful!