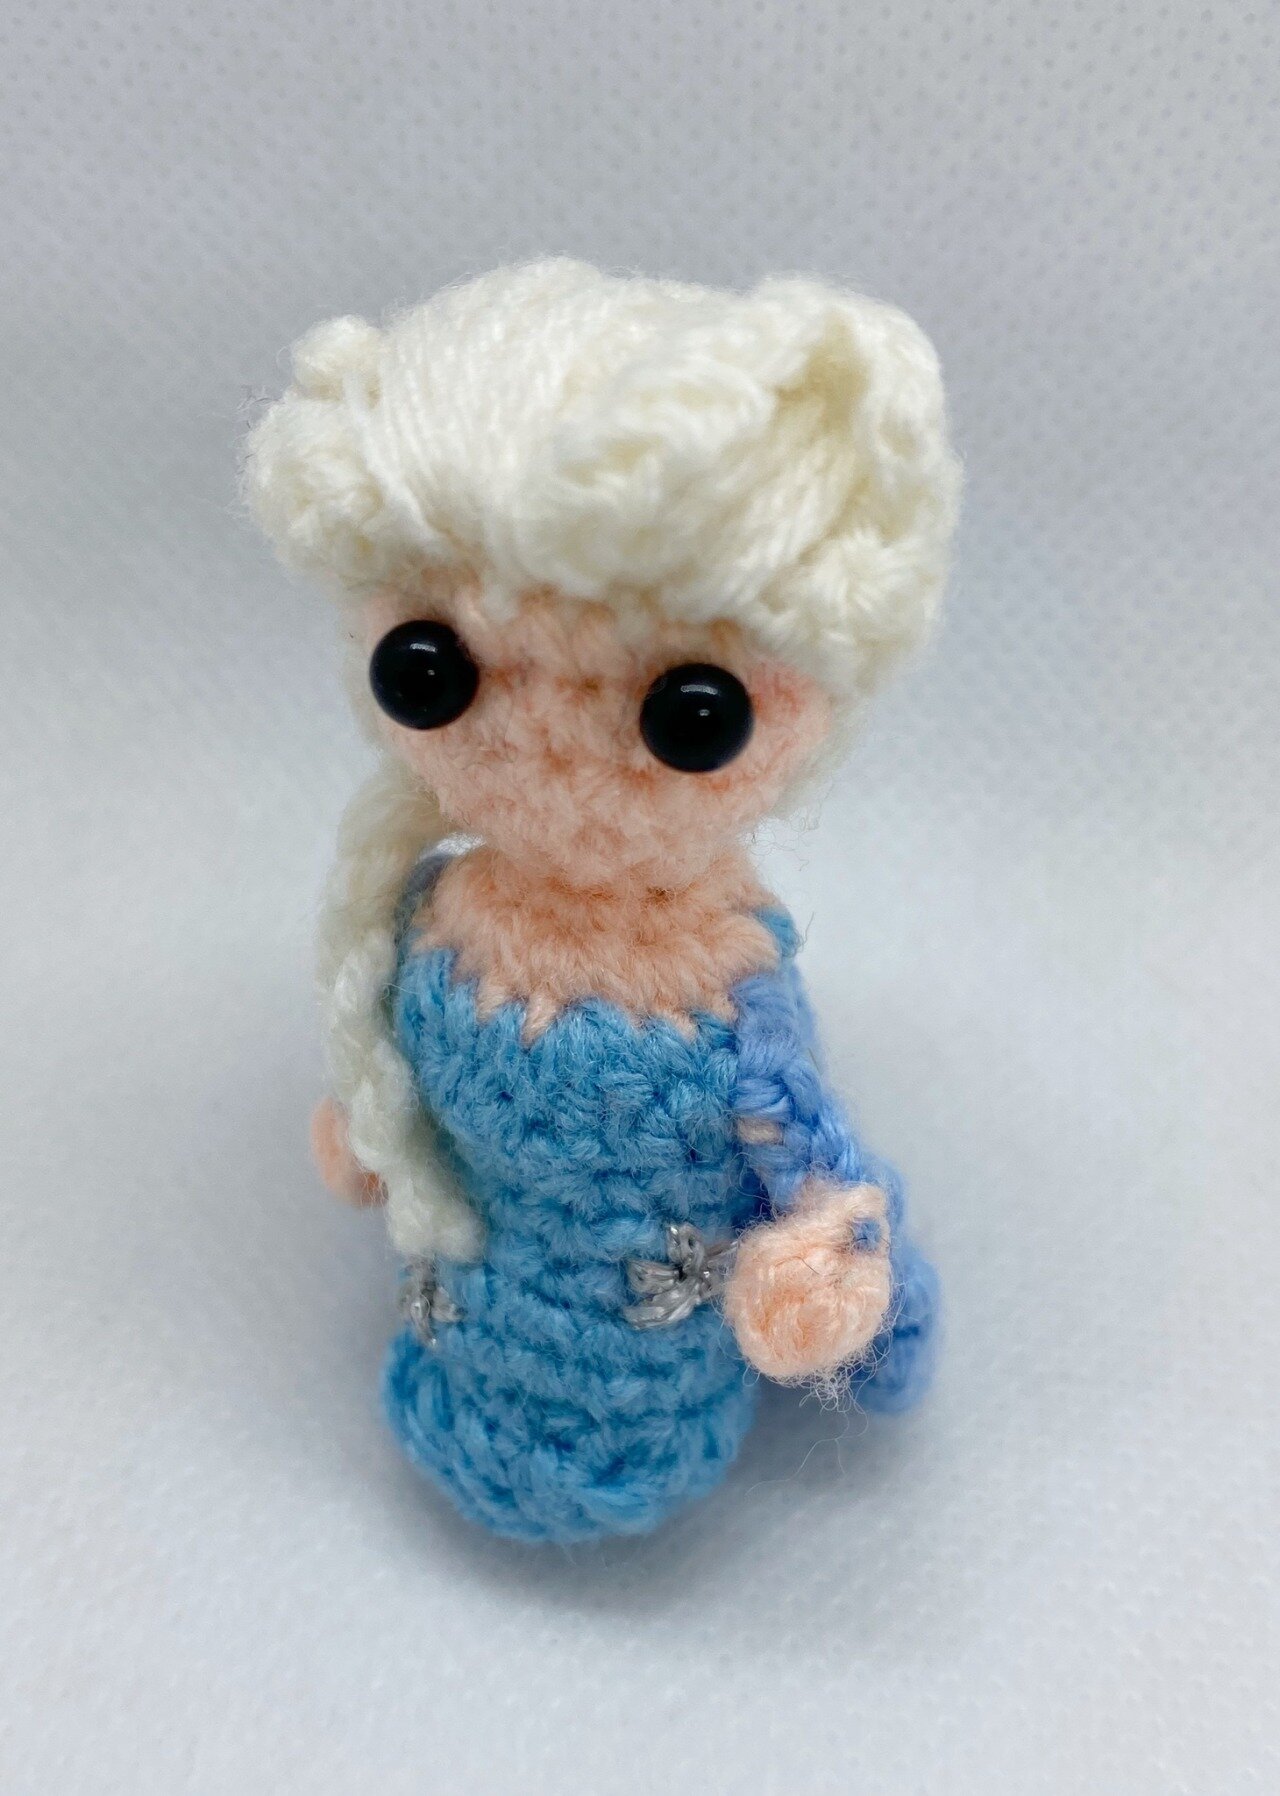
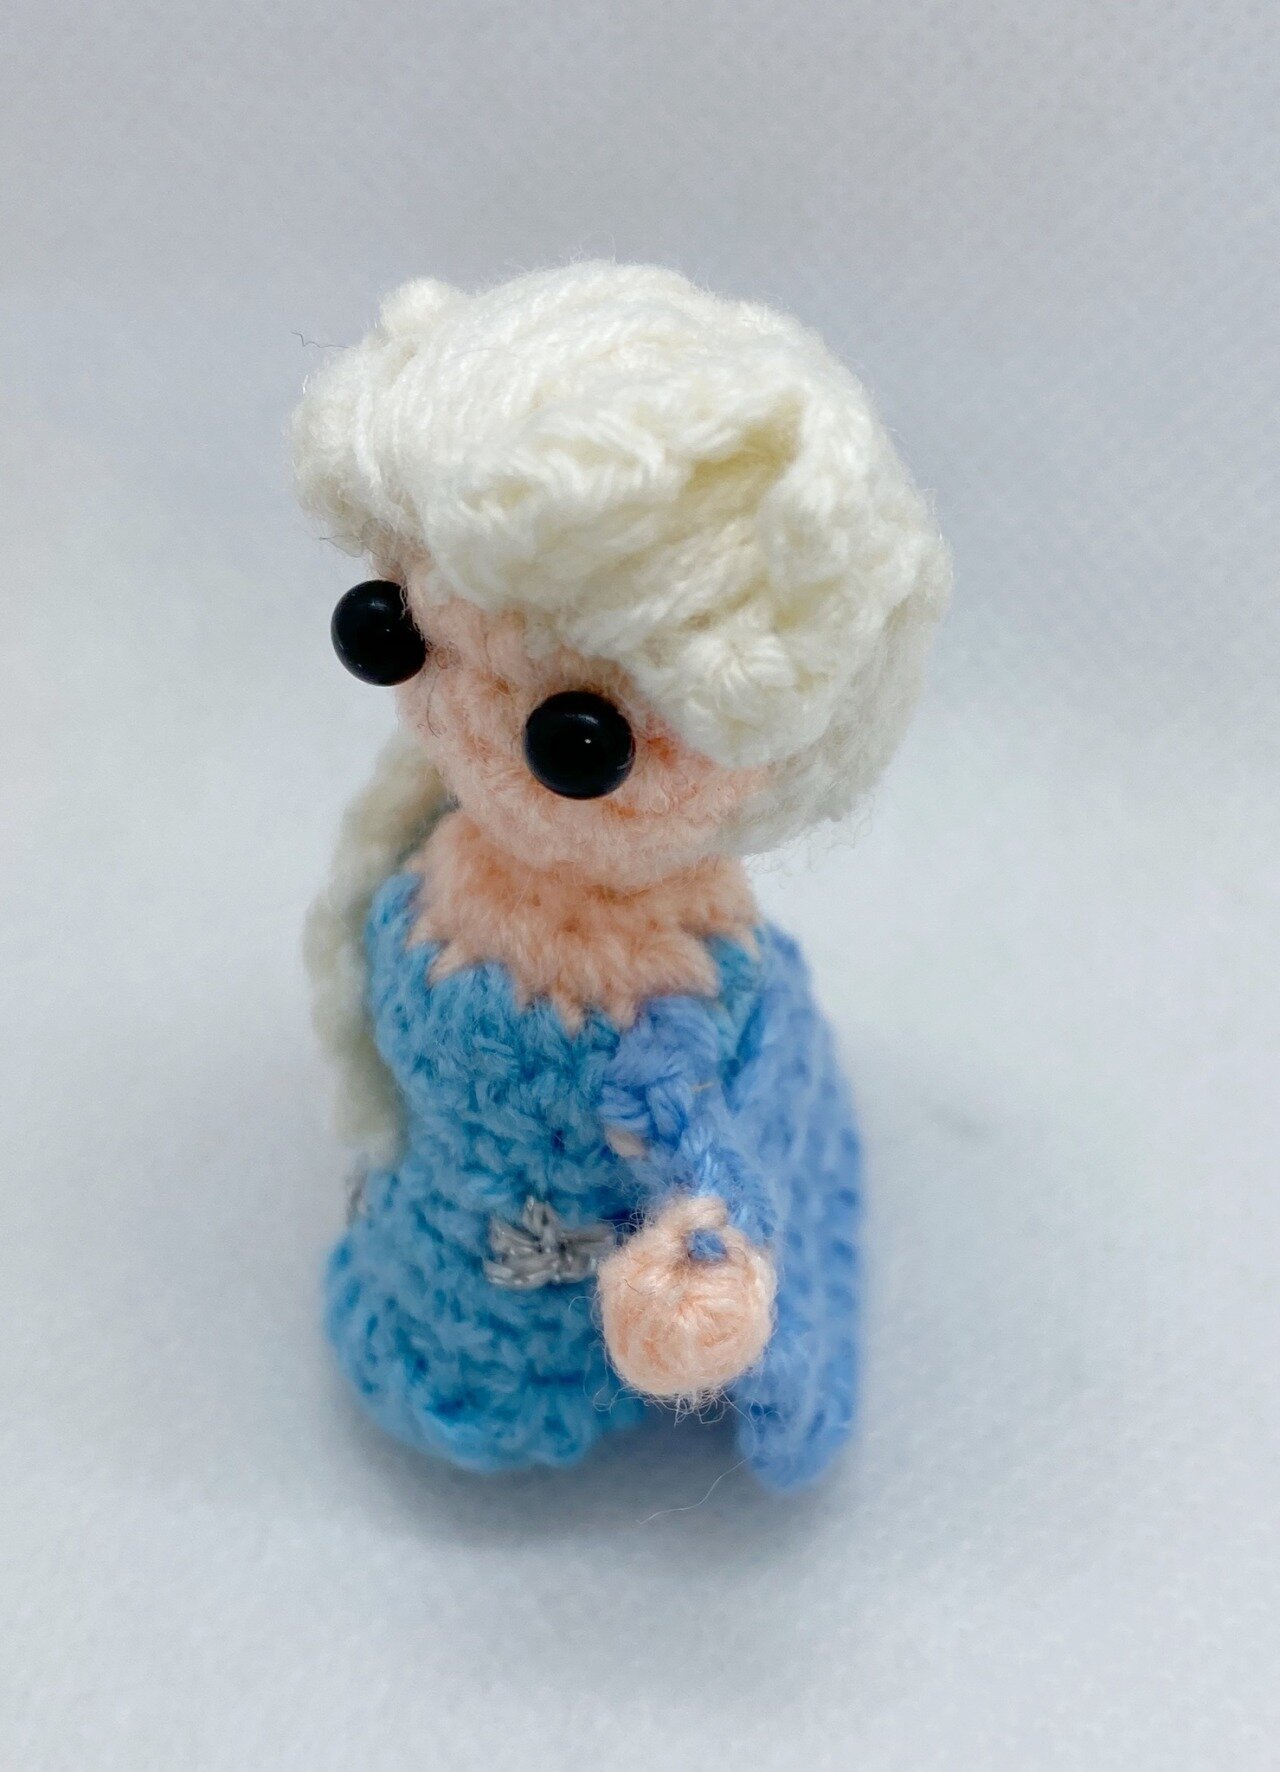
Free Mini Elsa Crochet Pattern!

As you can see, the mini Elsa I came up with was small enough to dangle from a ear lobe! I also had quite a bit of trial and error experimenting with her dress too before I settled on this following version.
As you can see, the mini Elsa I came up with was small enough to dangle from a ear lobe! I also had quite a bit of trial and error experimenting with her dress too before I settled on this following version.
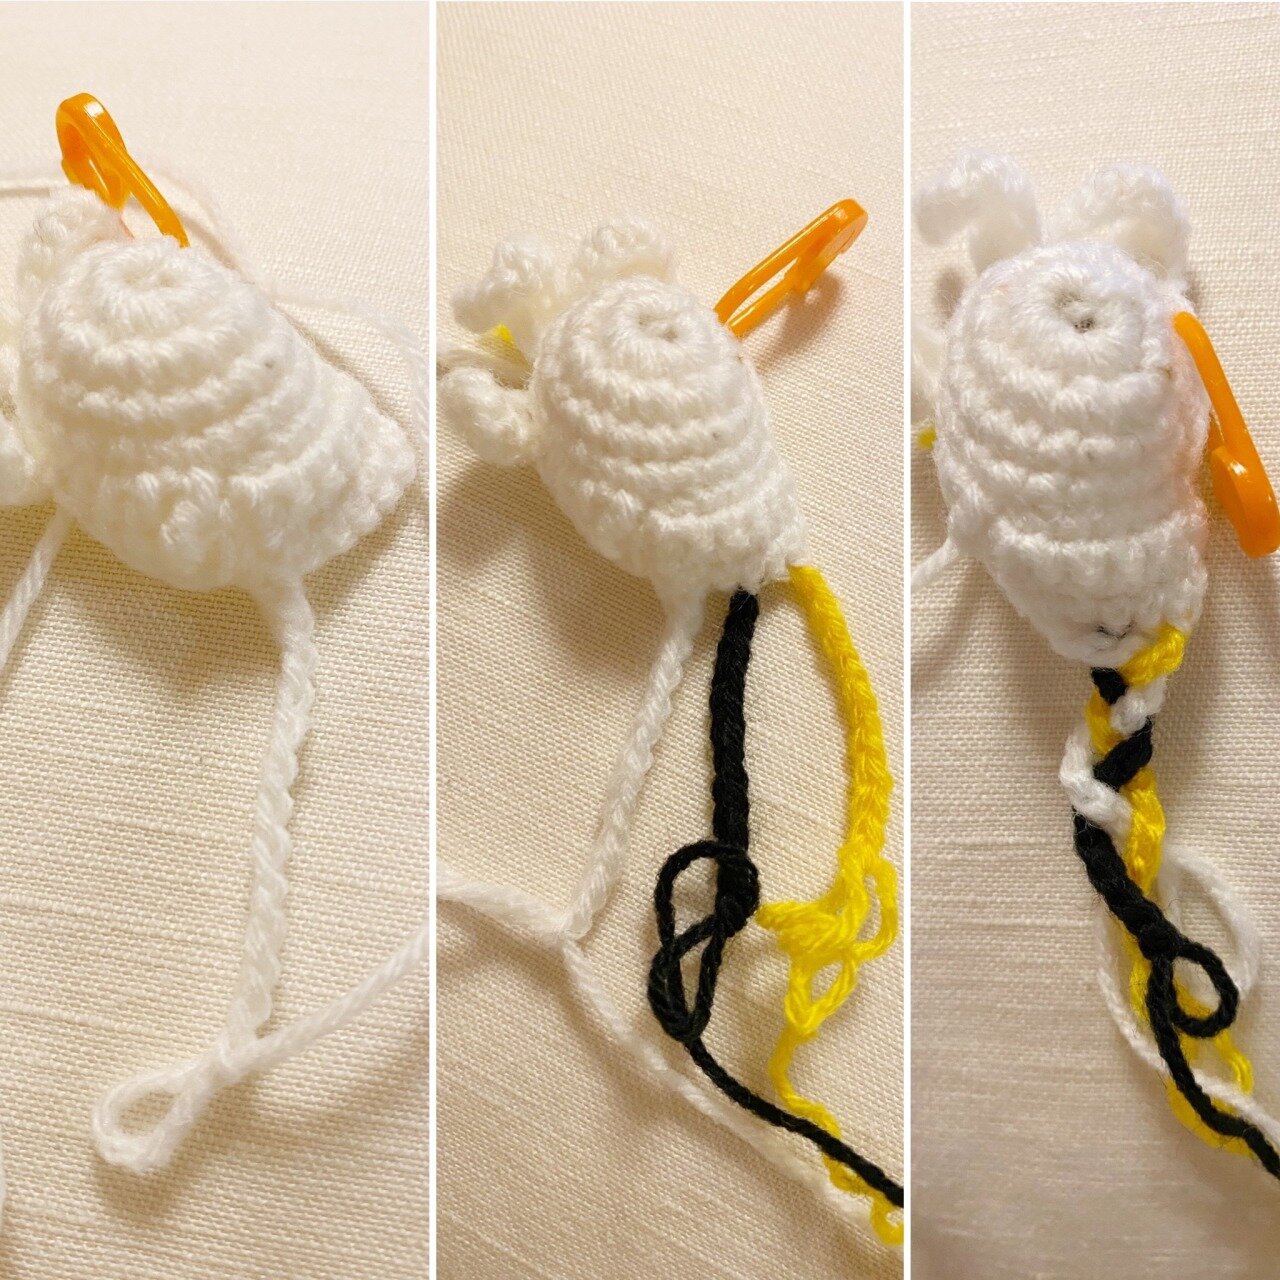
Heads up, as I mentioned under the terminology what techniques I used in this pattern, it also includes a ‘hdc bob on a chain’. For a step by step pictorial instruction on how to do this, check out my free 30-page ebook last section on ‘extended out bobble stitch’.
Or check out this post showing step-by-step how to create this hdc bob on chain.
Terminology
Ch = chain
Sc = single crochet (2sc1 means 2 single crochet in same ch)
Sl st = slip stitch
St = stitch (refers to number of stitches in one round)
Hdc = half double crochet
Hdc bob = half double crochet bobble stitch
3hdc bob = 3 half double crochet bobble stitch
3hdc bob on chain = 3 half double crochet bobble stitch done on a chain
(**3hdc bob on chain** means start with 1 half double crochet from end of chain into 3rd ch from end, then 2 subsequent half double crochet in same ch to form a rounded ‘bobble stitch’, frequently used to make seamless arms and legs)
Dc = double crochet (yarn over 1x)
Tc = treble crochet (yarn over 2x)
Dtc = double treble crochet (yarn over 3x)
Sc2tog1 = single crochet decrease
Materials and Tools
2.5mm Clover crochet hook
Orion Top Deluxe Yarn, Crown Yarn (or any equivalent acrylic yarn) - white, beige, light blue, baby blue, silver
Darning needle
Stitch markers
Filling – use leftover yarn or polyester fiberfill
Scissors
4mm glass eyes or safety eyes
Head
Round 1: Magic ring 10 (white) – 10st
Round 2: 2sc10 (white) – 20st
Round 3: Sc20 (white) – 20st
Round 4: (Sc1, 2sc1) x 10 (white) – 30st
Round 5: Sc12 (white), sc12 (beige), sc6 (white) – 30st
Round 6: (Sc1, sc2tog1) x 4 (white), (sc1, sc2tog1) x 4 (beige), (sc1, sc2tog1) x 2 (white) – 20st
Round 7: Sc8 (white), sc8 (beige), sc4 (white) – 20st
Round 8: Sc2tog4 (white), sc2tog4 (beige), sc2tog2 (white) – 10st
Round 9: Sc2tog5 (beige) – 5st

Body (continue from head)
Round 10: 2sc5 (beige) – 10st
Round 11: 2sc10 (beige) – 20st
Round 12: Sc9 (light blue), 10th arm, sc2 (light blue), 3hdc1 (light blue), sc2 (light blue), 3hdc1 (light blue), sc2 (light blue), 23rd arm, sc1 (light blue) – 24st
Arms (at 10th and 23rd positions): Sc1 on main ch (baby blue), ch3 (baby blue), ch3 (beige), **3hdc bob on chain (beige), sl st 3 (baby blue), sc1 back onto main st (baby blue)
Round 13: Sc2tog4 (light blue), sc1 before arm (light blue), skip st after arm, sc2tog5 (light blue), sc1 before arm (light blue), sc1 after arm (light blue) – 12st
Round 14: Sc12 (light blue) – 12st
Round 15: (Sc4, sc2tog1) x 2 (light blue) – 10st
Round 16: 2sc10 (light blue) – 20st
Round 17: Sc20 (light blue) – 20st
Round 18: Sc2tog10 (light blue) – 10st
Round 19: (Sc1, ch3 then dc1 in same main st), dc6, (ch1, sl st 1 along ch, ch2 and sl st back in same main st), (sc1, ch3, sl st 1 along ch, then dc1 in same main st), dc2 (all light blue) – 10st
Round 20: Magic ring 10 (light blue), to join up to round 18 (not 19) – 10st

Coat – baby blue
Round 1: Ch11 – 11st
Round 2: Sc10, ch1 and turn – 10st
Round 3-4: Repeat round 2 – 10st
Round 5: 2sc1, sc8, 2sc1, ch1 and turn – 12st
Round 6: Sc12, ch1 and turn – 12st
Round 7-9: Repeat round 6 – 12st
Attach coat just below both armpits
(I used a shimmery purplish blue shade :)
Wig cap – white
Round 1: Magic ring 10 – 10st
Round 2: 2sc10 – 20st
Round 3: Sc20 – 20st
Round 4: (Sc3, 2sc1) x 5 – 25st
Round 5 (fringe): Sc1,
(ch10, sl st 3 along ch, sc3, hdc3, skip 2st then sl st on main st),
(ch13, sl st 4 along ch, sc4, hdc4, skip 2st then sl st on main st),
(ch10, sl st 3 along ch, sc3, hdc3, skip 2st then sl st on main st),
hdc1, dc1, tc1, dtc6, ch3, sl st on next main st,
sc6, turn (continue in rows now, not rounds) – 6st

Round 6: Sc6, turn – 6st
Round 7: Repeat round 6 – 6st
Round 8: Sc6, then join up to (round 5 dtc6 part), turn – 6st
Round 9: Sc2tog1 forward, ch12 and end off — this will form 1 plait of hair
+ Using new yarn, slip knot directly onto next st along round 8: (Sc2tog1, ch12) x 2
Forms 2 more plaits of hair, then string all 3 together to form a braid, over right shoulder. Attach wig cap onto the hairline of the head.
Assembly
Head components
Attach wig cap onto hairline of head, align fringe over the front of face and the braid over right side of body.
Over fringe of hair, also sew down some white yarn extending from front to the middle vertex of head, to simulate the anterior hairline.
Tie the braid with the same coloured yarn and fray the end.
Insert 2 glass eyes at 1st row of the beige face.

Body components
To complete the clothes, add coat to just below the armpits on both sides.
Using silver yarn, string small stars over both sides of the lower half of body, branching outwards spanning 1 st distance
That’s it! If you also interested in making this teeny tiny version and want to transform it into a earring, you can get the attachment here. Also, check out this old post on 5 simple ways to turn small Amigurumi into gifts for more DIY gift ideas!
Look out for the full collection coming soon! This pattern is also a free PDF on Ravelry…

Disclaimer: Do tag us @pocketyarnlings on Instagram or share a picture once you have completed it. Hope you have fun making it!
*There are affiliate links in this post. We will receive a commission if you make a purchase through our affiliate link at no extra cost to you.*