

3 Easy Techniques on How to Make a Crochet Doll Body (no sew included!)
The easiest way to start crocheting a doll would be to crochet the parts separately and assemble them. Try out these faster methods by using seamless and surface crocheting. I will start off with the former and then move onto the latter techniques, see the table of contents for the outline of this article, have fun!
Table of Contents Show
What is an amigurumi doll?
Amigurumi is the Japanese art of crocheting or knitting small stuffed animals and dolls. The word is derived from a combination of the Japanese words ami, meaning crocheted or knitted, and nuigurumi, meaning stuffed doll.
Amigurumi is often used as a term for the category of stuffed toys in general, but can also be used for other types of stuffed animals, such as dolls, monsters, and anthropomorphized characters.
The stuffed animals are usually made from natural materials like wool or cotton yarn. Amigurumi are usually given as gifts at holidays or special occasions. They can be used as collectibles or can be used as a source of inspiration for crafts.
If you are confused between amigurumi and crochet, this article on 'Is Amigurumi Different from Crochet' might be useful.

Is it hard to crochet dolls?
It is not difficult to pick up crocheting, which can be done over a couple of hours with good teaching resources and then creating your first doll can be done in as easily as 30 minutes! For some, it might be slightly more challenging to pick up the steps and the impatient ones might give up, so see whether crocheting is the right hobby for you here at 'Is Crochet the right Hobby for you?'
Before you start on making your first doll, consider picking up simple crocheting for a start. The first few steps in crocheting when mastering the basic crochet stitches is not difficult, and after you get the hang of the basics, the next few steps are pretty repetitive. Then as you gather more techniques under your belt, it gets easier and easier.
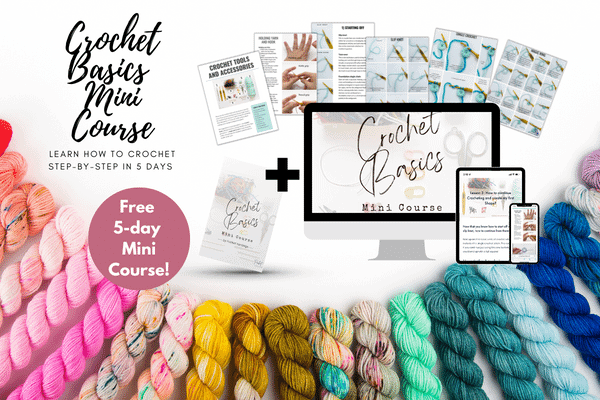
If you need help with starting on how to learn crocheting, try out this free basic mini course on how to crochet your first circle and square: 'Learn how to crochet step-by-step in 5 days with this free mini course!'
Now if you are already a crocheter and you are venturing into crocheting dolls, then you will start to crochet 3D shapes instead and combine them to create a doll appearance. As you will read later on, all you really need to how to crochet a sphere and a cylinder to get started with your first doll!
How long does it take to crochet a doll?
The answer to this question really depends on the crochet techniques you decide to use to crochet the doll. Here I will cover a combination of them for comparison to show there are many different ways to achieve a crochet doll body.
For a start, most beginners will crochet different body parts - including the head, body, arms and legs and then sew all the individual pieces together. This will be covered in detail in the next section.
If you are starting off with this method, which is oftentimes the easiest to learn, it could take longer, up to a couple of hours because the assembly part does take up a bit of time.
However, if you have moved onto more intermediate crocheting techniques, then you could using seamless or surface crocheting to achieve similar dolls in a much shorter time-frame. I have a crochet-a-long later who shows it can be done in as short a time as 30 minutes! This will be covered in the following section when I talk about one piece amigurumi dolls. Remember to pin the image below for future reference!

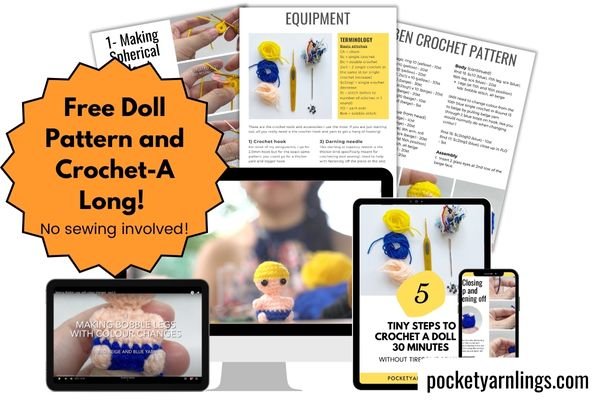
5 Tiny Steps to Crochet a Doll in 30 minutes
Click here to get started on this doll pattern with a CAL! Crochet a doll in minutes with our step-by-step guide and videos! Or click on the image on the left to join in!
How to crochet a doll for beginners?
Let us start off with the simplest and commonest way to crochet a doll, by creating all the individual components and then sewing them together. That would involve crocheting the head, which is a sphere, then the body a cylinder, with the arms and legs being smaller cylinders. The last part of this section, I will talking about sewing them all together.
How to crochet a doll head?
Crocheting a doll head is simply starting off with crocheting a sphere. Do note that most of my tutorials are based off crocheting from the top downwards. Here I will explore how to crochet a sphere using a short pattern below and some step by step instructions.
For a very detailed breakdown on how to crochet a sphere, including how to read the pattern and all the individual basic crochet stitches involved, check out this article on 'How to Get Started with Amigurumi in 8 simple steps'.
Equipment
3.0mm Crochet Hook (easiest to start off with)
Acrylic 4-ply Beige yarn - 2.8 yards or 25g
Darning needle
Paper Clip to mark start of rounds (in place of stitch markers before buying)
Recycled yarn or polyfill stuffing
Terminology
Ch = chain
Sc = single crochet
Hdc = half double crochet
Dc = double crochet
St = stitch (refers to number of stitches in 1 round)
FLO = front loop only
BLO = back loop only
2sc1 = single crochet increase
Sc2tog1 = invisible single crochet decrease
Let us start off with the head pattern first, we will be working from the top downwards and throughout just using beige yarn alone.
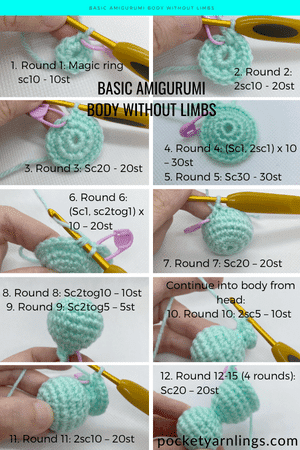
Crochet Head Pattern
Start off a magic ring with beige yarn.
Round 1: Magic ring sc10 – 10st
Round 2: 2sc10 – 20st
Round 3: Sc20 – 20st
Round 4: (Sc1, 2sc1) x 10 – 30st
Round 5: Sc30 – 30st
Round 6: (Sc1, sc2tog1) x 10 – 20st
Round 7: Sc20 – 20st
Round 8: Sc2tog10 – 10st
Round 9: Sc2tog5 – 5st
Once you have reached this point, you could end off and close up in front loops to form a simple sphere, which can be attached separately to the body. In this case, I have decided to continue from the head into the body as you will see in the next part.
How do you crochet a small doll body?
The second most common shape used in amigurumi crocheting after a sphere would be a cylinder. To learn just the basic crochet stitches involved in crocheting a cylinder, with a pattern example and an accompanying video, you check out this article on 'How do you Crochet Different Shapes in Amigurumi?'. Below here I included the body pattern which continues from the head above using beige yarn as well.
Crochet Body Pattern
Continue the pattern from the head to the body using beige yarn.
Round 10: 2sc5 – 10st
Round 11: 2sc10 – 20st
Round 12: Sc20 – 20st
Round 13-15 (3 rounds): Sc20 – 20st
Round 16: Sc2tog10 BLO – 10st
Round 17: Sc2tog5, close up in FLO – 5st
You could choose to crochet a separate sphere and a cylinder and then sew them together. Here I have decided to show how I have continued from the sphere into the cylinder continuously. As for the limbs later on, that will be crocheted separately and then sewed onto the main body.
How do you crochet doll arms?
Much like crocheting the body, crocheting the doll arms involve making smaller versions of the cylinder. Make 2 sides which are symmetrical and keep them ready for sewing on later. You can always make the doll arms longer or bigger, but always in proportion to the main head and body.
Crochet Arm Pattern
Using beige yarn, make 2 sets of arms, to be attached on later.
Round 1: Magic ring sc4 – 4st
Round 2: Sc4 – 4st
Round 3: Sc4, close up in FLO – 4st

How do you crochet doll legs?
For simplicity, you could follow the same cylindrical pattern similar to the arm above and just make it longer and wider. Here I have decided to change up the pattern slightly to include a foot extension.
Crochet Leg Pattern
Using beige yarn, make 2 sets of legs, to be attached on later.
Round 1: Magic ring 5 – 5st
Round 2: Sc1, hdc1, 2dc1, hdc1, sc1 – 6st
Round 3: Sc1, hdc4, sc1 – 6st
Round 4: Sc1, sc2tog2, sc1 – 4st
Round 5: Sc4 – 4st
Round 6: Sc4, close up in FLO – 4st– 4st

How to sew amigurumi parts together?
At this point, you should have 5 pieces (I tried to make it easier by combining the head and body into 1 piece) - including the head-body, 2 arms and 2 legs. Now comes the assembly part.
The most common sewing technique I would say is using the whip stitch method. Here is a short step by step tutorial on how to use the whip stitch using 2 perpendicular cylinders as an example.
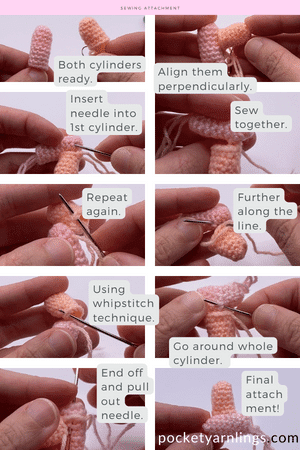
Sew on the left and right arm to the main body at a perpendicular angle as seen in the tutorial above. Then repeat the same process for the legs below.
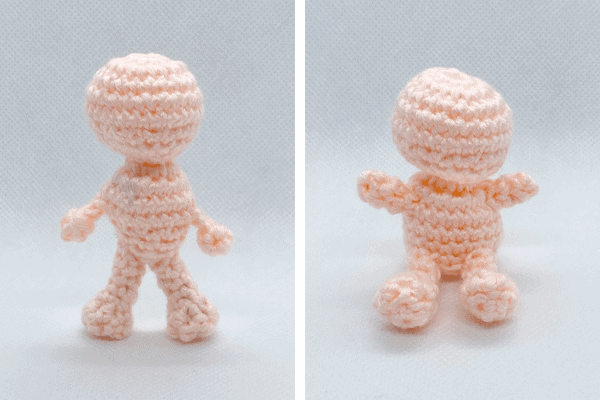
Here is the final little guy, slightly ragged and asymmetrical but still a doll body nonetheless!
How to crochet a doll in one piece?
This is what I always strive to do for most of my patterns and courses, to crochet the doll in one piece or no sew amigurumi patterns.
I classify these techniques into 2 categories - seamless crocheting and surface crocheting.
How do you attach a crochet head to a body without sewing?
As I mentioned above, I crocheted the head continuously into the body. Follow the same crochet head and body pattern above, then continue below.
There are a lot of ways to crochet the head and body together or even separately with a head component, neck component and body component. For many crocheters, they may encounter a floppy head problem when using this method, which can be easily fixed by inserting an extra cylinder into the neck.
By using the pattern above, I have decided to avoid having this problem and have a shorter neck, continuous from the head to the body.
How do you attach amigurumi limbs using no sew methods?
I will briefly talk about how to crochet limbs and body in one piece using seamless and surface crocheting. Both are techniques that can be used to attach amigurumi limbs without any sewing.
Seamless crocheting refers to crocheting out from the main amigurumi body in a continuous round so that there is no subsequent sewing attachment needed. It can be in the form of special crochet stitches or working on an extended chain.
See more of seamless crocheting here at 'Crocheting Limbs onto Amigurumi without attachment'. Here I go through step by step with pictorial instructions on how I achieve it, too much to include all inside one blog post!

Surface crocheting involves using a new set of yarn to crochet on another separate surface, whether it be a full or partial amigurumi body, or even an incomplete piece.
See more of surface crocheting here at 'Surface Crochet for Limb Attachment to Amigurumi'. Similarly here I provided the steps on how to surface crochet on a separate piece if you have not tried it before!

Conclusion
I first started off with explaining the easiest and most common way to crochet a base doll body which is by making the pieces separately and sewing them together. Then I went onto explaining how you can achieve a similar doll in a faster time by using seamless and surface crocheting so that no sewing is involved. There are further articles above that can show you specific examples on how to do both types of techniques.
The Next Step in Crocheting a One Piece Doll
Join in a free easy crochet doll pattern and crochet-a-long.
Here is where I invite you to try out this free easy crochet doll pattern, which is available for download and is also accompanied by a 5-day crochet-a-long right in your email inbox, with a total cumulative duration of 30 minutes (just 5 minutes a day!) and a workbook. It showcases my easiest method of seamless crocheting which was how I first started out and really the fastest to pick up!
Join me in this journey to crochet your first amigurumi doll that does not involve any sewing at all and you will start to enjoy the beauty of seamless crocheting!
Did you find this tutorial useful, remember to go check out more on seamless and surface crocheting above. How do you make your amigurumi doll? Comment below and let me know what is the fastest way you can crochet them!
What’s Next
🧵 How to Crochet Dolls: 7 Key Techniques for Body, Head, Hair & Clothes »
Your complete parent guide—learn all the core components of doll-making in one place.
🦴 3 Crochet Techniques and 9 methods for Attaching Limbs To Body! »
A deeper look at body construction—explore more ways to attach arms and legs cleanly.
🔗 Surface Crochet for Limb Attachment to Amigurumi »
Try this next-step no-sew method for adding limbs with perfect symmetry.