Master the Art of Single Crochet Stitches: A Comprehensive Guide and Tips
The single crochet stitch is one of the basic stitches or units in crochet and even though it is fairly simple to make, I have managed to come up with so many different variations of this basic stitch that are worth talking about.
First, we will talk about different scenarios where a single crochet stitch will be used, increases in sc, decreases in sc, differences from other stitches and even special stitches situations like single crochet bobble and popcorn stitches.
Table of Contents Show
What is a single crochet stitch?
The single crochet (sc) stitch is one of the basic stitches in crochet. The single crochet stitch creates a dense and sturdy fabric. It is commonly used for a variety of crochet projects, such as scarves, hats, blankets, and amigurumi. The stitch can be worked in rows or rounds, depending on the pattern instructions.
What is a single crochet called?
It is commonly abbreviated as "sc" in patterns. So when a row states sc5, it is referring to single crochet of 5 stitches.
What is single crochet UK?
There is not such thing as single crochet in UK terms! Converting back and forth between US and UK terms can be confusing. The most basic single crochet stitch in US terms actually is an equivalent double crochet in UK terms. Which also means there is no single crochet in UK terms.
How to do a single crochet stitch?
First I'll go through the steps involved in creating the single crochet stitch first, then I'll go through how sc looks like in a chain, row, round and magic ring. The steps are all the same, just that they look just slightly different in different scenarios.
The steps are as follows:
1. Insert hook into desired stitch, where want to start the single crochet.
2. Yarn over.
3. Draw yarn through stitch, you should get 2 loops on the hook.
4. Then yarn over again.
5. Draw yarn through both loops on the hook.
You should end up with just one loop on the hook.
Now let's apply these same 5 steps to all the different scenarios below.
How to single crochet in a chain?
After you have mastered a simple slip knot and managed to create a series of chain stitches to create a foundation chain, the next part involves crocheting down that chain. If you have not figured out how to make a slip knot and a foundation chain from there, you might want to check out this article on “Step-by-Step Guide: How to Master the Slip Knot in Crochet for Beginners”.
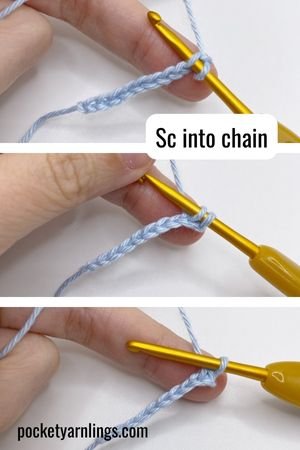
Similar to the steps above but this time, for step one, instead of inserting hook into desired stitch, insert it into the second chain from hook. Then continue with yarn over, draw yarn through chain, yarn over again and draw through 2 loops on hook to complete.
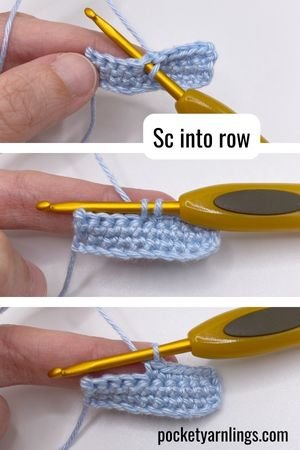
How to single crochet in a row?
After you have completed crocheting down the foundation chain, you have technically finished your first crochet row! Then you can continue working single crochet stitches down the next row.
Just follow the same steps above, inserting the hook into the first stitch away from the hook (remember the chain and loop on hook do not count as stitches). It is also the first stitch in the row.
Proceed to insert the hook into the first stitch of the row, yarn over, pull yarn through stitch to get 2 loops, then yarn over again, finally draw yarn through last 2 loops on hook.
How many do you chain for a single crochet?
This might seem like a strange question here, but it will make more sense when you decide to move onto the taller stitches like double crochet and treble crochet. To proceed with a single crochet, you do not need an additional chain, unless you want to crochet a turning chain right at the end of a single crochet row completed.
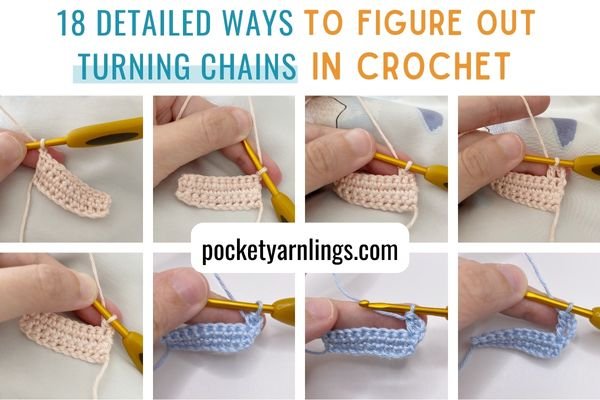
Once you have finished the row with the chain and then the next row with single crochet stitches, right at the end, when you want to move onto the subsequent row, you can do 1 chain, turn the whole piece and then proceed onto sc along row again.
To learn more about turning chains, check out this article on “18 detailed ways to figure out Turning Chains in Crochet”.
What is single crochet in a magic circle?
With the same steps but differently in step 1, insert the hook into the centre of the magic circle, then yarn over, draw loop through centre of circle, yarn over again and draw through last 2 loops on hook. So single crocheting will be worked around both free and ball ends of the yarn.
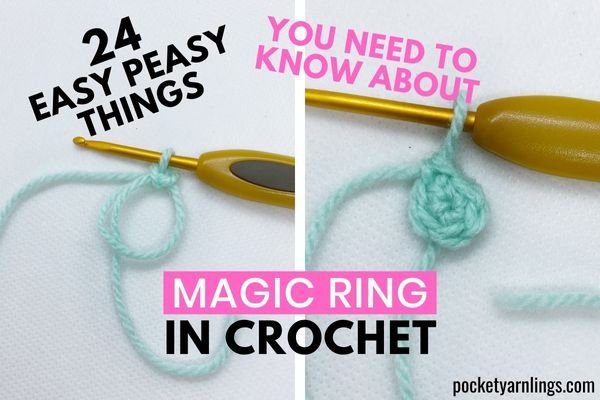
If you are not sure what a magic ring or magic circle is, which is fairly important in amigurumi, remember to check out this article, “24 Easy Peasy things you need to know about Magic Ring in Crochet”.
How to single crochet in a round?
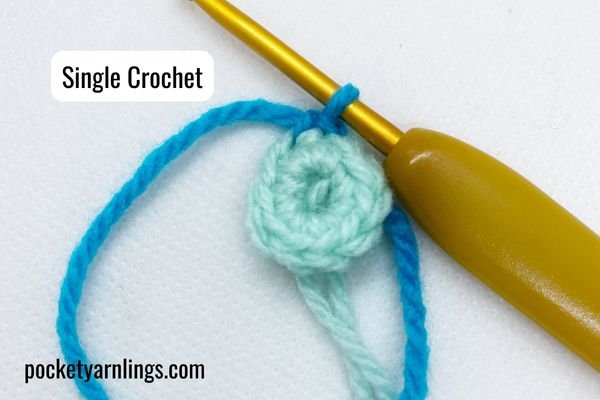
After you have finished single crocheting inside the magic ring, you would have completed the first round. When you continue to work into the second round, then steps in single crocheting are the same as for the rows, except this time each sc will progress in a circle instead of horizontally. Also follows steps 1-5 above, but the final appearance is different from the above situations.
How do you single crochet in the front loop only?
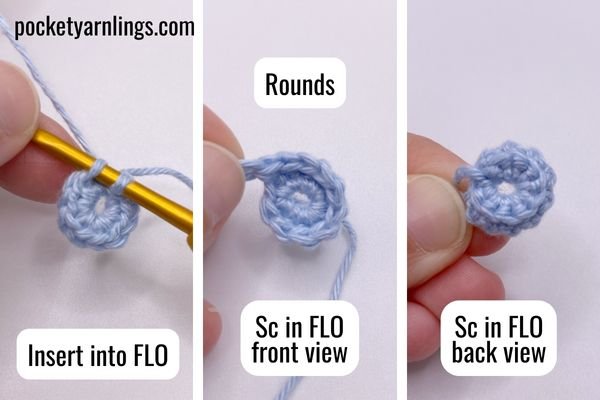
For single crochet in the front loop only, it can be in a chain, a row, a magic circle or a round. Since I have covered these different situations quite extensively above, I will just briefly go through the general concepts of just single crocheting into the front loop only (FLO).
This time, when you insert your hook inside a stitch along the row or along the round, instead of inserting into both the horizontal loop closer to and further from you, insert only into the front loop facing you.
This refers to you inserting the hook underneath the front loop and out into the space between the front and back loops. After inserting the hook into FLO, yarn over, pull loop through behind the front loop (and in front of the back loop), then proceed with a single crochet stitch.
If you do it in a row, you get a ribbing appearance, if done in a round, you get a staggered circular appearance. See what I mean below.
For more details on crocheting into front loops only, check out this article “Front Loop and Back Loop in Crochet - the easy way to know everything”.
How do you single crochet in the back loop only?
When working along a row, to single crochet back loop only (BLO), it refers to inserting the hook between the front loop and back loop, and out through behind the back loop.
After inserting the hook into BLO, yarn over, pull loop through beneath the back loop, then proceed with a single crochet stitch.
While working in rows or in rounds, you should end up with an obvious demarcation between the original row/ round and the new one, see the image examples below.
For more details on crocheting into front loops only, check out this article “Front Loop and Back Loop in Crochet - the easy way to know everything”.
What is single crochet increase?
A single crochet stitch increase adds additional stitches to your crochet project, so that it becomes wider and larger. It involves crocheting a few stitches (2 or more) within a single stitch, whether it is a row or a round.
What is the abbreviation of single crochet increase?
Do note that many different crochet pattern designers write differently, so refer to their pattern abbreviations right at the start before tackling their patterns. It can either be written as 2 sc in the next stitch or simply just the abbreviation ‘inc’. I will elaborate more below.
What is a 2 single crochet increase?
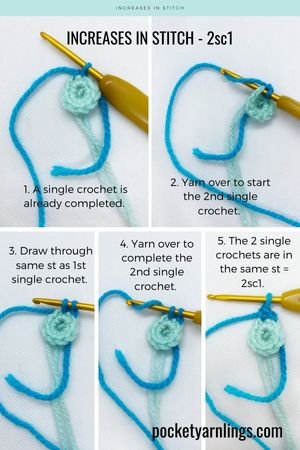
This 2 single crochet increase refers to 2 single crochet stitches in the same stitch, most often written as '2sc in the next st'. For me, I often write my patterns as 2sc1, referring to 2 single crochet in the 1 stitch. Others commonly write like what I mention in the following point, which may be easier for some crocheters to follow.
What does * INC * mean in crochet?
Some pattern designers use the abbreviation 'inc' for increase. So the pattern will look something like this, 'inc in the next 3 st', which can be written as 2 sc in next 3 st, or for me, I would write 2sc1. There is technically no right or wrong answer and the best way to go about reading this would be to check out the crochet designer’s terminology at the beginning of the pattern.
How do you increase a single crochet stitch?
Here in addition to the usual steps for an increase in single crochet, I mention how using this stitch in different scenarios will cause different shapes to arise. First off, just do a regular single crochet stitch, then insert the crochet hook back into the same stitch, and repeat the sc again, to get 2 sc in the same stitch.
How do you increase single crochet in the middle of a row?
When you decide to increase single crochet in the middle of a row or even in a chain, while leaving the rest of the row in just sc, you can create a crescent shape. An example pattern is below:
Chain 6.
Row 1: Sc1, 2sc3, sc1 - 8st
(Alternatively, Row 1: Sc1, 2sc in next 3st, sc1 - 8st
Or, Row 1: Sc1, inc in next 3st, sc1 - 8st)
See how increasing in the middle of the chain resulted in a crescent shape appearance.
How to increase single crochet at end of row?
Try switching the single crochet increases to the ends of the row, and if you start off with a narrower chain and progressively increase at the ends for longer rows, the eventual shape you get is a triangle instead! Here's a short example (which will not amount to the full triangle):
Chain 6.
Row 1: 2sc1, sc3, 2sc1 - 7st
(Alternatively, Row 1: 2sc in next st, sc3, 2sc in next st - 7st
Or, Row 1: Inc in next st, sc3, inc in next st - 7st)
How do you increase single crochet when crocheting in the round?
Increase when crocheting in a round here refers to evenly spaced increases and there is a specific mathematical pattern for the increases in each round.
Round 1: Magic ring sc6 - 6st
Round 2: 2sc6 - 12st
Round 3: (Sc1, 2sc1) x 6 - 18st
Round 4: (Sc2, 2sc1) x 6 - 24st
Round 5: (Sc3, 2sc1) x 6 - 30st
As you can see here, from the initial magic ring, the 2nd round involves increases all around, 3rd round involves alternate increases, 4th round increases every 2 stitches and so on.
If you found this article useful, remember to pin to Pinterest for reference later or share there so that others might benefit from reading this too!
What is a 3 single crochet increase?
In addition to just a regular sc increase, a 3 single crochet increase refers to 3 single crochet stitches within the same stitch. It is a larger increase than just the 2sc above. It can go even higher depending on what is needed in the pattern.
What is the abbreviation of 3 single crochet increase?
The abbreviation for 3 single crochet increase or 3 single crochet in the same stitch would be ‘3 sc inc’ or for me, my pattern would put 3sc1, but the former is what is commonly used.
What does it mean 3 SC Inc?
Likewise, 3 sc inc refers to 3 single crochet increase, or 3 single crochet stitches in the same stitch.
How do you do a 3 single crochet increase?
To do a 3 single crochet increase (3 sc inc), you will work three single crochet stitches into the same stitch or space, effectively increasing the stitch count by two. Follow the steps for one single crochet into the desired stitch, then repeat the same steps again another 2 more times into the same stitch.
The 3 sc increase is commonly used to create shape and increase the stitch count in crochet projects.
How to do a 3 single crochet increase in a row?
Repeat the same steps for single crochet in the same stitch 3 times, when working along a row. Working multiple stitches into the same stitch will cause the row to widen, creating an increase in the stitch count and shape the project as intended in the pattern.
How to do a 3 single crochet increase in a round?
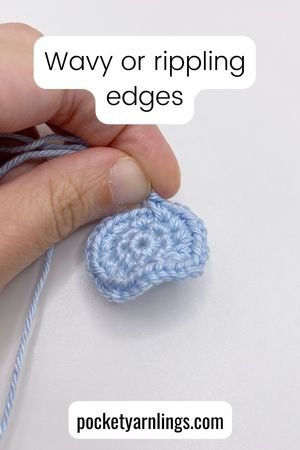
Similarly for 3 single crochet increase in a round, repeat the same step 3 times, again into the same stitch. This time the appearance, rather than widening the row, you would be widening the circular appearance in a round. If you continue to increase the number of sc in the same stitch, you can even create a rippling effect.
What is single crochet decrease in crochet?
Let us start with the easiest basic single crochet first. A single crochet decrease involves reducing 2 sc stitches into a single 1 stitch.
What is the abbreviation of single crochet decrease?
Some clarification on common terminology first before moving onto the steps. Here I tried to cover as many of the commonly used terminology as possible so that in the future if you see it, it won't be too confusing.
Is single crochet 2 together the same as a decrease?
A decrease in single crochet is the same as single crochet 2 together. Apart from bringing the 2 stitches together, there are no additional special techniques involved. The abbreviation for single crochet 2 together is sc2tog. As for me, I usually write in my patterns sc2tog1, i.e. single crochet 2 together into 1 stitch.
What does 2sc Dec mean in crochet?
I do not see this abbreviations often but thought to include here for clarity. As single crochet increase abbreviation often includes the short form 'inc', likewise, decrease can be written in the form of 'dec'. In this case, 2sc dec refers to decrease of 2 single crochet stitches, or sc2tog - they mean the same thing!
Is sc2tog the same as DEC?
Like I mentioned above, sc2tog is the same as a dec, but remember there are other forms of decrease as well, like hdc, dc, tr and so on. If it is just written as dec, it is assumed as a single crochet form of decrease.
What is Inv Dec?
This is a special techniques involved in decreasing crochet stitches called the invisible decrease and often used for amigurumi to reduce gaps in between the stitches. I will talk more about it below after going through a basic sc decrease first.
How do you do a decrease crochet?
Let us go through the most basic steps involved in doing a single crochet decrease.
1. Insert hook into desired stitch, where want to start the single crochet decrease.
2. Yarn over.
3. Draw yarn through stitch, you should get 2 loops on the hook.
4. Insert hook into next stitch, then yarn over again.
5. Draw yarn through stitch to get 3 loops on the hook.
6. Finally, yarn over for the last time, and pull yarn through all 3 loops on the hook to get back 1 loop on the hook only.
You have just taken away 1 stitch from your crochet project! From the initial 2 stitches, you have brought it down to just 1 stitch and hence the decrease.
Does a decrease count as one or two stitches?
A decrease counts an one stitch after it is completed, meaning 2 stitches become 1. Another reason why my patterns are written as sc2tog1, so that you know 2 stitches become 1. It can get a bit confusi
How do you decrease in the middle of a row in crochet?
There are a few ways to decrease your crochet stitches. If you do it uniformly throughout the row, you will get a shorter row than the preceding one. If you choose to only decrease it in the middle of the row, keeping the rest of the row in regular single crochet stitches, then the horizontal row will start to curve inwards like a convex shape. An example short pattern is below:
Chain 11.
Row 1: Sc2, sc2tog3, sc2 - 7st
(Alternatively, Row 1: Sc2, sc2tog in next 3st, sc2 - 7st
Or, Row 1: Sc2, dec in next 3st, sc2 - 7st)
So you see in the above example, you have reduced the middle 6 stitches to just 3 stitches or basically halved it by bringing 2 stitches together to 1. The total stitch count also went down from the initial chain 11, which will normally become a row of sc10 if it was just single crochet throughout, but instead went down further to 7 stitches because of the middle 3 decreases.
How do you decrease at the beginning of a row in crochet?
Decreasing crochet stitches at the start and at the end of rows is also another way to eventually crochet a triangle. I mentioned about this when talking about increases in crochet. When you increase crochet at the ends, you can create a triangle from a shorter start and slightly increase to the long base of a triangle.
On the flip side, for decreases, you could start with a longer chain and slowly decrease both ends to reduced the subsequent row lengths until you eventually reach the tip of the triangle. For a detailed breakdown of the different ways I use both decreases and increases to make mini flat triangles, check out this post on 'How do you Crochet Different Shapes in Amigurumi?'.
How do you decrease when crocheting in the round?
The decreases in the round often start from a larger circle when you intend to reduce its size. Once you start reducing the size of the circle by decreasing the single crochet stitches, the flat 2D circle starts to approach a more spherical 3D appearance. For a pattern example, see below:
Round 1: Magic ring sc6 - 6st
Round 2: 2sc6 - 12st
Round 3: (Sc1, 2sc1) x 6 - 18st
Round 4: (Sc2, 2sc1) x 6 - 24st (<--- increasing till this point)
Round 5: Sc24 - 24st (<--- keeping the same stitch count)
Round 6: (Sc2, sc2tog1) x 6 - 18st (<--- start of the decreases)
Round 7: (Sc1, sc2tog1) x 6 - 12st (<--- see how the decreases are similar proportion to the increases?)
Round 8: Sc2tog6 - 6st (<--- decrease all around the round)
Close up in front loops only.
So you see, only after you have increased the round until Round 4 which is the largest round in this example, while Round 5 is kept at same stitch count, the decrease only starts in Round 6 onwards.
Also see how the decreases are similar proportion to the increases and the repeats are similar (just replacing 2sc1 with sc2tog1), so you should end up with a nice ball or sphere.
What is an invisible decrease?
An invisible decrease still refers to a single crochet decrease but using a technique that makes the decrease 'invisible'. First I will go through the steps on how it is done, and then I will talk about why is it the preferred techniques for decreases in crochet.
How do you do a invisible decrease in single crochet?
The steps involved are as follows:
1. Insert hook into front loop only of the desired stitch.
2. Tilt the crochet hook slightly anti-clockwise and again insert hook into front loop only of the next stitch.
3. Yarn over and draw yarn through the 2 front loops, should have 2 loops on hook.
4. Yarn over for a final time.
5. Draw yarn through the last 2 loops on the hook, to complete the single crochet decrease.
What is the difference between a decrease and an invisible decrease?
Most commonly this technique is used in crocheting amigurumi because the decreases are less obvious when done this way and the gaps in between the decreases are a lot smaller. This translates to fewer gaps in the final amigurumi project and the stuffing will appear less obvious. All these help with making the amigurumi appear neater! To get more suggestion on getting the amigurumi appear neater, check out this article on '7 Useful Ways on How to Make Amigurumi Neater?'.
Also, remember to grab my free 45-paged cheat sheet on how to crochet for beginners step by step with pictures PDF download below. It is basically a beginner printable crochet stitch guide with free printable crochet instructions for complete beginners!
Free Beginners Step-by-step Guide
Grab these 45-pages of cheat sheets that will help you with crochet stitches, magic rings, increases and decreases, FLO and BLO. Click on image on left for access!
What is a 3 single crochet decrease?
Just like how you can have a larger increase in stitches like 3sc or 3 single crochet in 1 stitch, you can have the reverse. Meaning single crochet 3 together, or decrease down to 1 stitch from 3 stitches. This is also called a 3 single crochet decrease or single crochet 3 together!
What is the abbreviation of 3 single crochet decrease?
The abbreviation for 3 single crochet decrease is much like that for a regular decrease.
What does sc3tog mean in crochet?
So sc3tog refers to single crochet 3 stitches together, so it is technically more than a simple decrease. It is also called a 3 single crochet decrease. For my own patterns, I tend to write sc3tog1.
What is 3 sc dec in crochet?
Decrease in stitches that are more than 2 single crochet together are not commonly written this way but I've decided to include it because there are some patterns written this way. 3 sc dec is technically the same as sc3tog.
How do you do a 3 single crochet decrease?
Let's go through the steps involved in making a 3 single crochet decrease.
1. Insert hook into desired stitch.
2. Yarn over, pull loop through stitch, should have 2 loops on hook.
3. Insert hook into the next stitch.
4. Yarn over, pull loop through stitch again, should have 3 loops on hook.
5. Insert hook into the next stitch for the last time.
6. Yarn over, pull loop through stitch for last time, should have 4 loops on hook.
7. Final yarn over and draw yarn through all the 4 loops on the hook.
You have decreased 3 stitches down to just 1 stitch, forming a 3 single crochet decrease!
How to do a 3 single crochet decrease in a row?
Much like the example for the decrease above for the sc2tog, working a bigger decrease (sc3tog) in a row can create a convex or even a crescent shape, even more curved than the example for the decrease above. See more below:
Chain 10.
Row 1: Sc9 - 9st
Row 2: Sc3tog3 - 3st
Bigger decrease in the number of stitches, from 9 stitches to 3 stitches!
How to do a 3 single crochet decrease in a round?
A 3 single crochet decrease in a round narrows a sphere far quicker than just a sc2tog decrease, if done uniformly around the round. Just like the example below:
Round 1: Magic ring sc6 - 6st
Round 2: 2sc6 - 12st
Round 3: (Sc1, 2sc1) x 6 - 18st
Round 4: Sc3tog6 - 6st
Also consider if you do a 3sc decrease (or sc3tog) asymmetrically, meaning in a round, you do the cluster stitch on one side and the other side you leave regular single crochet stitches, you will end up with a 'cap-like' appearance.
Differences between single crochet and other crochet stitches
Before we more onto more complex crochet stitches, let us talk a little bit about the differences between a single crochet and some other types of stitches.
Is single crochet the same as a chain?
No they are not the same. A chain is formed after you yarn over and pull through a loop after a slip knot is formed and is the starting point of crocheting. Single crochet is the subsequent stitches to work into those chains.
Are single crochet and slip stitch the same?
No they are not the same. A slip stitch is a flatter or shorter stitch than a single crochet stitch and It is the shortest of all the different stitches. Most crochet projects has its regular basic unit made up of single crochet stitches while slip stitches are often used for seaming or ending off.
Here is a whole comprehensive article titled, “Slip Stitch Crochet: A Comprehensive Beginner's Guide to Mastering the Technique”, all about slip stitches and its uses in crochet.
What is the difference between single crochet and double crochet?
Double crochet is double the height of the basic single crochet stitch. The steps involved in both are different as well - double crochet will need a yarn over before hook insertion, then pull through to get 3 loops on hook instead, then pull through 2 of loops and then yarn over and finally pull through last 2 loops. Also, double crochet stitches are not used as frequently as single crochet stitches and sometimes not used at all in certain crochet projects or amigurumi for that matter.
Here is a whole comprehensive article titled, “Mastering the Double Crochet Stitch: A Comprehensive Guide and Essential Techniques“, all about double crochet stitches and its uses in crochet.
How do you do a single crochet bobble stitch?
Here we will be doing a 4 single crochet bobble stitch.
1) Insert hook into desired st, yarn over, pull through to get 2 loops on hook.
2) Yarn over again, draw through just 1 loop on hook, to get 2 loops on hook.
3) Then insert hook back into same st, yarn over again, draw through to get 3 loops on hook.
4) Yarn over, draw through just 1 loop on hook, to get 3 loops on hook.
5) Insert hook back into the same st for last time, yarn over, draw through to get 4 loops on hook.
6) Yarn over, draw through just 1 loop on hook, to get 4 loops on hook.
7) Finally yarn over and draw through all 4 loops on the hook to get a 4 sc bobble stitch.
How to crochet single crochet bobble stitch in a row?
Proceed with crocheting a bobble stitch like you would usually do after crocheting along the row. You might want to leave a few regular single crochet stitches along the rest of the row as a few consecutive bobble stitches might not fit so well and the row might start to curve along the side.
Also, if you are crocheting back and forth, along the right side and then the wrong side of the rows, then the bobble stitch on each type of row will look different. The bulge you are supposed to see will be facing opposite sides. To avoid this and still create your desired textured appearance, then only crochet bobble stitches on the rows that are facing the right sides.
If you do not know how to tell your right sides from your wrong sides, whether for rows or rounds, check out this comprehensive article on '8 effortless ways to tell Which side of yarn is Right side in Crochet'.
How to crochet single crochet bobble stitch in a round?
Generally for crocheting bobble stitches in a round, it is easier, because you should be crocheting in a continuous clockwise direction and the bulge of the bobble stitch should always be facing outwards.
Follow the same steps as listed above and work the bobble stitches inside a round, whether for texturing reasons or to give certain appearances in your amigurumi.
How do you do a single crochet popcorn stitch?
To make a 3sc pop or a 3 single crochet popcorn stitch, the following steps are involved.
1) Make a single crochet stitch - insert hook, yarn over, draw yarn through, yarn over again and draw through 2 loops.
2) Repeat again another 2 more times into the same st to get 3sc in the same st.
3) Drop the loop from hook. Insert hook into the 1st sc done (both front and back loops).
4) Grab the dropped loop and draw it through the first sc st.
5) The popcorn st looks like it is popping forward in the front.
6) Do a sc in the next st to seal the popcorn st down securely.
The completed 3 single crochet popcorn stitch.
How to crochet single crochet popcorn stitch in a row?
To crochet the single crochet popcorn stitch, the technique is generally the same whether you're working it in a row or in a round. The key difference between working the single crochet popcorn stitch in a row versus in a round is the direction of your stitches. In a row, you'll be working the popcorn stitches consecutively in the same stitch.
If you are crocheting back and forth, along the right side and then the wrong side of the rows, then the popcorn stitch on each type of row will look different. The conical protrusion you are supposed to see will be facing opposite sides. To avoid this and still create your desired textured appearance, then only crochet popcorn stitches on the rows that are facing the right sides.
If you do not know how to tell your right sides from your wrong sides, whether for rows or rounds, check out this comprehensive article on '8 effortless ways to tell Which side of yarn is Right side in Crochet'.
How to crochet single crochet popcorn stitch in a round?
For crocheting popcorn stitches in a round, it is easier, because you should be crocheting in a continuous anti-clockwise direction and the bulge of the popcorn stitch should always be facing outwards in one direction. In a round, you'll be working the popcorn stitches in the same stitch, but you'll also be working other stitches around them as part of the round.
Always refer to the specific pattern instructions for any additional details or modifications, as they may provide specific guidance on working the single crochet popcorn stitch in a row or in a round.
If you found this article useful, remember to pin to Pinterest for reference later or share there so that others might benefit from reading this too!
Conclusion of Single Crochet Stitches
Hope I have covered as much about single crochet stitches as possible - the basic unit of how to do it, increases, decreases, in rows and rounds and also in special stitches. I tried to be as comprehensive as possible so you can always refer back here when you are thinking of anything single crochet!
Free Beginners Step-by-step Guide
Grab these 45-pages of cheat sheets that will help you with crochet stitches, magic rings, increases and decreases, FLO and BLO. Click on image on left for access!
Related articles
How to Learn Basic Crochet Stitches step by step for Absolute Beginners - 6 Easy Steps!
Step-by-Step Guide: How to Effortlessly Master the Slip Knot in Crochet for Beginners
Mastering Half Double Crochet Stitches: A Step-by-Step Guide and Tips
Mastering the Double Crochet Stitch: A Comprehensive Guide and Essential Techniques
Master the Treble Crochet Stitch: A Comprehensive Guide and Tips
Slip Stitch Crochet: A Comprehensive Beginner's Guide to Mastering the Technique


