

Making mixed coloured bobble stitches

If you can see Rapunzel or Snow White’s shoulder pads more carefully, they are actually made up of bobble stitches which are made up of mixed colours. From making bobble stitches to making mixed coloured bobble stitches… let’s dive in!
Basics - making bobble stitches and changing colours
First and foremost, some basic crochet skills to have before attempting this would be firstly how to change colours and secondly how to do bobble stitches. My previous blog post on making bobble stitches as amigurumi limbs shows step by step how to make bobble stitches.
Otherwise, you can download the free 30-page ebook with those basic skill sets and more before venturing to variations of them.

Making mixed coloured bobble stitches
For the following step-by-step tutorial example, we shall use the coloured end-point as such:
Bobble stitch = 1 dark blue, 1 light blue, 1 dark blue, 1 light blue, 1 dark blue
If in this case, you consider the regular colour in the round is light blue, then to change to dark blue to start the bobble st, will need to pull through dark blue yarn through 2 light blue loops on hook, like you would normally do when changing colour.
Hence, in step 1, the base colour of loop on the hook is dark blue. Steps 1-5 is showcasing how to make the adjacent column into a light blue column, next to the original dark blue base in step 1.

Yarn over light blue, insert hook, yarn over light blue again, draw light blue yarn through –> you will have 2 light blue and 1 dark blue loop on hook (steps 1-4)
Then draw light blue yarn through 2 light blue loops on hook –> you will have 1 light blue and 1 dark blue loop on hook (step 5)

Repeat process (step 6-8), but this time in dark blue: yo dark blue, insert hook, yo dark blue and draw dark blue yarn through –> you will have 2 dark blue purple, 1 light blue and 1 dark blue loop on hook
Then draw dark blue yarn through 2 dark blue loops on hook –> you will have 1 dark blue, 1 light blue and 1 dark blue loop on hook (step 8)
Repeat again, back to light blue (steps 9-10): yo light blue, insert hook, yo light blue and draw light blue yarn through –> you will have 2 light blue, 1 dark blue, 1 light blue and 1 dark blue loop on hook

Then draw light blue yarn through 2 light blue loops on hook –> you will have 1 light blue, 1 dark blue, 1 light blue and 1 dark blue loop on hook (step 11)
Repeat last time, switch back to dark blue (step 12): yo dark blue, insert hook, yo dark blue and draw dark blue yarn through–> you will have 2 dark blue, 1 light blue, 1 dark blue, 1 light blue and 1 dark blue loop on hook
Then draw dark blue yarn through 2 dark blue loops on hook –> you will have 1 dark blue, 1 light blue, 1 dark blue, 1 light blue and 1 dark blue loop on hook (step 13)
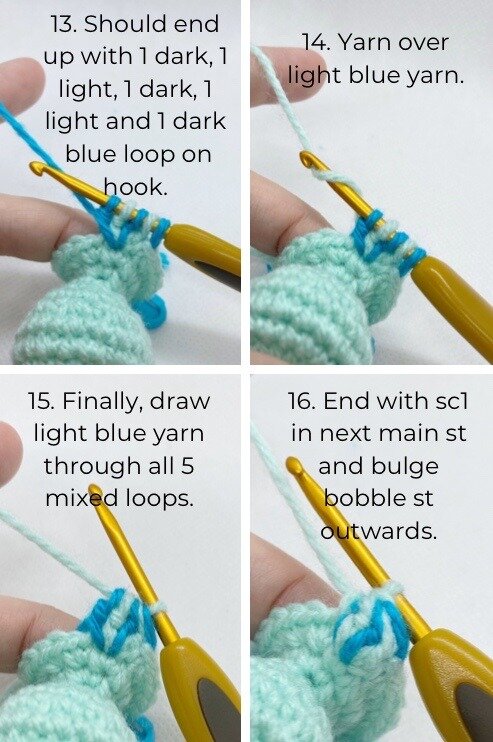
Then finally, pull through light blue yarn (original colour in the round) through all 5 mixed loops on hook and sc1 in next main stitch (step 14-16).
Ta-da, how it looks when facing right way up, you get the alternating colour appearance, which is what I used for the shoulder pads in Rapunzel and Snow White.

There are many other ways to infuse colour changes in bobble stitches, you can do alternating colours like I did above, or alternating top and bottom halves different colours. Or like in the example just below, top half one colour and bottom half another colour.

If you would similarly like to see a step by step pictorial tutorial on how to achieve this top and bottom halves separate colours in the bobble stitch, go check out more in my Freebie Vault below!
Happy experimenting! Just keep testing testing testing…