Seamless Amigurumi Doll Arms: How to Crochet Bobble Stitches on a Chain
When it comes to crocheting amigurumi dolls, the limbs are where your creativity truly shines. Arms, legs, hands, and feet—each part adds character and life to your creation. But creating these intricate pieces can be challenging, especially if you’re aiming for a seamless, polished look without the need for extra sewing.

Table of Contents Show
Doll Amigurumi Limbs Introduction
We will first take a quick look at the outline of amigurumi doll bodies then talk about seamless amigurumi limbs and specifically about bobble stitch on a chain. Plus, I’ll share step-by-step instructions, pictorial guides, and even a video tutorial to ensure you can follow along with ease.
Ready to bring your amigurumi dolls to life? Let’s dive into the world of seamless limb creation!
Outline of Doll Amigurumi Bodies
Before we can move onto crocheting doll limbs, here are some other relevant resources to check out first. These include some inspirational ideas for doll amigurumi bodies and some examples for doll amigurumi limbs as well.
Doll Amigurumi Bodies
Doll Amigurumi Limbs
Seamless Amigurumi Arms
Crocheting dolls often involve many different moving parts, including the head, the main body, the arms and then the legs. If you think about it that way, then you actually have to sew together 6 different parts! The examples given just below are just some ideas on how to crochet the limbs without having to sew on many separate pieces.
Half double crochet increase on chain
My first example includes a simple half double crochet increase at the end of a chain. The increase at the end is to create the illusion of a circular hand appearance. This was my first attempt at making an arm that extends out without requiring any sewing. Here are the step by step instructions to try out.

Bobble stitch on chain
This method is similar to the previous one and is also worked into the 3rd chain from the hook, extending out from the main body. Except this time we will be creating a full bobble stitch on a chain, which helps with creating a spherical hand versus a flat circular hand in the previous example. So using this bobble stitch method prevents the hollow base from the previous method. As for the step by step instructions, read on in the next section.
Bobble Stitch On Chain for Doll Arms
Let us move onto the technique proper. If you have no idea what a bobble stitch is, check out this post first on 6 important things to know about Bobble Stitch Crochet. We will talk about the pattern first, then the step-by-step pictorial instructions, followed by a video so that it is easier to follow along. Finally right at the end, you can check out how to use these techniques in both doll and animal amigurumis, as well as some links to patterns where you can try out the technique!
Pattern for Base Head and Body (before arms)
Let us just briefly mention the base head and body so that you have a reference point before moving onto the arms.
Head
Round 1: Magic ring 10 – 10st
Round 2: 2sc10 – 20st
Round 3: Sc20 – 20st
Round 4: (Sc1, 2sc1) x 10 – 30st
Round 5: Sc30 – 30st
Round 6: (Sc1, sc2tog1) x 10 – 20st
Round 7: Sc20 – 20st
Round 8: Sc2tog10 – 10st
Round 9: Sc2tog5 – 5st
Continue into body.
Body (continue from head)
Round 10: 2sc5 – 10st
Round 11: 2sc10 – 20st
Round 12: Sc9, 10th arm, sc8, 19th arm, sc1 – 20st
The last round, Round 12, will be continued in the next section and contains the arms section.
Pattern for Bobble Stitch on Chain
The pattern that continues from Round 12 above is as follows
Round 12: Sc9, (sc1, ch6, 4dc bob in 3rd ch from hook, sl st 3, sc1 back into same main st), sc8, (sc1, ch6, 4dc bob in 3rd ch from hook, sl st 3, sc1 back into same main st), sc1 – 20st
Steps involved in Bobble Stitch on Chain
Here are the instructions for just the arm part and then the steps involved in just making the 4dc bobble stitch on a chain are shown in a series of pictures up next.
Extended bobble stitch arm instructions
= 4dc bob on chain = 4 double crochet bobble on a chain
=yarn over and insert hook into 3rd ch from hook, pull through yarn to get 3 loops on hook, yarn over, draw through 2 loops, (yarn over, insert hook into same st, yarn over, pull through 2 loops) 3 times, yarn over, pull through 5 loops on hook
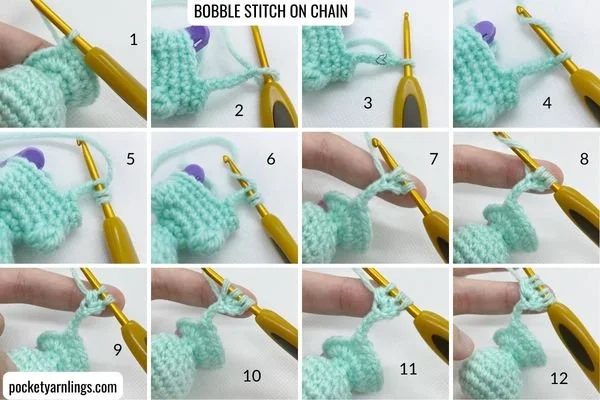
1. Decide where to place the arm.
2. Chain 6.
3. Insert hook into 3rd chain from hook.
4. Yarn over first before inserting hook.
5. Insert hook into 3rd chain from hook.
6. Yarn over again after inserting hook into chain.
7. Draw yarn through, should have 3 loops on hook.
8. Yarn over.
9. Pull through only 2 of 3 loops on hook, resulting in 2 loops left.
10. Repeat steps 4-7 again, back into same 3rd ch from hook. Will get 4 loops.
11. Pull through only 2 of 4 loops, resulting in 3 loops left on hook.
12. Repeat process until there are 5 loops on hook.

13. Yarn over and pull through all 5 loops on hook.
14. This forms a 4dc bob on a chain!
15. Insert hook into next st in chain (just above 4dc bob). Yarn over.
16. Draw yarn through st in chain and then loop on hook, to form a sl st.
17. Slip stitch 2 more times down the chain, closer to the amigurumi main round.
18. Once reach back to main row, insert hook into 1st initial sc in step 1 (or start of chain initially).
19. Do a single crochet (sc1) into the base of the extended bobble arm.
20. For the next round in round 13: do a single crochet (sc1) at base of arm.
21. Go across the bottom of the extended bobble arm and sc1 into next main st.
Completed extended bobble arms and legs!
Video showing Bobble Stitch on Chain Steps
To follow up the steps above, check out the short video below which might be easier to follow. This video has been taken from my doll courses, including a Limbs and Bends Course Bundle I will be releasing soon!
Uses of Bobble Stitch on Chain in Amigurumi
Now that I have shown you the technique, here are some ways to consider using making use of them in your amigurumi, here I have given the example of it in a doll and also in a monkey amigurumi. As for the monkey amigurumi, remember to check out the pattern and the accompanying video as well when they are released!
Bobble Stitch on Chain in Dolls
The example of the school girl below in her uniform makes use of the same bobble stitch on a chain method for both the arms and legs. In this case, the variation is that I had to change the colours leading from arm to hand, and from the legs to the socks and then to the feet.
To get an idea of how to change colours for this technique, check out the monkey amigurumi below in a separate blog post with its own set of pattern and video.

Bobble Stitch on Chain in Animals
For the monkey example just below, I used the bobble stitch on chain method also for the arms and legs. In this case, the arms and legs are one colour and the hands and feet are another colour. You can see it is quite a suitable technique for this particular animal amigurumi and if you would like to see how to crochet this little guy below, stay tuned for the pattern and video, which will be coming out soon.

If you found this article useful or it inspired you in your next doll amigurumi and would love to share this with others, remember to pin the image below to Pinterest so that others might benefit from it too!

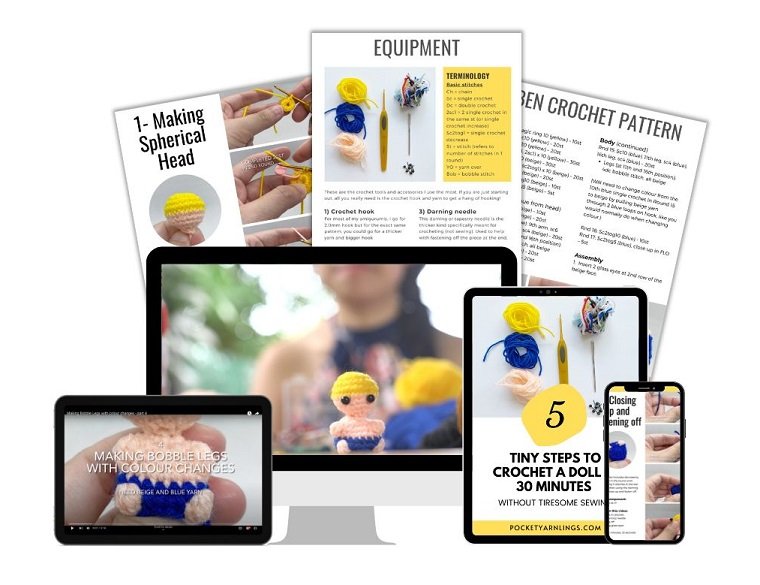
Free Crochet Doll Starter Guide
Also if you are keen to try out a simple doll with bobble stitches as the limbs, then join me for this free Crochet Doll Starter Guide - Crochet a doll in minutes with our step-by-step guide and videos!